Step 4: Install drain
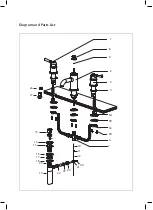
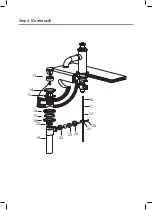
1. Remove waste stopper (13) from drain (14). Remove drain body (19),
mounting nut (18), plastic washer (17), and concave washer (16) from
drain (14)
2. From underneath, insert lift pole extension (12) to faucet body and
attach to lift pole rod (10) using connector (11) inside faucet body (2).
Secure tightly
3. Install drain (14), with rubber washer (15) attached, into the drain hole
4. From underneath countertop, attach concave washer (16), plastic
washer (17), and mounting nut (18) to drain (14), and secure tightly to
sink. Thread drain body (19) onto drain (14). Hand-tighten
5. Insert waste stopper (13) into drain (14). Make sure hole in brass screw
on waste stopper (13) is aligned with drain body (19) opening
6. Remove retaining nut (24) from drain body (19). Leave top hat washer
(22) inside drain body (19)
7. Insert shortest end of drain-off pole (20) into drain body (19). Attach
washer (23) and retaining nut (24) through drain-off pole (20). Secure
retaining nut (24) to drain body (19)
8. Align drain body (19) to enable drain-off pole (20) and lift pole extension
(12) to engage
9. Connect lift pole extension (12) and drain-off pole (20) using elbow
connector (21). Adjust and tighten elbow connector (21) with Phillips
head screwdriver
Note: The connector (11) is not a visible part and is secured in the faucet body (2)


