background image

Your VS-626 (VS-828) Video Audio Matrix Switcher 


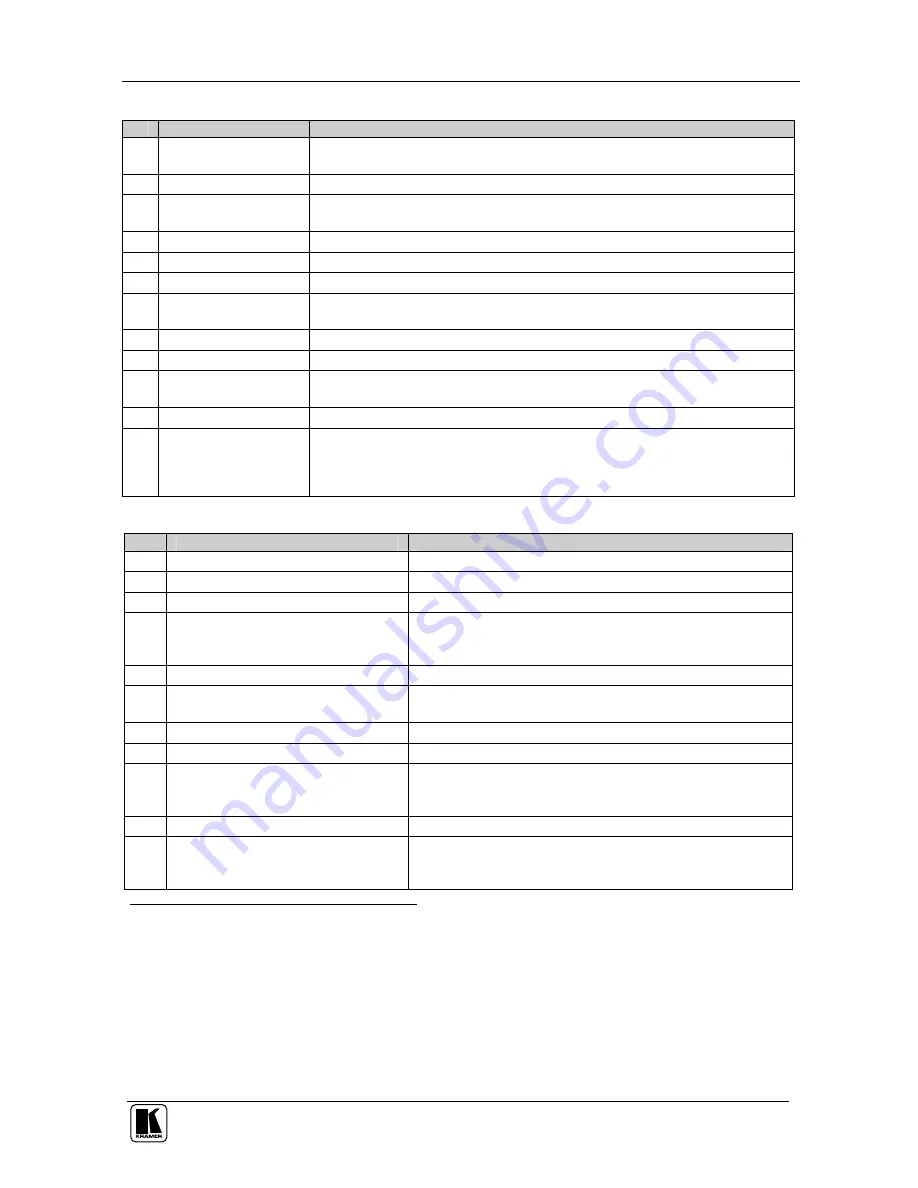
Table 1: Front Panel VS-626 6x6 (VS-828 8x8) Video / Audio Matrix Switcher Features 

Feature 

Function 

1  IR Receiver


The red LED is illuminated when receiving signals from the infra-red remote 

control transmitter 

POWER

 Switch 

Illuminated switch for turning the unit ON or OFF 

OFF

 Button 

An OFF-OUT combination disconnects that output from the inputs; an OFF-ALL 

combination disconnects all the outputs 

ALL

 Button 

Pressing ALL followed by an INPUT button, connects that input to all outputs

1


OUTPUT 

Buttons 

Select the output to which the input is switched 

INPUT 

Buttons 

Select the input to switch to the output 

7  7-segment


Display 

Displays the selected audio

2

 or video

3


input switched to the output (marked 

above each input)


VIDEO 

Button


When pressed button is illuminated and all actions relate to video 

AUDIO

 Button 

When pressed button is illuminated and all actions relate to audio 

10 

AFV 

Button


When pressed button is illuminated and all actions relate to video and audio 

channels. Audio channels follow the video channels 

11 

STO

 (STORE) Button  Pressing STO followed by an output button stores the current setting

4


12 

RCL

 (RECALL) Button


Pressing the RCL button and the corresponding OUTPUT key recalls a 

setup from the non-volatile memory. The stored status blinks. Pressing a 

different OUTPUT button lets you view

5

 another setup. After making your 

choice, pressing the RCL button again implements the new status 

Table 2: Rear Panel VS-626 6x6 (VS-828 8x8) Video / Audio Matrix Switcher Features 

Feature 

Function 

13 

EXT. SYNC

 BNC Connector 

Connects to the external SYNC source 

14 

AUDIO INPUTS

 RCA Connectors 

Connect to the audio sources 

15 

VIDEO INPUTS 

BNC Connectors 

Connect to the video sources (from 1 to 6 / 8) 

16 

SYNC

 Source


Selector


Button


Pushing in selects the (EXT) external sync source on the SYNC 

connector; releasing selects the (IN 1) internal sync on the 

VIDEO IN 1 connector 

17 

AUDIO OUTPUTS 

RCA Connectors  Connect to the audio acceptors 

18 

VIDEO OUTPUTS 

BNC Connectors

6

  Connect to the video acceptors (from 1 to 6 / 8) 

19 

RS-485 

Connector


RS-485 port on detachable terminal block 

20 

RS-232

 DB 9F Connector 

Connects to the PC or other Serial Controller 

21  Setup Dipswitches


DIP 1, 2, and 3 for machine SELF ADDRESS #; DIP 4 for 

RS-485 termination, DIP 5 for reply from switcher to PC, 

DIP 8 for RS-232 / RS-485 communication 

22  Power Connector with 

Fuse


AC connector enabling power supply to the unit 

23 

REMOTE IR 

3.5mm Mini Jack


Connect to an external IR receiver unit for controlling the 

machine via an IR remote controller (instead of using the front 

panel IR receiver)

7


1 For example, press ALL and then Input button # 2 to connect input # 2 to all the outputs 
2 When the Audio button illuminates, that is, when the audio breakaway mode is selected 
3 When the Video button illuminates, that is, when the video breakaway mode is selected 
4 For example, press STO and then the Output button # 3 to store in Setup # 3 
5 Only view, nothing is implemented at this stage 
6 For RGBS applications, one of the sync channels (H or V) may be used for the S channel 
7 Optional. Can be used instead of the front panel (built-in) IR receiver to remotely control the VS-626/VS-828 (only if the 
internal IR connection cable has been installed) 

Summary of Contents for VS-626

Page 1: ...Kramer Electronics Ltd USER MANUAL Models VS 626 6x6 Video Audio Matrix Switcher VS 828 8x8 Video Audio Matrix Switcher ...

Page 2: ...deo or Breakaway Option 17 7 3 1 Setting the Audio Follow Video Option 17 7 3 2 Setting the Breakaway Option 17 7 4 Storing Recalling Input Output Configurations 17 7 4 1 Storing an Input Output Configuration 17 7 4 2 Recalling an Input Output Configuration 18 7 4 3 Deleting an Input Output Configuration 18 7 5 Resetting the Machine 18 8 Technical Specifications 19 9 Communication Protocol 20 10 T...

Page 3: ...able 2 Rear Panel VS 626 6x6 VS 828 8x8 Video Audio Matrix Switcher Features 7 Table 3 Dipswitch Settings 11 Table 4 Self Address Dipswitch Settings 11 Table 5 Technical Specifications of the VS 626 VS828 19 Table 6 Protocol Definitions 20 Table 7 Protocol Instruction Codes 21 Table 8 VS 828 Hex Codes for Switching the Master VS 828 23 ...

Page 4: ...er and or VS 828 8x8 Video Audio Matrix Switcher Power cord and Null modem adapter Windows based Kramer control software This user manual2 2 Getting Started We recommend that you Unpack the equipment carefully and save the original box and packaging materials for possible future shipment Review the contents of this user manual Use Kramer high performance high resolution cables3 2 1 Quick Start Thi...

Page 5: ...Getting Started KRAMER SIMPLE CREATIVE TECHNOLOGY 2 ...

Page 6: ...tional external IR receiver3 The external IR receiver can be located 15 meters away from the machine This distance can be extended to up to 60 meters when used with three extension cables4 Before using the external IR receiver be sure to arrange for your Kramer dealer to insert an internal IR connection cable5 which is required so that the REMOTE IR 3 5mm connector can be used Connect the external...

Page 7: ...o two vertical spaces 2U of a standard 19 rack To achieve the best performance Connect only good quality connection cables thus avoiding interference deterioration in signal quality due to poor matching and elevated noise levels often associated with low quality cables Avoid interference from neighboring electrical appliances and position your Kramer VS 626 VS 828 away from moisture excessive sunl...

Page 8: ...Your VS 626 VS 828 Video Audio Matrix Switcher 5 Figure 1 VS 626 6x6 Video Audio Matrix Switcher ...

Page 9: ...Your VS 626 VS 828 Video Audio Matrix Switcher KRAMER SIMPLE CREATIVE TECHNOLOGY 6 Figure 2 VS 828 8x8 Video Audio Matrix Switcher ...

Page 10: ...Switcher Features Feature Function 13 EXT SYNC BNC Connector Connects to the external SYNC source 14 AUDIO INPUTS RCA Connectors Connect to the audio sources 15 VIDEO INPUTS BNC Connectors Connect to the video sources from 1 to 6 8 16 SYNC Source Selector Button Pushing in selects the EXT external sync source on the SYNC connector releasing selects the IN 1 internal sync on the VIDEO IN 1 connecto...

Page 11: ...Installing on a Rack KRAMER SIMPLE CREATIVE TECHNOLOGY 8 5 Installing on a Rack This section describes what to do before installing on a rack and how to rack mount ...

Page 12: ...8 6 composite video acceptors for example composite video recorders 3 If required connect to a PC or other controller via RS 232 see section 6 2 or RS 232 and RS 485 see section 6 3 4 Connect the power cord to the mains electricity4 5 Set the dipswitches see section 6 1 1 From this section on all the information is relevant also to the VS 626 unless noted otherwise 2 Note that you can connect up t...

Page 13: ...Connecting the VS 828 Video Audio Matrix Switcher KRAMER SIMPLE CREATIVE TECHNOLOGY 10 Figure 3 Connecting the Video Sources and Acceptors to the Rear Panel ...

Page 14: ...S 485 ON enables RS 232 communication between the switcher and PC OFF enables RS 485 communication between the switcher and PC To set the dipswitches use a small flathead screwdriver to move the dipswitches to the ON or OFF position as described in the following sections 6 1 1 SELF ADDRESS Dipswitches The Self Address dipswitch determines the position of a VS 828 unit in the sequence specifying wh...

Page 15: ...except for the first usually the PC and last units on the communication line Dipswitch 4 connects or disconnects the termination resistor 6 2 Controlling via RS 232 for example using a PC You can connect a PC or other controller to the VS 828 via the RS 232 port To connect using the Null modem adapter provided with the machine recommended method Connect the RS 232 DB9 rear panel port on the VS 828...

Page 16: ...ower cord to each VS 828 unit 2 On each VS 828 unit set the Self Address dipswitches as required1 see Table 4 3 Connect the RS 232 port on the first unit to the PC2 4 Interconnect the RS 485 ports on all the VS 828 units from the RS 485 port on the first VS 828 unit to the RS 485 port on the second VS 828 unit and so on up to the RS 485 port on the last unit 5 Terminate the RS 485 line as describe...

Page 17: ...ond and B to the third Make sure that each component of a video source is connected to the same input number on all three switchers 2 Similarly connect the RGB acceptors to the VIDEO OUTPUTS connectors of the three Matrix Switchers 3 If the video sources are synchronized and vertical interval switching is desired connect sync sources to all 3 machines and select to work with Ext Sync selector swit...

Page 18: ...ting the VS 828 Video Audio Matrix Switcher 15 RED Matrix Controlling PC Data Projector RGB Source Genlock Source Other RGB Source BLUE Matrix GREEN Matrix Figure 7 RGB Switching with RS 232 control via a PC ...

Page 19: ...nput To select an output or input simply press the designated button on the front panel These buttons correspond to output connections as marked on the rear panel To connect a video audio Input to a specific output press the desired output button followed by the desired input button To disconnect a video audio Input from a specific output press the desired output button followed by the OFF button ...

Page 20: ...press either the AUDIO for audio control only or the VIDEO for video control only button If the AUDIO button illuminates switching operations relate to Audio If the VIDEO button illuminates switching operations relate to Video 7 4 Storing Recalling Input Output Configurations You can store and recall up to 8 6 input output configurations or setups in non volatile memory using the INPUT SELECTOR bu...

Page 21: ...utput Configuration To delete an input output configuration do the following 1 Press the STO and RCL buttons simultaneously Both the STO and RCL buttons blink 2 Press the appropriate INPUT SELECTOR button This erases that specific input output configuration from the memory leaving it empty and available1 7 5 Resetting the Machine To reset the machine press INPUT buttons 1 2 and 3 simultaneously Th...

Page 22: ...te video 1Vpp 75 on BNC connectors 8 audio stereo 4dBm 50 on RCA connectors MAX OUTPUT LEVEL VIDEO 2Vpp AUDIO 20Vpp BANDWIDTH 3dB VIDEO 100MHz AUDIO 100kHz DIFF GAIN 0 05 DIFF PHASE 0 03 Deg K FACTOR 0 05 S N RATIO VIDEO 74dB AUDIO 88 dB unweighted 1Vpp CROSSTALK all hostile VIDEO 50 dB 5MHz AUDIO 71 4dB 1kHz CONTROLS Manual RS 232 or RS 485 COUPLING VIDEO DC AUDIO AC AUDIO THD NOISE 0 016 1V 1kHz...

Page 23: ...oard then these bits are set with the INSTRUCTION NO which was performed The instruction codes are defined according to the table below INSTRUCTION NO is the value to be set for N5 N0 2nd BYTE Bit 7 Defined as 1 Bits 4 6 Defined as 0 I3 I0 INPUT When switching via RS 232 for RS 485 for instruction codes 1 and 2 these bits set the input that is to be switched Similarly if switching is done via the ...

Page 24: ...1 REQUEST BREAKAWAY SETTING Set as SETUP 1 6 1 8 for the VS 626 VS 828 Don t care 3 7 12 to 14 NOT USED 15 REQUEST WHETHER SETUP IS DEFINED Set as SETUP 1 6 1 8 for the VS 626 VS 828 Don t care 4 16 ERROR BUSY Don t care Don t care 5 17 RESERVED 6 18 RESET MACHINE 0 0 1 19 STORE STATUS Set as SETUP 1 6 1 8 for the VS 626 VS 828 0 to store parameters 1 to delete setup 2 7 9 20 RECALL STATUS Set as ...

Page 25: ...achine is being programmed via the front panel Reception of this code by the switcher is not valid NOTE 6 This code is reserved for internal use NOTE 7 SETUP 0 is the present setting SETUP 1 to SETU P 8 are the settings saved in the switcher s memory i e those used for Store and Recall NOTE 8 Under normal conditions the machine s present status is saved each time a change is made The power down sa...

Page 26: ...Table 8 shows the HEX codes for switching the Master VS 828 NOTE The table is also valid for the VS 626 if the last two rows and columns are ignored Table 8 VS 828 Hex Codes for Switching the Master VS 828 OUT 8 OUT 7 OUT 6 OUT 5 OUT 4 OUT 3 OUT 2 OUT1 IN 1 IN 2 IN 3 IN 4 IN 5 IN 6 IN IN 8 ...

Page 27: ...KRAMER SIMPLE CREATIVE TECHNOLOGY 24 ...

Page 28: ...For the latest information on our products and a list of Kramer distributors visit our Web site www kramerelectronics com where updates to this user manual may be found We welcome your questions comments and feedback Caution Safety Warning Disconnect the unit from the power supply before opening servicing ...

Reviews: