


# Feature
Function
5 EFFECT Buttons
Press to select one of 11 effects or press RANDOM to randomly select an effect each time a
transition is implemented.
6 WIPE DIRECTION Buttons Select the direction of the transition (for example, inwards/outwards, left/right, up/down).
7 SPEED Potentiometer
Turn to set the speed of the transition when using the TAKE button to implement a transition.
When turned completely to the left, a click sound indicates that the speed level is at its default value
set in the
VP-772
.
8 T-Bar Control Stick
Move to implement a transition manually.
9 PREVIEW LEDs
Located on both sides of the T-bar control stick.
A PREVIEW LED lights to indicate the transition direction for moving the preview output to the
program output. Moving the T-bar control stick towards the lit PREVIEW LED moves the preview
output to the program output, completing the transition. Once a transition is complete, the PREVIEW
LED on the T-bar control stick side turns off and the PREVIEW LED on the opposite side lights,
indicating the direction for the next transition.
Switcher Functionality
10 MENU Button
Press to access/exit the OSD menu on the selected
VP-772
device. When browsing the Program
OSD menu, a long press on the MENU button switches to the Preview menu and vice versa.
11
Navigation
Buttons
// VOLUME Press to move to the previous level in the OSD screen. When not within the OSD menu: in the
transition mode, press to decrease the Audio OUT 2 Program volume. In the Overlay mode, press
to decrease the general volume.
// VOLUME Press to move up the menu list values and to increase numerical values. When in the transition
mode and not within the OSD menu mode, press to increase the Audio OUT 1 Preview volume.
// VOLUME Press to move down the menu list and to decrease numerical values. When in the transition mode
and not within the OSD menu mode, press to decrease the Audio OUT 1 Preview volume.
// VOLUME Press to move to the next level in the OSD screen. When not within the OSD menu: in the transition
mode, increase the Audio OUT 2 Program volume. In the Overlay mode, press to increase the
general volume.
ENTER
Press to enter sub-menu items, and save. When in the transition mode and not within the OSD
menu, performs as the TAKE button.
12 OSD Button
Press to lock the menu buttons (button illuminates). Press again to unlock the menu buttons.
13 MODE Button
Select the operation mode: AFV (audio follow video), video or audio.
14 Mode LED Indicators
Indicate the operation mode, as selected via the MODE button.
15 PREVIEW Buttons
Press to select the input (from 1 to 8) to switch to the PREVIEW output.
16 PROGRAM Buttons
Press to select the input (from 1 to 8) to switch to the PROGRAM output.
17 PROGRAM FREEZE Button Press to freeze/unfreeze the PROGRAM output video image.
18 PREVIEW FREEZE Button Press to freeze/unfreeze the PREVIEW output video image.
19 PREVIEW BLACK Button
Press to toggle between a blank screen (black) and the PREVIEW display.
20 PROGRAM BLACK Button Press to toggle between a blank screen (black) and the PROGRAM display.
21 TAKE
Press to perform a transition.
# Feature
Function
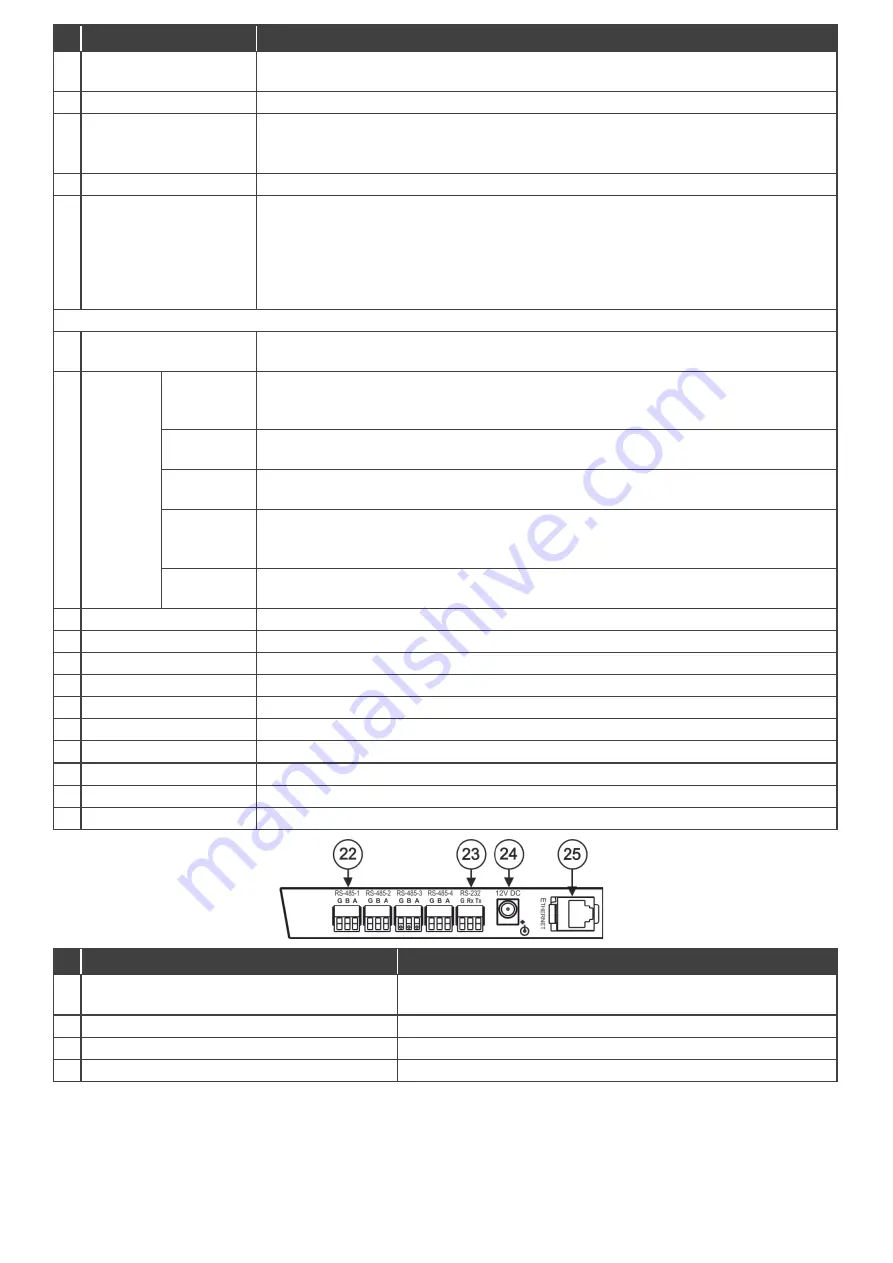
22 RS-485-1 (G B A) 3-pin Terminal Block Connector
Connects to the RS-485 port on the VP-772 which is recognized as
machine # 1 (from 1 to 4).
23 RS-232 (G, Rx, Tx) 3-pin Terminal Block Connector
Connect to the PC or other serial controller.
24 12V DC
12V DC connector for powering the unit.
25 Ethernet RJ-45 Connector
Connect to the PC or other Controller through computer networking.


