background image


VP
-69
0

 –

 O

v

er
vi

ew


5


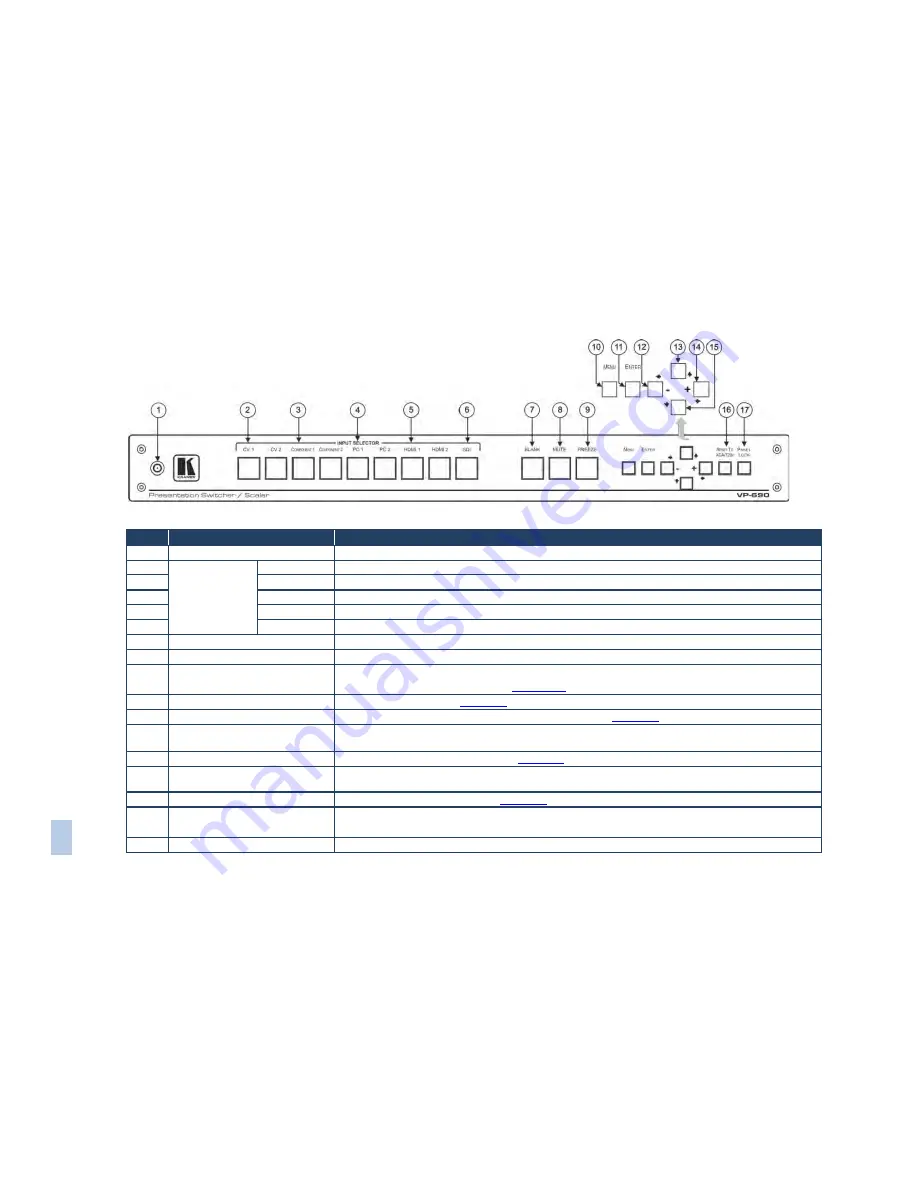
Figure 1: VP-690 Presentation Switcher/Scaler Front Panel 

Feature 

Function 

IR

 Receiver 

Receives signals from the remote control transmitter 

NPUT SELECTOR 

Buttons 

CV 

Press to select the composite video input (from 1 to 2) 

COMPONENT 

Press to select the component video input (from 1 to 2) 

PC 

Press to select the computer graphics input (from 1 to 2) 

HDMI  

Press to select the HDMI input (from 1 to 2) 

SDI 

Press to select the SDI input 

BLANK

 Button 

Press to toggle between a blank screen (blue or black screen) and the display 

MUTE

 Button 

Press to toggle between muting (blocking out the sound) and enabling the audio output 

FREEZE

 Button 

Press to freeze/unfreeze the output video image 

Can be programmed to follow MUTE (see 

Section  6.2.3

10 

MENU

 Button 

Displays the OSD menu (see 

Section  6.2

11 

ENTER Button 

Press to accept changes and change the SETUP parameters (see 

Section  6.2

12 

)  

 Button 

Press to decrease numerical values or select from several definitions. 
For convenience and speed—when not working in the OSD—press to reduce volume 

13 


Button 

Press to move up the menu list values (see 

Section  6.2

14 

 Button


Press to increase numerical values or select from several definitions. 
For convenience and speed—when not working in the OSD—press to increase volume 

15 


Button 

Press to move down the menu list (see 

Section  6.2

16 

)  

RESET TO XGA/720p Button 

Press to reset the video resolution to XGA or 720p 

Press and hold for about 2 seconds to reset to XGA; or press and hold for about 5 seconds to reset to 720p 

17 

PANEL LOCK Button 

Press and hold (for about 2 seconds) to lock/unlock the front panel buttons 

Summary of Contents for VP-690

Page 1: ...KRAMER ELECTRONICS LTD USER MANUAL MODEL VP 690 Presentation Switcher Scaler P N 2900 000704 Rev 5...

Page 2: ......

Page 3: ......

Page 4: ...o the VP 690 via RS 232 14 6 4 Controlling via the ETHERNET 14 6 5 Controlling via the Infrared Remote Control Transmitter 16 7 Technical Specifications 17 7 1 Input Resolutions 18 8 RS 232 Communicat...

Page 5: ...ups that are clearly defined by function GROUP 1 Distribution Amplifiers GROUP 2 Switchers and Routers GROUP 3 Control Systems GROUP 4 Format Standards Converters GROUP 5 Range Extenders and Repeaters...

Page 6: ...ow quality cables Do not secure the cables in tight bundles or roll the slack into tight coils Avoid interference from neighboring electrical appliances that may adversely influence signal quality Pos...

Page 7: ...compliant Is HDTV compatible and the resolution can be up or down scaled The resolu ions which can be selected include 480i 480p 576i 576p 720p 1080i 1080p WXGA WSXGA WUXGA NATIVE VGA SVGA XGA SXGA U...

Page 8: ...system PC or other serial controller Remotely from the infrared remote control transmitter Via the Ethernet The VP 690 is housed in a 19 1U rack mountable enclosure with rack ears included and is fed...

Page 9: ...n be programmed to follow MUTE see Section 6 2 3 10 MENU Button Displays the OSD menu see Section 6 2 11 ENTER Button Press to accept changes and change the SETUP parameters see Section 6 2 12 Button...

Page 10: ...dio computer graphics source from 1 to 2 CV Connect to the analog audio composite video source from 1 to 2 COMP Connect to the analog audio component video source from 1 to 2 28 AUDIO OUTPUTS RCA Conn...

Page 11: ...VP 690 Installing in a Rack 7 4 Installing in a Rack This section provides instructions for rack mounting the unit...

Page 12: ...ple a DVD player to the HDMI 1 VIDEO INPUT connector Alternatively you can connect the DVI connector on the DVD player to the HDMI connector on the VP 690 via a DVI HDMI adapter When using this adapte...

Page 13: ...acceptor for example a projector 11 Connect the audio output signals to the AUDIO OUTPUTS stereo analog audio acceptor and or the digital audio acceptor as required not shown in Figure 3 12 Connect th...

Page 14: ...owing front panel buttons Input selector buttons for selecting the required input CV 1 and 2 COMPONENT 1 and 2 PC 1 and 2 HDMI 1 and 2 or SDI BLANK MUTE and FREEZE buttons MENU ENTER and arrow buttons...

Page 15: ...nu default NATIVE Output resolution Appears as Output resolu ion Appears as NATIVE 1080p 50Hz 1080P50 640x480 VGA 1366x768 WXGA 800x600 SVGA 1680x1050 WSXGA 1024x768 XGA 1920x1200 WUXGA 1280x1024 SXGA...

Page 16: ...s on the analog outputs until a valid input is again detected EXIT Select to exit the menu 6 2 2 The FINETUNE Menu Input Signal Parameter Function CV COMPONENT HUE Set the color hue SATURATION Set the...

Page 17: ...3 the GROUP 3 channels are selected GROUP 4 the GROUP 4 channels are selected HDMI AUDIO IN Select AUTOMATIC the embedded audio on the HDMI input is selected for an HDMI signal or the analog audio in...

Page 18: ...connection via a network hub or network router After connecting the Ethernet port you have to install and configure your Ethernet Port For detailed instructions see the Ethernet Configuration FC 11 gu...

Page 19: ...in Figure 5 You can use any IP address in the range 192 168 1 1 to 192 168 1 255 excluding 192 168 1 39 that is provided by your IT department 7 Click OK Figure 5 Internet Protocol TCP IP Properties W...

Page 20: ...input SDI Select the SDI input XGA Reset Reset the resolution to XGA 720p Reset Reset the resolution to 720p INFO Displays the selected input the input and output resolutions and the firmware version...

Page 21: ...ESOLUTIONS VGA SVGA XGA SXGA UXGA 480i 480p 720p60 1080i60 1080p60 576i 576p 720p50 1080i50 1080p50 WXGA WSXGA WUXGA 1280x800 WXGA SXGA 1600x900 2048x1080 50 2048x1080 60 480i59 480p59 720p59 1080i59...

Page 22: ...80I 60 50 RGB No No No No Yes 1080P 60 50 RGB No No Yes No Yes 1080P 24 25 30 RGB No No No No Yes VGA 60 67 72 75 85 No No Yes No Yes SVGA 56 60 72 75 No No Yes No Yes XGA 60 70 75 No No Yes No Yes SX...

Page 23: ...g Space CR Carriage Return ASCII code 0x0D LF or Line Feed ASCII code 0x0A Set and Get Command Set Command Type in Y Control_Type Function Param CR Reply Z Control_Type Function Param CRDone CR Get Co...

Page 24: ...UP button on remote control 0 16 N A NATIVE button on remote control 0 17 N A LEFT button on remote control 0 18 N A OK button on remote control 0 19 N A RIGHT button on remote control 0 20 N A MENU...

Page 25: ...etting V Position 1 Set 2 Get 43 0 100 OSD Timeout 1 Set 2 Get 44 0 8 OSD Background 1 Set 2 Get 50 0 3 NR Noise Reduction 0 Off 1 Low 2 Mid 3 High 1 Set 2 Get 51 0 3 Audio delay 0 Off 1 40ms 2 110ms...

Page 26: ...p60 9 1080i60 10 1080p60 11 576i 12 576p 13 720p50 14 1080i50 15 1080p50 16 WXGA 17 WSXGA 18 WUXGA 19 1280x800 20 WXGA 1440X900 21 SXGA 1400X1050 22 1600x900 23 2048x1080 50 24 2048x1080 60 25 480i59...

Page 27: ...X900 21 SXGA 1400X1050 22 1600X900 23 2048X1080 50 24 2048X1080 60 6 Set 7 Get 0 0 2 Power 0 Power Down 1 Power On 2 Reboot 6 Set 7 Get 1 0 1 Freeze 0 Off 1 On 6 Set 7 Get 2 0 1 Blank 0 Off 1 On 6 Set...

Page 28: ......

Page 29: ...sit our Web site where updates to this user manual may be found We welcome your questions comments and feedback Web site E mail www kramerelectronics com info kramerel com P N 2900 000704 Rev 5 SAFETY...

Reviews: