


10
VP-470 - Operating the VP-470 SD / 3G HD-SDI Scaler
5.2.2
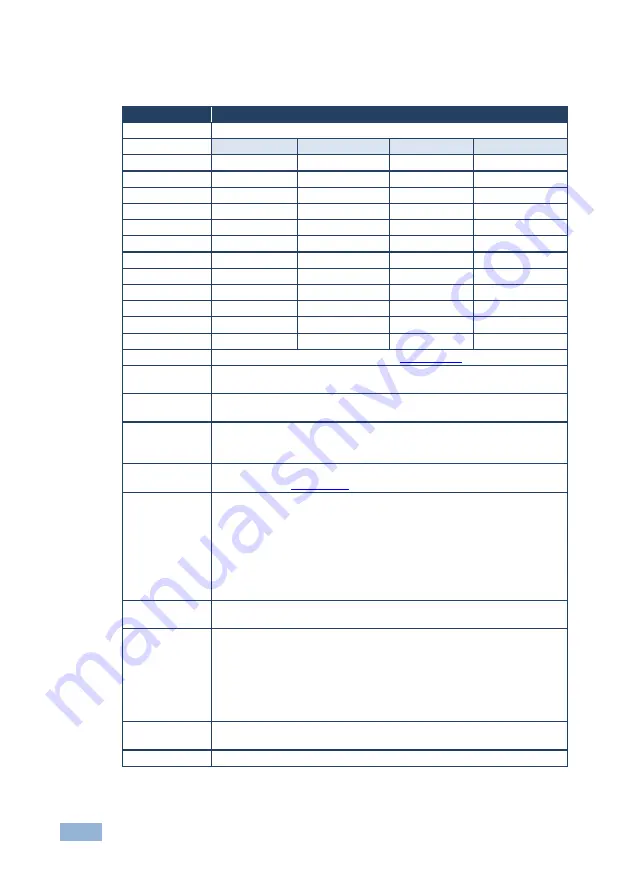
The Main Menu
Parameter
Function
OUTPUT
Set the output resolution (default is 720P 60):
OUTPUT PAGE 1
RESOLUTION
OUTPUT PAGE 2
RESOLUTION
480I 59
480i @59.94Hz
1080I 59
1080i @59.94Hz
576I 50
576i @50Hz
1080P 59
1080p @59.94Hz
720P 50
720p @50Hz
1080I 60
1080i @60Hz
720P 59
720p @59.94
1080P 60
1080p @60Hz
720P 60
720p @60Hz
1080P 23
1080p @23.98Hz
1080P 24
1080p @24Hz
1080P 25
1080p @25Hz
1080P 29
1080p @29.97Hz
1080P 30
1080p @30Hz
1080I 50
1080i @50
1080P 50
1080p @50
PICTURE
Set the output picture parameters (see
Section
ASPECT
RATIO
FULL (default), 16:9 TV, 16:10 TV, 4:3 TV or BEST FIT
OVERSCAN
ENABLE over scan YES/NO (default). If enabled, set the H SIZE and V
SIZE percentage
AUDIO
ENABLE the audio YES (default)/NO
SOURCE GROUP
– Set the SDI audio channel settings to AUTO, 1+2 or
3+4
OSD SETTINGS
Set the OSD parameters: Position, Transparency, Menu Timeout, Info Timeout
and Display (see
Section
ADVANCED
AUTO SYNC-OFF
– turn the auto sync ON/OFF (default). When ON, this
deactivates the output after a few minutes if no input is present, until a valid
input is again detected or any button is pressed.
This is useful, for example, when the output is connected to a projector,
and the projector will automatically shut down when it has no input
MIRROR-V
– set to OFF (default) or ON to flip the image vertically
FREEZE
- set the function of the FREEZE button: MUTE
(default), MUTE ONLY, FREEZE ONLY
PATTERN
Set pattern ON/OFF (default). When ON, select COLOR BAR, GRAY SCALE,
CROSS HATCH, CROSS, WHITE WINDOW or RAMP
FACTORY
DEFAULT
Resets to the default parameters
If you cannot see the display after factory reset, use the front panel
buttons to set the correct resolution:
To reset to 1080p, press the FREEZE (+) and ENTER buttons
simultaneously for about 2 seconds
To reset to 720p press the
– and MENU buttons simultaneously for about
2 seconds
INFORMATION
Displays the input and output resolutions, audio group detection report
and the firmware version
EXIT
Exit the Main menu
Summary of Contents for VP-470
Page 1: ...KRAMER ELECTRONICS LTD USER MANUAL MODEL VP 470 SD 3G HD SDI Scaler P N 2900 300035 Rev 2...
Page 2: ......
Page 16: ......


