background image


VP-436N - Controlling the VP-436N 

15 


15 

6.4 

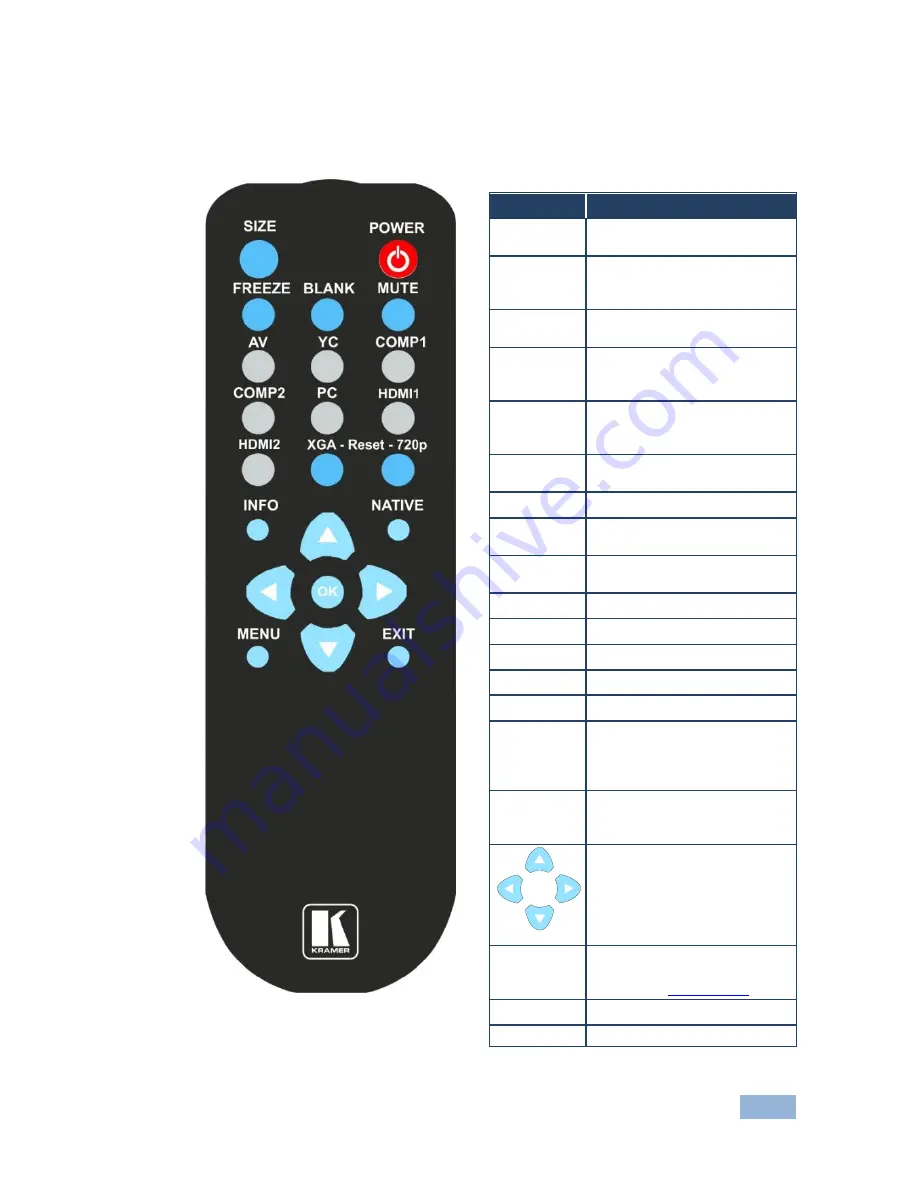
Controlling via the Infrared Remote Control Transmitter 

You can control the 

VP-436N 

from the infrared remote control transmitter: 


Figure 4: Infrared Remote Control 
Transmitter 


Keys 

Function 


SIZE 

Set the size of the image 
displayed 


POWER 

Turn the 

VP-436N

 ON or OFF 

(the outputs and the front-panel 
are disabled) 


FREEZE 

Freeze/unfreeze the output 
video image 


BLANK 

Toggle between a blank screen 
(blue or black screen) and the 
display 


MUTE 

Toggle between muting 
(blocking out the sound) and 
enabling the audio output 


AV 

Select the composite video 
input 


YC 

Select the s-Video input 


COMP1 

Select the component video 1 
input 


COMP2 

Select the component video 2 
input 


PC 

Select the UXGA input 


HDMI1 

Select the HDMI1 input 


HDMI2 

Select the HDMI2 input 


XGA Reset 

Reset the resolution to XGA 


720p Reset 

Reset the resolution to 720p 


INFO 

Displays the selected input, the 
input and output resolutions and 
the firmware versions on the 
OSD 


NATIVE 

Select the output resolution via 
the EDID of the connected 
HDMI monitor 


Four navigation keys 
When not in the OSD, the left 
and right arrows also control the 
output volume 

For embedded HDMI inputs, this 
does not affect the embedded output


OK 

Press to accept changes  
Press also to auto adjust the 
picture (see 

Section 

 6.1.1


MENU 

Enter the OSD menu 


EXIT 

EXIT the menu 


im Vertrieb von            CAMBOARD Electronics

www.camboard.de

Tel. 07131 911201
Fax 07131 911203

[email protected]

Summary of Contents for VP-436N

Page 1: ...MER ELECTRONICS LTD USER MANUAL MODEL VP 436N Presentation Switcher Scaler P N 2900 300149 Rev 4 im Vertrieb von CAMBOARD Electronics www camboard de Tel 07131 911201 Fax 07131 911203 ce info camboard...

Page 2: ...im Vertrieb von CAMBOARD Electronics www camboard de Tel 07131 911201 Fax 07131 911203 ce info camboard de...

Page 3: ...im Vertrieb von CAMBOARD Electronics www camboard de Tel 07131 911201 Fax 07131 911203 ce info camboard de...

Page 4: ...to the VP 436N via RS 232 14 6 4 Controlling via the Infrared Remote Control Transmitter 15 7 Technical Specifications 16 7 1 Input Resolutions 17 7 2 Default Communication Parameters 17 8 RS 232 Com...

Page 5: ...ribution Amplifiers GROUP 2 Switchers and Routers GROUP 3 Control Systems GROUP 4 Format Standards Converters GROUP 5 Range Extenders and Repeaters GROUP 6 Specialty AV Products GROUP 7 Scan Converter...

Page 6: ...mmend Kramer high performance high resolution cables to avoid interference deterioration in signal quality due to poor matching and elevated noise levels often associated with low quality cables Do no...

Page 7: ...002 96 EC aims to reduce the amount of WEEE sent for disposal to landfill or incineration by requiring it to be collected and recycled To comply with the WEEE Directive Kramer Electronics has made arr...

Page 8: ...80i 50 and 60Hz 1080p 50 and 60Hz WXGA WSXGA WUXGA 1280x800 1440x900 1400x1050 and 1600x900 The VP 436N Presentation Switcher Scaler Has an improved HDMI output drive exceeding 60 feet at 1080p 60Hz H...

Page 9: ...from the infrared remote control transmitter The VP 436N is housed in a 19 1U rack mountable enclosure with rack ears included and is fed from a 100 240 VAC universal switching power supply 3 1 Defini...

Page 10: ...n Press to accept changes change the SETUP parameters see Section 6 2 and to auto adjust the image when not within the OSD menu see Section 6 1 1 13 Button Press to decrease numerical values or select...

Page 11: ...ctor 31 HDMI Connector Connect to the HDMI acceptor 32 VGA 15 pin HD Connector Connect to a VGA acceptor 33 AUDIO IN Unbalanced Stereo Terminal Block Connectors HDMI Connect to the analog audio HDMI s...

Page 12: ...nstalling in a Rack 4 Installing in a Rack This section provides instructions for rack mounting the unit im Vertrieb von CAMBOARD Electronics www camboard de Tel 07131 911201 Fax 07131 911203 ce info...

Page 13: ...udio signal via the terminal block connector 2 Connect a computer graphics source to the VGA 15 pin HD VIDEO INPUT connector 3 Connect a composite video source for example a composite video player to...

Page 14: ...UT stereo analog audio acceptor and or the digital audio acceptor as required not shown in Figure 3 11 Connect the power cord not shown in Figure 3 12 If required connect a PC via RS 232 see Section 6...

Page 15: ...t Auto Tune Feature The auto adjust feature which applies only to the VGA input automatically centers the image on the screen when pressing the ENTER front panel button or the OK button on the remote...

Page 16: ...T Select the output resolution from the menu NATIVE is the default Output resolution Appears as Output resolution Appears as 1080i 60Hz 1080I60 1080i 59 94Hz 1080I59 1080p 60Hz 1080P60 1080p 59 94Hz 1...

Page 17: ...H and V syncs on the analog outputs until a valid input is again detected or any keypad button is pressed EXIT Select to exit the menu 6 2 2 The FINETUNE Menu Input Signal Parameter Function CV YC CO...

Page 18: ...I signal is selected ANALOG the analog audio input is selected HDMI AUDIO IN is enabled only when one of the HDMI inputs is selected 6 2 4 The OSD Menu Parameter Function H POSITION Set the horizontal...

Page 19: ...Select the component video 1 input COMP2 Select the component video 2 input PC Select the UXGA input HDMI1 Select the HDMI1 input HDMI2 Select the HDMI2 input XGA Reset Reset the resolution to XGA 720...

Page 20: ...to 40 C 32 to 104 F STORAGE TEMPERATURE 40 to 70 C 40 to 158 F HUMIDITY 10 to 90 RHL non condensing OUTPUT RESOLUTIONS Native VGA SVGA XGA SXGA UXGA 480i 480p 576i 576p 720p 1080i 1080p WXGA WSXGA WU...

Page 21: ...2 75 No No Yes Yes XGA 60 70 75 No No Yes Yes SXGA 60 75 No No Yes Yes 1280X960 No No Yes Yes 1600X900 60 No No Yes Yes UXGA 60 1600X1200 No No Yes Yes WXGA 60 1280x800 No No Yes Yes WXGA 60 1440x900...

Page 22: ...Command Set Command Type in Y Control_Type Function Param CR Reply Z Control_Type Function Param CR LF Get Command Type in Y Control_Type Function CR Reply Z Control_Type Function Param CR LF When se...

Page 23: ...control 0 16 N A NATIVE button on remote control 0 17 N A LEFT button on remote control Volume down Volume down when not in OSD 0 18 N A OK button on remote control 0 19 N A RIGHT button on remote con...

Page 24: ...t 41 0 100 OSD Setting H Position 1 Set 2 Get 42 0 100 OSD Setting V Position 1 Set 2 Get 43 0 100 OSD Timeout 1 Set 2 Get 44 0 8 OSD Background 1 Set 2 Get 50 0 3 NR Noise Reduction 0 Off 1 Low 2 Mid...

Page 25: ...1 VGA 2 SVGA 3 XGA 4 SXGA 5 UXGA 6 480i 7 480p 8 720p60 9 1080i60 10 1080p60 11 576i 12 576p 13 720p50 14 1080i50 15 1080p50 16 WXGA 17 WSXGA 18 WUXGA 19 1280x800 20 WXGA 1440X900 21 SXGA 1400X1050 22...

Page 26: ...22 1600X900 23 2048X1080 50 24 2048X1080 60 6 Set 7 Get 0 0 2 Power 0 Power Down 1 Power On 2 Firmware reset 6 Set 7 Get 1 0 1 Freeze 0 Off 1 On 6 Set 7 Get 2 0 1 Blank 0 Off 1 On 6 Set 7 Get 3 0 1 Mu...

Page 27: ...VP 436N 23 im Vertrieb von CAMBOARD Electronics www camboard de Tel 07131 911201 Fax 07131 911203 ce info camboard de...

Page 28: ...be found We welcome your questions comments and feedback Web site www kramerelectronics com E mail info kramerel com P N 2900 300149 Rev 4 SAFETY WARNING Disconnect the unit from the power supply bef...

Reviews: