background image


VP-419xl - Controlling the VP-419xl


11 


5.3 

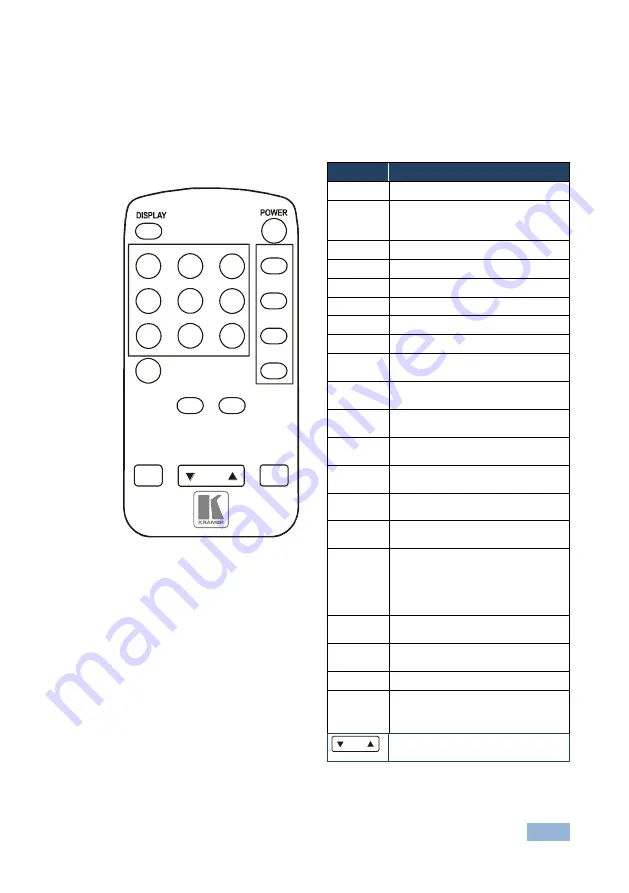
Using the Infra-Red Remote Control Transmitter 

You can control the 

VP-419xl 

from the infra-red remote control transmitter, as 

Figure 3 defines: 


Figure 3: Infrared Remote Control 
Transmitter 


Keys 

Function 


POWER 

Turn power ON or OFF 


DISPLAY 

Turn input standard and output 
resolution information display ON or 
OFF 


C-VIDEO 

Select the composite video input 


S-VIDEO 

Select the s-Video input 


YCbCr 

Select the component video input 


PC 

Select the input PC to loop-through 


VGA 

Set the output resolution to 640x480 


SVGA 

Set the output resolution to 800x600 


XGA 

Set the output resolution to 
1024x768 


SXGA 

Set the output resolution to 
1280x1024 


480p 

Set the output resolution to 
852x480p 


576p 

Set the output resolution to 
852x576p 


720p 

Set the output resolution to 
1280x720p 


1080i 

Set the output resolution to 
1920x1080i 


ASPECT 

Select the standard, normal (4:3) or 
the wide (16:9) aspect ratio 


PICTURE 
RESET 

Press and hold for 2 seconds to 
reset all the ProcAmp settings 
(contrast, brightness and so on) 

In some versions, you need to be 
within the PICTURE menu to do this 


3D 

Turn the 3D enhance feature ON or 
OFF 


NR 

Turn the digital noise reduction 
feature ON or OFF 


MENU 

Enter the OSD menu 


ENTER 

Press to accept changes and to 
change SETUP parameters 


Press to adjust the picture 
parameters 


MENU

NR

PC

YPbCr

S-VIDEO

C-VIDEO

3D

PICTURE

RESET

ASPECT

SXGA

SVGA

VGA

XGA

576p

720p

1080i

480p

ENTER


Summary of Contents for VP-419XL

Page 1: ...KRAMER ELECTRONICS LTD USER MANUAL MODEL VP 419xl Video to SXGA HD Scaler P N 2900 000201 Rev 7...

Page 2: ......

Page 3: ...deo to SXGA HD Scaler 5 4 Connecting the VP 419xl 7 5 Controlling the VP 419xl 9 5 1 Controlling via the Front Panel Buttons 9 5 2 Using the CONTROL Buttons 9 5 3 Using the Infra Red Remote Control Tr...

Page 4: ...in 11 groups that are clearly defined by function GROUP 1 Distribution Amplifiers GROUP 2 Switchers and Routers GROUP 3 Control Systems GROUP 4 Format Standards Converters GROUP 5 Range Extenders and...

Page 5: ...nce high resolution cables to avoid interference deterioration in signal quality due to poor matching and elevated noise levels often associated with low quality cables Do not secure the cables in tig...

Page 6: ...l and Electronic Equipment WEEE Directive 2002 96 EC aims to reduce the amount of WEEE sent for disposal to landfill or incineration by requiring it to be collected and recycled To comply with the WEE...

Page 7: ...Scaler also features Automatic detection of NTSC N4 43 PAL PAL M PAL N SECAM video standards An On Screen Display OSD for easy setup and adjustment accessible via the IR remote control and via the fr...

Page 8: ...control transmitter 3 RGB RESET Button Illuminates when the output resolution is set to RGB Press to set output to Y Pb Pr the button no longer illuminates Press and hold for more than 3 seconds to re...

Page 9: ...omposite video source 14 Y RCA Connector Connects to the interlaced component video source Not compatible with progressive scan Y Pb Pr or HDTV For component video connect all three connectors Y Cb Cr...

Page 10: ...component video source for example a DVD player to the Y Cb and Cr INPUT RCA connectors 4 Connect an SXGA graphics source to the SXGA PASS INPUT 15 pin HD connector This PC input signal is not scaled...

Page 11: ...8 VP 419xl Connecting the VP 419xl Figure 2 Connecting the VP 419xl Video to SXGA HD Scaler...

Page 12: ...the resolution to VGA or 480p Press for 3 seconds to reset to VGA and press for 10 seconds to reset to 480p CONTROL buttons including the MENU ENTER and buttons INPUT SELECTOR buttons for selecting th...

Page 13: ...TAIL Adjust the sharpness From 0 to 63 10 RESET Select RESET and press ENTER to reset to the default parameters EXIT Select to exit to the MAIN MENU 5 2 3 The SETUP Menu The following table defines th...

Page 14: ...esolution to 1024x768 SXGA Set the output resolution to 1280x1024 480p Set the output resolution to 852x480p 576p Set the output resolution to 852x576p 720p Set the output resolution to 1280x720p 1080...

Page 15: ...ter graphics resolutions 50 60Hz for HDTV resolutions PROCESSING DELAY 2 frames CONTROLS Front panel buttons and infrared remote for menu driven OSD control ADDITIONAL CONTROLS Contrast brightness col...

Page 16: ......

Page 17: ...list of Kramer distributors visit our Web site where updates to this user manual may be found We welcome your questions comments and feedback P N 2900 000201 Rev 7 SAFETY WARNING Disconnect the unit f...

Reviews: