


VM-300HDCP - Defining the VM-300HDCP 1:3 DVI Distributor
5
5
4
Defining the VM-300HDCP 1:3 DVI
Distributor
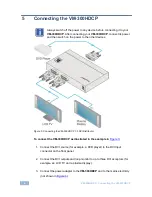
Figure 1
and
Figure 2
define the front and rear panels of the
VM-300HDCP
.
Figure 1: VM-300HDCP 1:3 DVI Distributor Front Panel
#
Feature
Function
1
INPUT
DVI Connector
Connect to a DVI source (see
Section 5
2
)
MONITOR OUT
DVI
Loop Connector
Connect to a DVI acceptor for input monitoring (see
Section 5
3
)
EDID
READ
Button
Press to acquire the EDID following selecting the EDID
source. Press again to indicate the EDID status (see
Section 6
Lights when configuring the EDID
)
4
SELECT
Button
Press to select the EDID source (single output, Auto-Mix or
default), see
Lights when configuring the EDID
Section 6
5
MONITOR
LED
Lights green when an output is connected to the Monitor
Out connector and is active.
The LED flashes to indicate the source of the EDID
acquired (see
Section 6
6
) or when connecting a non HDCP
display while providing HDCP content to the
VM-300HDCP
OUT1, OUT 2
LEDs
Lights green when an output is connected and is active.
The LED flashes to indicate the source of the EDID
acquired (see
Section 6
7
) or when connecting a non HDCP
display while providing HDCP content to the
VM-300HDCP
ON
LED
Lights green when the device receives power
Figure 2
defines the rear panel of the
VM-300HDCP
.
Figure 2: VM-300HDCP 1:3 DVI Distributor Rear Panel
#
Feature
Function
8
OUT 1
DVI Connector
Connect to a DVI acceptor (see
Section 5
9
)
OUT 2
DVI Connector
Connect to a DVI acceptor (see
Section 5
10
)
5V DC
Connector
Connect to the power adapter, center pin positive