background image

KRAMER:  SIMPLE CREATIVE TECHNOLOGY


Using the VA-680D Digital Audio Delay 


5  Using the VA-680D Digital Audio Delay 

To adjust a lip sync error when using a scaler, use the 

VA-680D

, as the 

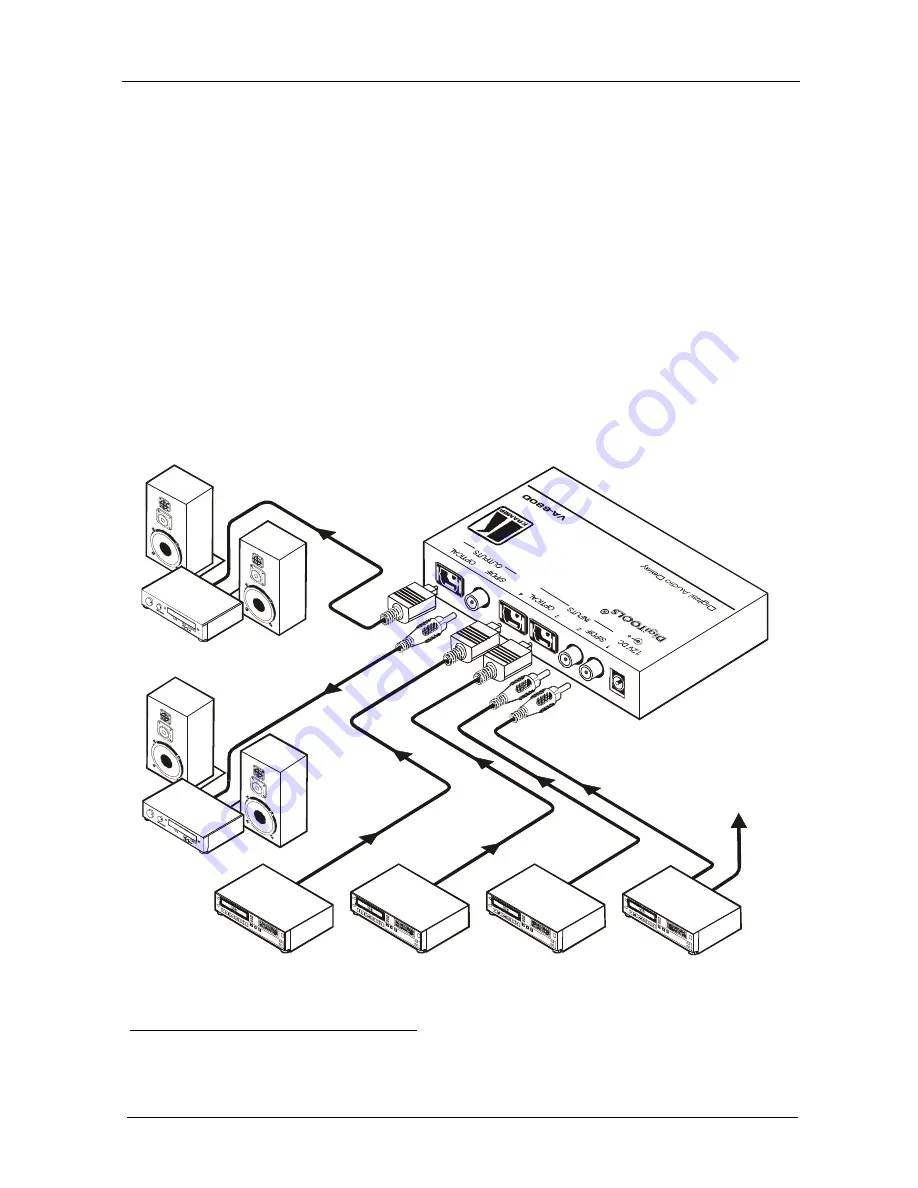
example in Figure 2 illustrates: 

1.  Connect the audio output of the DVD players to the S/PDIF and/or 

OPTICAL INPUTS (inputs 1 to 4) on the 

VA-680D

.  

2.  Connect the S/PDIF and/or OPTICAL OUTPUTS on the 

VA-680D

 to 

the audio input on the audio receiver (for example an AV receiver). 

3.  Connect the 12V DC power adapter

1

 to the power socket and connect the 

adapter to the mains electricity. 

4.  Press an INPUT SELECTOR button

1

 (1 to 4) to select the desired source 

to switch to the outputs

2

5.  Set the Delay Control, as section 5.1 describes. 

To a Scaler

and then

to Plasma 

Display

AV Receiver

DVD

Player

DVD

Player

AV Receiver

DVD

Player

DVD

Player


Figure 2: Connecting the VA-680D Digital Audio Delay 


1 Not shown in Figure 2 
2


Both outputs are available 

Summary of Contents for VA-680D

Page 1: ...Kramer Electronics Ltd USER MANUAL Model VA 680D Digital Audio Delay...

Page 2: ...tting the Display Brightness Dimmer Setting Level 5 6 Technical Specifications 6 Figures Figure 1 VA 680D Digital Audio Delay 3 Figure 2 Connecting the VA 680D Digital Audio Delay 4 Tables Table 1 Fea...

Page 3: ...the user manual Caution No operator serviceable parts inside unit Warning Use only the Kramer Electronics input power wall adapter that is provided with this unit1 Warning Disconnect power and unplug...

Page 4: ...Power adapter 12V DC Input This user manual2 2 Getting Started We recommend that you Unpack the equipment carefully and save the original box and packaging materials for possible future shipment Revie...

Page 5: ...nd supports 32kHz to 96kHz sample frequency range Is fully transparent to the digital stream making it ideal for the most demanding audio applications including home cinema and professional audio appl...

Page 6: ...6 S PDIF Connect to the digital audio acceptor 7 OUTPUTS OPTICAL Connect to the digital audio acceptor 8 INPUT SELECTOR Buttons Press button 1 to 4 to select the input 9 Button1 Press to decrease the...

Page 7: ...ICAL OUTPUTS on the VA 680D to the audio input on the audio receiver for example an AV receiver 3 Connect the 12V DC power adapter1 to the power socket and connect the adapter to the mains electricity...

Page 8: ...Use the dimmer settings to modify the brightness of the four input buttons and the display To set the brightness dimmer setting level do the following 1 Press both the and buttons continuously for 3...

Page 9: ...DVD standards including Dolby Digital EX DTS ES and PCM Audio sample rates of 32kHz 44 1kHz 48kHz standard DVD and 96kHz DTS 96 24 AUDIO DELAY CAPABILITIES DIPSWITCH SETTINGS 0 999ms for 32kHz sample...

Page 10: ...iginal dated invoice or a copy must be presented as proof of warranty coverage and should be included in any shipment of the product Please also include in any mailing a contact name company address a...

Page 11: ...or the latest information on our products and a list of Kramer distributors visit our Web site www kramerelectronics com where updates to this user manual may be found We welcome your questions commen...

Reviews: