KRAMER: SIMPLE CREATIVE TECHNOLOGY
Mounting the 622 on the Kramer RK-622 Rack Adapter
4
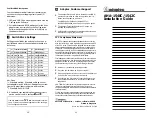
SCREW CONUS
BLACK M3x8
SCREW CONUS
BLACK M3x8
SCREW CONUS
BLACK M3x5
622R/T (Al)
622R/T (Al)
Figure 3: RK-622 Rack Adapter – Connecting the 622 (Aluminum)
5. Tighten the screws.
6. Rotate the
622
horizontally with the unit connected.
7. Place the next
622
unit next to the unit that is already mounted.
8. Repeat steps 2 to 4 for the second unit.
5.2 Mounting an Extrusion Housing Unit
To mount the
622
units on the
RK-622
, do the following:
1. Place the first
622
unit on the rack.
2. Hold both the
622
and the
RK-622
with your hands and turn them upside
down.
3. Insert the appropriate amount of screws through the holes on the
RK-622
that
fit the holes on the underside of the
622
, using the screws supplied with the
unit (as illustrated in Figure 4).
4. Tighten the screws.
5. Rotate the
622
horizontally with the unit connected.
6. Place the next
622
unit next to the unit that is already mounted.
7. Repeat steps 2 to 4 for each other unit.