Step 3: Choose the best location
Before installing the speakers:
Experiment by placing the speakers in different locations before finally deciding on the most suitable location.
Be sure that the wall type is appropriate for the mounting U-brackets, that is, either solid wood, bricks, concrete, hollow
building blocks, or wood studs.
Check that the mounting location is free of obstructions, such as electrical piping, AC ducts or water lines, and so on.
Step 4: Install the Galil 6-AW
Always switch OFF the power on each device before connecting it to your
Galil 6-AW
. For best results, we recommend that you
always use Kramer high-performance cables to connect AV equipment to
Galil 6-AW
.
To connect the
Galil 6-AW to the amplifier
:
1. Cut the dual color cable wires to similar lengths,
leaving some
ex
cess wire to easily remove the
speakers from the U-brackets.
Note that for outdoor installations you need to
use weatherproof cables
.
2. Adjust the tap setting.
3. Connect the wires to the appropriate terminal block
connectors on the speaker.
4. Mount the grommet/cable gland on the protective
cover and pass the cables through
the
grommet/cable gland and the protective cover.
5. Close the tap selector and connector opening with
the protective cover.
6. Connect the mounting U-brackets.
7. Connect the wires to the amplifier (left speaker
wires to amplifier
“L” terminal blocks and right
speaker to amplifier
“R” terminal blocks.
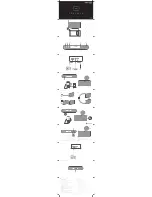
The following diagram displays the
Galil 6-AW
speakers connected to a recommended Kramer power amplifier
(for example,
PA-120Z
):