background image

Your 840H HDMI Pattern Generator 


Table 1: 840H HDMI Pattern Generator Features 

Feature 

Function 

12V DC 

+12V DC connector for powering the unit 

OUTPUT 

Connector 

Connect to the HDMI acceptor 

ON LED 

Illuminates when receiving power 

PATTERN NUMBER 

7-segment


Display


Shows the pattern number (from 00 to 31) 

Button


Advances to the next pattern number 

PATTERN – 

Button


Goes back to the previous pattern number 

Wide (On) 

Button

1


Displays a wide image and provides 7 extra resolutions when pressed together 

with one or two of these buttons:

 SVGA

,

 XGA

,

 SXGA

 and/or

 1400x1050


1400x1050 

Button

1


Selects 1400x1050


when pressed. Selects 1440x900 when pressed together 

with the 

Wide (On) 

button. Selects 1920x540 when pressed together with the 

SXGA

 button and the

 Wide (On) 

button 

SXGA

 Button

1


Selects SXGA (1280x1024) when pressed. Selects 1366x768 when pressed 

together with the 

Wide (On) 

button. Selects 1920x1080 when pressed 

together with the XGA button and the

 Wide (On) 

button. Selects 1920x540 

when pressed together with the 

1400x1050

 button and the

 Wide (On) 

button 

10 

XGA

 Button

1


Selects XGA (1024x768) when pressed. Selects 1280x720 when pressed 

together with the 

Wide (On) 

button. Selects 720x480 when pressed together 

with the SVGA button and the

 Wide (On) 

button. Selects 1920x1080 when 

pressed together with the 

SXGA

 button and the

 Wide (On) 

button 

11 

SVGA

 Button

1

Selects SVGA (800x600) when pressed. Selects 852x480 when pressed 

together with the 

Wide (On) 

button. Selects 720x480 when pressed together 

with the XGA button and the

 Wide (On) 

button 


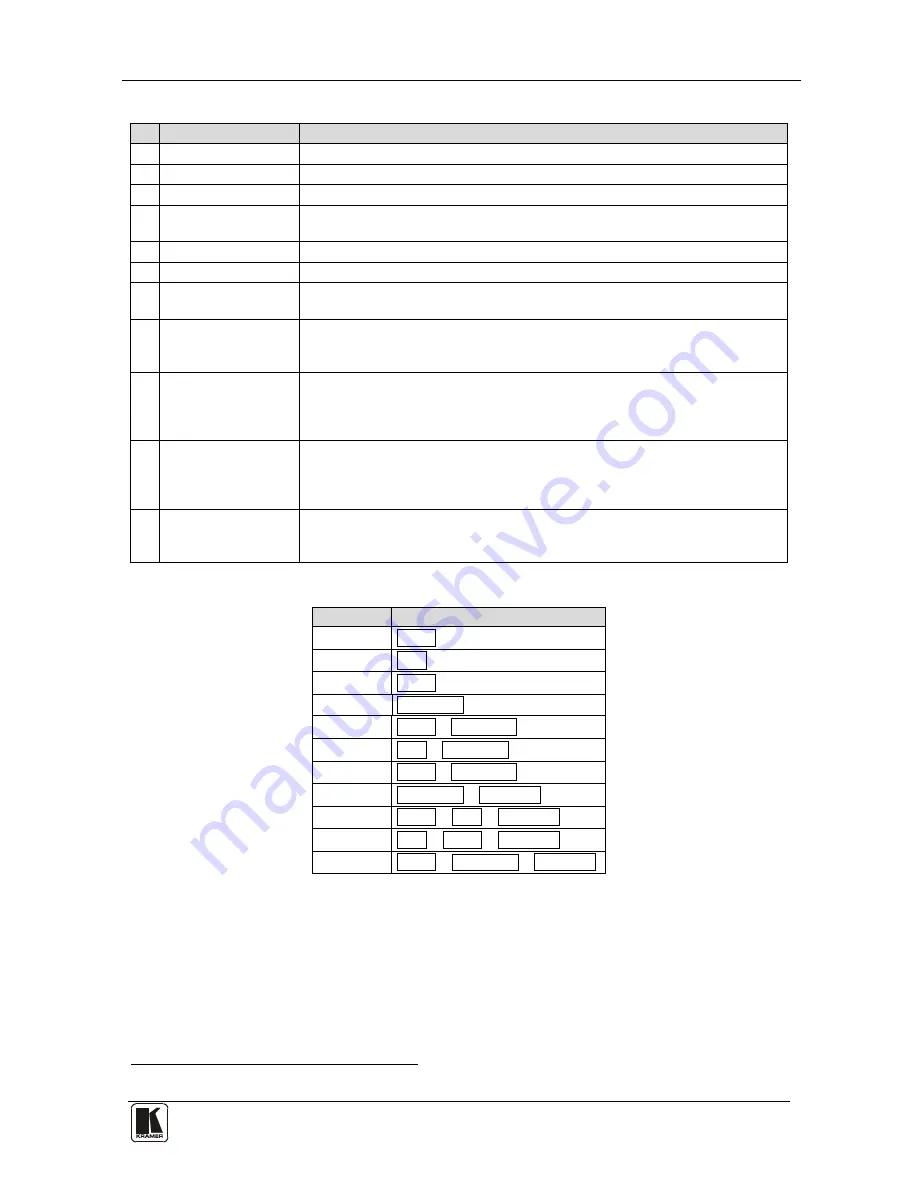
Table 2: Selecting the HDMI Output Resolutions 

To select: 

Press: 

SVGA


SVGA 

XGA 

XGA 

SXGA


SXGA 

1400x1050


1400x1050 

852x480


SVGA + Wide (On) 

1280x720


XGA + Wide (On) 

1366x768


SXGA + Wide (On) 

1440x900


140 Wide (On) 

720x480


SVGA +  XGA + Wide (On) 

1920x1080


XGA + SXGA + Wide (On) 

1920x540


SXGA + 140 Wide (On) 


1 Illuminates when pressed 

Summary of Contents for 840H

Page 1: ...Kramer Electronics Ltd Preliminary USER MANUAL Model 840H HDMI Pattern Generator ...

Page 2: ...ting Your 840H HDMI Pattern Generator 7 5 3 Interpreting Each Pattern Number Definition 8 6 Technical Specifications 9 Figures Figure 1 840H HDMI Pattern Generator 4 Figure 2 Connecting the 840H HDMI Pattern Generator 6 Tables Table 1 840H HDMI Pattern Generator Features 5 Table 2 Selecting the HDMI Output Resolutions 5 Table 3 Pattern Number Definitions 8 Table 4 Technical Specifications of the 8...

Page 3: ...just the name has changed replacing the suffix HDMI by H according to the HDMI Guideline Each package includes the following items 840H HDMI Pattern Generator Power supply This user manual2 2 Getting Started We recommend that you Unpack the equipment carefully and save the original box and packaging materials for possible future shipment Review the contents of this user manual Use Kramer high perf...

Page 4: ...PATTERN A 7 segment display that indicates the pattern number An on board EERROM that saves the last setting used To achieve the best performance Connect only good quality connection cables thus avoiding interference deterioration in signal quality due to poor matching and elevated noise levels often associated with low quality cables Avoid interference from neighboring electrical appliances that ...

Page 5: ...Overview 3 3 1 Quick Start This quick start chart summarizes the basic setup and operation steps ...

Page 6: ...OGY Your 840H HDMI Pattern Generator 4 4 Your 840H HDMI Pattern Generator Figure 1 and Table 1 define the 840H HDMI Pattern Generator Table 2 summarizes how to select each HDMI Output Resolution Figure 1 840H HDMI Pattern Generator ...

Page 7: ...essed Selects 1366x768 when pressed together with the Wide On button Selects 1920x1080 when pressed together with the XGA button and the Wide On button Selects 1920x540 when pressed together with the 1400x1050 button and the Wide On button 10 XGA Button1 Selects XGA 1024x768 when pressed Selects 1280x720 when pressed together with the Wide On button Selects 720x480 when pressed together with the S...

Page 8: ...tor To connect the 840H HDMI Pattern Generator do the following1 1 Connect the OUTPUT connector to an HDMI acceptor for example a flat panel LCD display as Figure 2 illustrates or a projector or plasma screen 2 Connect the 12V DC power adapter wall transformer to the 12V DC socket and connect the transformer to the mains electricity Figure 2 Connecting the 840H HDMI Pattern Generator 1 Switch OFF ...

Page 9: ...onse HDMI cable checking the quality2 Plasma screen to check the black level of the plasma monitor use PATTERN 00 to generate the black screen of the colors both separately and together To operate the 840H HDMI Pattern Generator do the following 1 Press the appropriate PATTERN button PATTERN to display the next pattern or PATTERN to display the previous pattern to generate the required pattern The...

Page 10: ...creen 09 Magenta screen 10 White screen 11 Gray screen 12 Red green blue ramps 13 White crosshatch on black background 14 Red crosshatch on green background 15 Red crosshatch on blue background 16 White squares 17 White dots 18 Active picture border 19 Centered round target and active picture border 20 Motion Moving vertical line 21 Moving horizontal line 22 Aperture moving over colored background...

Page 11: ...OLUTIONS SVGA 800x600 XGA 1024x768 SXGA 1280x1024 1400x1050 852x480 1280x720 1366x768 1440x900 720x480 1920x1080 and 1920x540 All resolutions 60Hz CONTROLS Buttons PATTERN PATTERN 1400x1050 SXGA XGA SVGA Wide On POWER SOURCE 12 VDC 150mA DIMENSIONS 12cm x 7 5cm x 2 5cm 4 7 x 0 98 x 2 95 W D H WEIGHT 0 3kg 0 66lbs ACCESSORIES Power supply mounting bracket 1 Specifications are subject to change with...

Page 12: ...ter lightning orotheractsofnature ii Product modification orfailureto followinstructions supplied with theproduct iii Repairorattemptedrepairby anyonenot authorized byKramer iv Anyshipment oftheproduct claims must bepresentedtothe carrier v Removalorinstallationoftheproduct vi Anyothercause whichdoes not relateto aproduct defect vii Cartons equipment enclosures cables or accessoriesusedinconjuncti...

Page 13: ...For the latest information on our products and a list of Kramer distributors visit our Web site www kramerelectronics com where updates to this user manual may be found We welcome your questions comments and feedback Caution Safety Warning Disconnect the unit from the power supply before opening servicing ...

Reviews: