background image

3

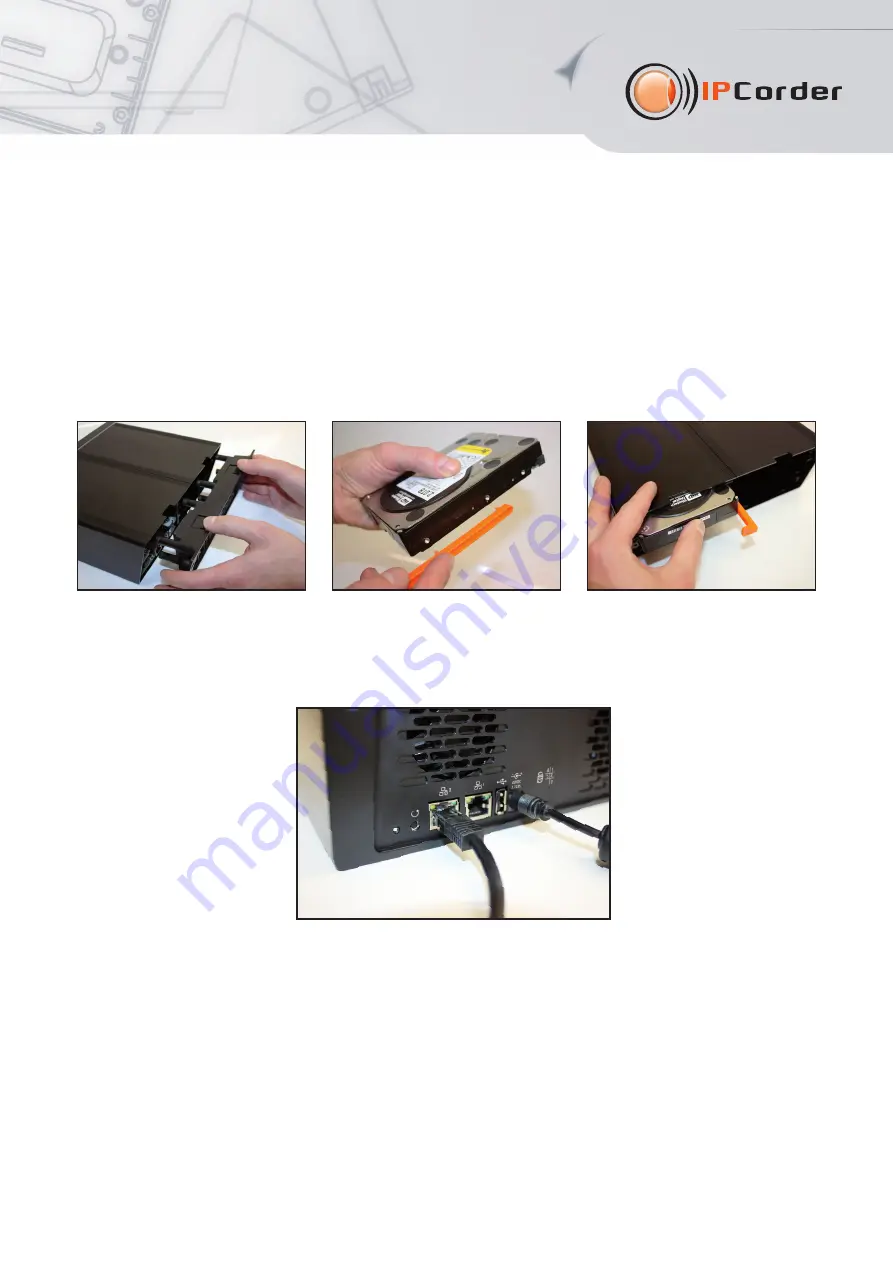
• Use the following procedure for the installation of hard disks:

1) Press down both top locks and remove the back panel. If you have secured it in the past with two screws, unscrew

them. The device is supplied by the manufacturer with a clipped in back cover. Screws for securing the back
cover are part of the package.

2) Attach the holder for the removal of the disk to the hard disk.

3) Slide the disk into the free disk position. The order of the occupied positions does not matter.

4) Attach the back panel and clip in both top locks. The back panel can be secured by the two supplied screws

to ensure greater safety.

• Attach one or both network adapters to the computer network (see. Redundant Network Connection).

• Firstly connect the original power adapter to IPCorder and then plug it into an electric outlet.

• On start-up IPCorder will attempt to obtain the IP address automatically via DHCP. If unsuccessful it is set up to the

default value of 

192.168.1.78

. If the IPCorder is in the same subnet as the PC used to access it, it should appear

in the 

Network Places

folder under Microsoft Windows.

IPCorder Discover

– the utility for discovering the IPCorder device in your network - can be used to find the IP address

of your IPCorder. You will find this application on the enclosed CD or on the manufacturer’s website 
Users of the Windows operating system can use the 

IPCorderDiscover.exe

file, other users the 

IPCorderDiscover.jar

file.

You need to install Java SE version 6 or newer (

) for the correction function of the

Discover program.

Summary of Contents for KNR-5016

Page 1: ...nsuitable environment The device is not designed for outdoor use Do not use the device in an environment with strong vibrations Unauthorized modification of this device can damage it or cause a fire Prevent from contact with fluids do not expose the device to high temperatures Protect the device from falling It is permitted to use accessories only intended for the device hard disks cables etc In c...

Page 2: ...val of the disk an installation CD two screws for securing the back panel the installation guide and licence agreement 2 How to install IPCorder in several minutes Up to five 3 5 inch SATA I SATA II or SATA III disks in various combination can be inserted in the IPCorder KNR 5016 5020 5032 5040 the individual positions are numbered as follows ...

Page 3: ...ter network see Redundant Network Connection Firstly connect the original power adapter to IPCorder and then plug it into an electric outlet On start up IPCorder will attempt to obtain the IP address automatically via DHCP If unsuccessful it is set up to the default value of 192 168 1 78 If the IPCorder is in the same subnet as the PC used to access it it should appear in the Network Places folder...

Page 4: ... will be indicated by a lit red diode with an exclamation mark symbol You will be asked to configure the RAID array on the Storage Configuration screen After its successful creation restart to the Normal mode The Normal mode is indicated when the blue diodes light up You will find more information about the configuration in the relevant user manual on the enclosed CD The login window will shortly ...

Page 5: ...ethod of the Failure detection Link cable connected this option detects disconnection of the network cable If the cable from network adapter no 1 is removed the connection through the network adapter no 2 will be automatically activated and vice versa Network ping address from the list this option checks if there is any traffic running through the active network adapter of the IPCorder If no netwo...

Page 6: ... signals the length of the pressed Reset button If pressed for less than 5 seconds the diode is on if pressed for more than 5 seconds it blinks slowly and if pressed for more than 15 seconds it blinks quickly Button function description Button ON OFF If pressed for less than 3 seconds it will switch off the acoustic signal in defined cases see below If pressed for more than 5 seconds accompanied b...

Page 7: ...entry in the log By a continuous sound if the temperature of the device exceeds 70 C The device in this case will make an entry in the log send an information e mail if the SMTP is set up and will be automatically switched off If the temperature limits are exceeded the acoustic signal is accompanied by the blinking of a red light on the lightstrip 4 System Requirements The system requirements are ...

Page 8: ...AAM Team The manufacturer bears no responsibility for any technical or printing errors and reserves the right to make any changes in the product and in this User Manual without prior notice Any such changes shall be announced via the product s website The manufacturer does not provide warranties of any kind whatsoever with regard to any information given in this user manual or any derived warranti...

Reviews: