background image

6

INSTRUCTIONS FOR THE USER

It is necessary that all the operations regarding the installation, 

adjustment and adaptation to the type of gas available are carried out 

by qualified personnel, in conformity with the regulations in force.

The specific instructions are described in the booklet section intended 

for the installer.

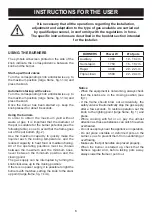
USING THE BURNERS

The symbols silk-screen printed on the side of the 

knob indicate the correspondence between the 

knob and the burner.

Start-up without valves

Turn the corresponding knob anticlockwise up to 

the maximum position (large flame, fig.1-1/A) and 

press the knob.

Automatic start-up with valves

Turn the corresponding knob anticlockwise up to 

the maximum position (large flame, fig.1-1/A) and 

press the knob.

Once the burner has been started up, keep the 

knob pressed for about 6 seconds.

Using the burners

In order to obtain the maximum yield without 

waste of gas, it is important that the diameter of 

the pot is suitable for the burner potential (see the 

following table), so as to avoid that the flame goes 

out of the pot bottom (fig. 2).

Use the maximum capacity to quickly make the 

liquids reach the boiling temperature, and the 

reduced capacity to heat food or maintain boiling. 

All of the operating positions must be chosen 

between the maximum and the minimum ones, 

never between the minimum position and the 

closing point.

The gas supply can be interrupted by turning the 

knob clockwise up to the closing position.

If there is no power supply, it is possible to light the 

burners with matches, setting the knob to the start-

up point (large flame, fig. 1-1/A).

BURNERS

Power W

Ø of pots

Auxiliary

1000

10 - 14 cm

Semi-rapid

1750

16 - 18 cm

Rapid

3000

20 - 22 cm

Triple crown

3500

22 - 24 cm

Notice

 -When the equipment is not working, always check 

that the knobs are in the closing position (see 

fig.1).

 -If the flame should blow out accidentally, the 

safety valve will automatically stop the gas supply, 

after a few seconds. To restore operation, set the 

knob to the lighting point (large flame, fig. 1) and 

press.

 -While cooking with fat or oil, pay the utmost 

attention as these substances can catch fire when 

overheated.

 -Do not use sprays near the appliance in operation.

 -Do not place unstable or deformed pots on the 

burner, so as to prevent them from overturning or 

overflowing.

 -Make sure that pot handles are placed properly.

 -When the burner is started up, check that the 

flameis regular and, before taking pots away, 

always lowerthe flame or put it out.

Summary of Contents for HK 9414 GMRB

Page 1: ...HK 9414 GMX HK 9414 GMRB HK 9414 GMRN...

Page 2: ......

Page 3: ...oncerning use of the appliance in a safe way and understand the hazards involved Children shall not play with the appliance Cleaning and user maintenance shall not be made by children without supervis...

Page 4: ...efully read the instructions before installing and using the appliance The manufacturer is not responsible if the installation and improper use of the device causing injury or damage Keep the instruct...

Page 5: ...eplaced by the manufacturer by an authorized technician or by a qualified person to avoid danger When connecting the power cable make sure it is not in direct contact eg through the use of insulation...

Page 6: ...e appliance by a person responsible for their safety Children should be supervised to ensure that they do not play with the appliance While the appliance is running watch the children and make sure th...

Page 7: ...e boiling temperature and the reduced capacity to heat food or maintain boiling All of the operating positions must be chosen between the maximum and the minimum ones never between the minimum positio...

Page 8: ...the highest number corresponds the maximum power fig B If the hob is fitted with extended zones the outer heating element can be switched on turning the knob up to the end of rotation The indicator l...

Page 9: ...tended period of time The stainless steel parts should also be cleaned with soapy water and then dried with a soft cloth BURNERS AND RACKS These parts can be removed to make cleaning easier The burner...

Page 10: ...ooling ventilation proper air vents must be installed to guarantee an adequate ventilation with the lower air entering with a cross section of at least 200cm2 and the higher air exiting with a cross s...

Page 11: ...hat the electric system is provided with an effective ground connction in compliance with the regulations and provisions of the law Grounding is compulsory GAS TRANSFORMATIONS AND ADJUSTMENTS Replacin...

Page 12: ...12 5 6 6 A 8 7 9 A 10 10 A 9 Closed Maximum Minimum 1 1 A 2 Closed Maximum Minimum 9 B 3 4 9 B F F P x L 30 MIN 100 MIN 760 MIN...

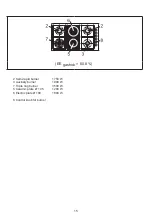
Page 13: ...15 2 Semi rapid burner 1750 W 3 Auxiliary burner 1000 W 7 Triple ring burner 3500 W 5 Ceramic plate 145 1200 W 6 Electric plate 180 1800 W 8 Control knob for burner EE gas hob 60 8...

Page 14: ...8 30 255 94 60 3500 1500 54 6 G20 20 334 100 Reg 3500 1500 Short title or reference to the measurement and calculation methods used to establish compliance with the above requirements The performance...

Page 15: ...provided for by the current waste legislation Appropriate separate waste collection for the subsequent start up of the disposed appliance to recycling treatment and environmentally compatible disposa...

Page 16: ...https korting ru support 8 800 550 78 62 K rting 2 1889 3 1 2 3 4 5 6 K rting...

Page 17: ..._________________________________ __________________________________________________________________ __________________________________________________________ ________________________________________...

Page 18: ......

Page 19: ......

Page 20: ...64 14 8 800 500 68 92 Email info korting ru K rting 8 800 550 78 62 Email service korting ru K rting 7 495 150 64 14 8 800 500 68 92 Email info korting ru 1 K rting korting ru K rting 7 495 150 64 14...

Reviews: