Note name indicators for bass mode: LB, 4E, 3A, 2D, 1G, HC
(LB stands for low B, and HC stands for high C.)
Calibration (reference pitch) settings
(*M)
Each time you press the CALIB button, the calibration value (reference pitch)
increases in 1 Hz steps. The setting range is between 436 and 445 Hz. Hold
down the button for at least one second to reset the calibration to 440 Hz.
Specifying flat/capo settings
(*M)
Each time you hold down the FLAT/CAPO button, the
setting changes between flat and capo, with the current
setting shown by the FLAT/CAPO indicator.
Flat (
)
→
Capo (
)
→
Flat (
)...
To change the flat setting, press the FLAT/CAPO button
while the FLAT indicator is lit up.
The setting range is between 1 and 5 semitones lower.
To change the capo setting, press the FLAT/CAPO button while the
CAPO indicator is lit.
The setting range is between 1 and 7 semitones higher.
When the flat or capo setting is changed 0, the FLAT/CAPO indicator turns
off after a few seconds, and the default setting (no flat or capo tuning) is
applied.
Both flat and capo tuning can be set in guitar mode, but only flat tuning can
be set in bass mode, and neither flat nor capo tuning can be set in chromatic
mode.
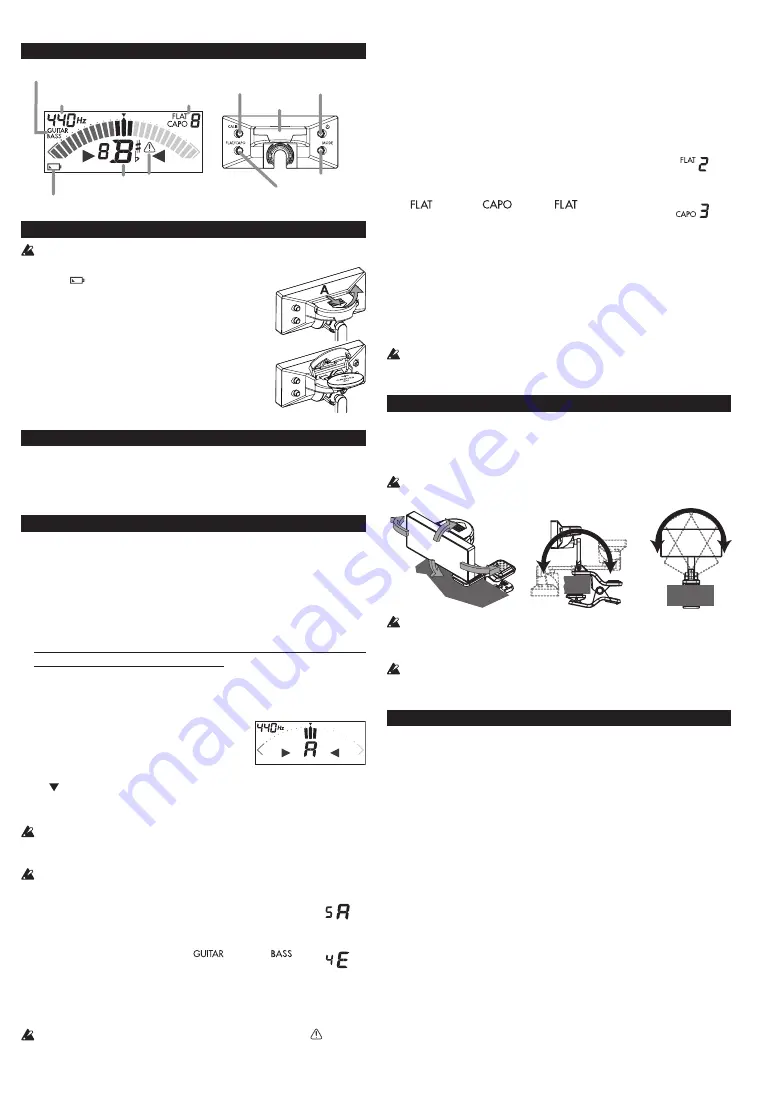
Attaching to the instrument and range of motion
The PitchHawk-G2 tunes by picking up the vibrations of the instrument.
Therefore, be sure to attach the PitchHawk-G2 to the head stock of your
instrument in order to tune it. In addition, the PitchHawk-G2 can be freely
moved so that the display is easy to read.
The PitchHawk-G2 may be damaged if you apply excessive force within its
range of motion, or attempt to move it beyond its intended range of motion.
180°
180°
30°
30°
45°
45°
Please carefully attach the PitchHawk-G2 to your instrument. Leaving the
PitchHawk-G2 attached for a long time may damage or mark the instrument's
surface.
Depending on various factors such as age-related change or the surface finish,
there is a possibility that your instrument may be damaged by attaching this
product.
Specifications
Scale:
12-note equal temperament
Range (sine wave): Chromatic A0 (27.50 Hz)–C8 (4186 Hz)
Guitar B1 flat5 (46.25 Hz)–E4 capo7 (493.88 Hz)
Bass
B0 flat5 (23.12 Hz)–C3 (130.81 Hz)
Precision:
+/-1 cent
Reference pitch:
436–445 Hz (1 Hz steps)
Flat tuning:
1–5 semitones (in semitone steps)
Capo tuning:
1–7 semitones (in semitone steps)
Dimensions:
61 mm(W) X 65 mm(D) X 28 mm(H)
2.40’’ (W) X 2.56’’ (D) X 1.10 ’’ (H)
Weight:
26 g/0.92 oz. (including battery)
Battery life:
approximately 8 hours
(tuner continuously operating, A4 input)
Included items:
CR2032 lithium battery (3V)
*M Settings are remembered even when the power is off. However, set-
tings will be initialized when you replace the battery (default, Tuner
mode: Chromatic, calibration: 440 Hz, FLAT/CAPO: normal)
• Specifications and appearance are subject to change without notice for
improvement.
2 semitones
lower
3 semitones
higher
Parts of the PitchHawk-G2
Reference
pitch indicator
CALIB button
Power button
FLAT/
CAPO indicator
MODE indicator
Battery indicator
MODE button
Note name
indicator
1st string overtightening
warning indicator
FLAT/CAPO button
Battery cover
Installing the battery
Make sure to turn the power off before you install or replace the battery.
When the battery begins to run low, the battery
indicator (
) will light up.
The PitchHawk-G2 will continue to function for a
while longer, but tuning will become less accurate.
Replace the battery as soon as possible.
1. Push the battery cover in direction A and push
it to open it up.
2. Making sure to observe the correct polarity,
insert the battery so that the “+” side of the bat-
tery is visible.
3. Return the battery cover to its original position.
Backlight
The backlight will illuminate brightly when sound is input or when a
button is pressed. When there has been no user input for approximately
three seconds, the backlight will dim slightly in order to prevent the bat-
tery from being depleted.
Tuning
Tuning procedure
1. Press the power button. The power will turn on/off each time you
press this button.
If the power is left on for approximately 3 minutes without any user
input, it will turn off automatically.
2. If necessary, change the tuner mode, calibration (reference pitch) and
flat/capo settings.
The procedure with the tuner mode set to chromatic (factory default;
no mode indicator) is described below.
3. Play a single note on your instrument.
The display will show the name of the note that’s closest to the pitch
detected. Tune your instrument to the correct pitch so that the desired
note name appears.
4. Once again play a single note on your
instrument, and adjust the tuning so that
the center segment of the meter (indicated
by ) is lit up.
An indicator toward the right will light up if the pitch is too high, and
an indicator toward the left will light up if the pitch is too low.
Even if the pitch is within the range of detection, it may not be possible to detect
the pitch of an instrumental sound that contains large numbers of overtones
or a sound that has a rapid decay.
The meter may respond to vibrations it picks up from the environment; however,
this will not affect tuning of the instrument.
Setting the tuner mode
(*M)
Each time you press the MODE button, the tuner mode changes,
with the current mode shown by the mode indicator.
Chromatic (no indicator)
→
Guitar (
)
→
Bass (
)
→
Chromatic...
In addition, in the guitar and bass modes, the string number closest
to the detected pitch appears to the left of the note name indicator.
Note name indicators for guitar mode: 7B, 6E, 5A, 4D, 3G, 2B, 1E
In guitar mode, the 1st string overtightening warning indicator ( ) will light
to help prevent the 1st string from breaking as a result of overtightening.
Meter indications
when correctly tuned
5th guitar
string
4th bass
string