


98
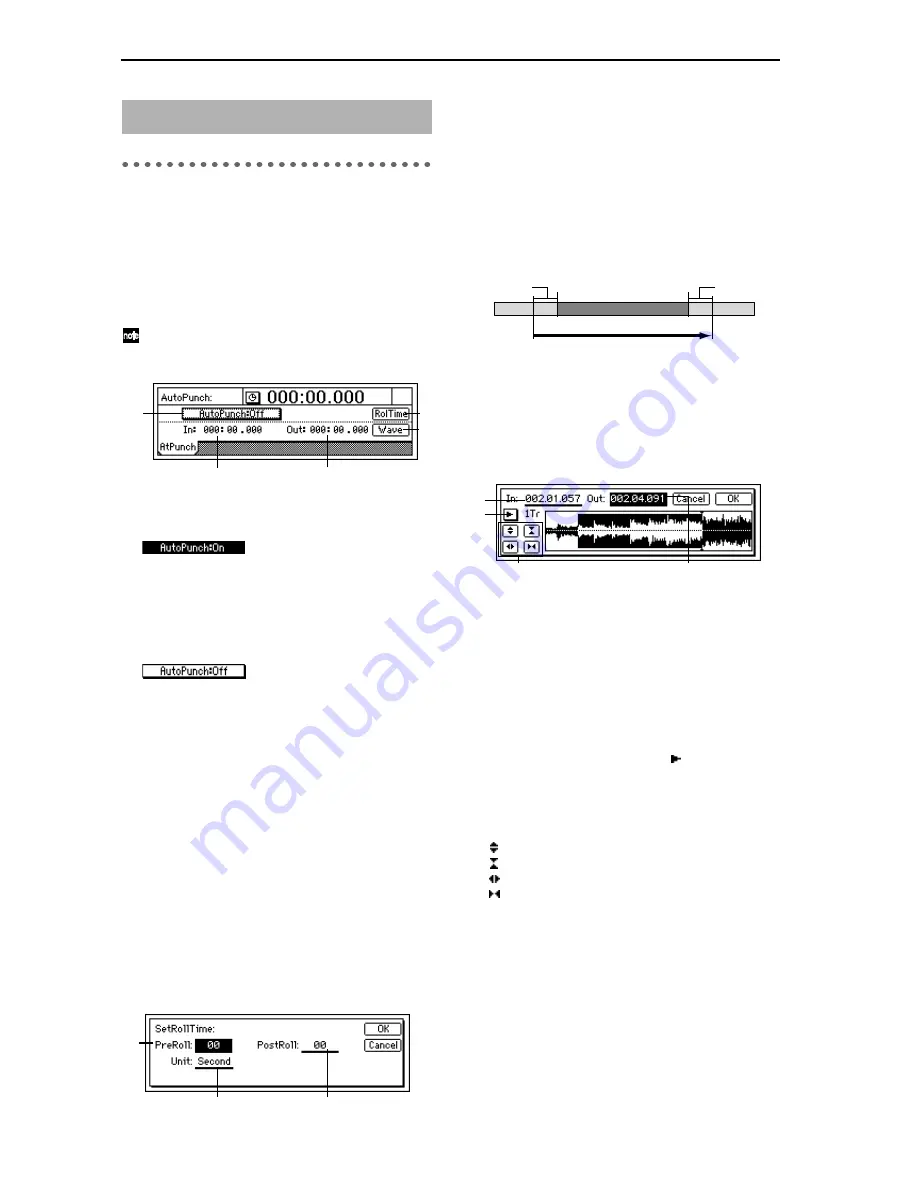
P1 AtPunch: Settings for auto
punch-in/out recording
Auto punch-in/out recording
is a function that auto-
matically starts recording (punch-in) and stops record-
ing (punch-out) at the time locations you specify
beforehand.
If you record when “AutoPunch” is “
On
,” punch-in/
out recording will occur automatically.
By turning the [RHSL] key “
On
,” you can rehearse
auto punch-in/out recording (i.e., practice without
actually recording anything). (
→
p.112)
1. AutoPunch ................................................. [On, Off]
Set the auto punch-in/out recording function on/
off.
On
: When you record, auto
punch recording will occur. When “
On
,” the
[AUTO PUNCH] key will light.
When you begin recording, the song will start at the
pre-roll time before the registered time (
IN
), record-
ing will occur for the recording region (
IN
–
OUT
),
and playback will stop after the post-roll time.
(
→
”RolTime”)
Off
: When you record, record-
ing will occur normally.
2. In .................................................... (000:00.000…)
This shows the auto punch-in time (where record-
ing will begin).
To set this time location, use the [STORE] key and
[IN/LOC1] key, or use “Wave.”
3. Out.................................................. (000:00.000…)
This shows the auto punch-out time (where record-
ing will end).
To set this time location, use the [STORE] key and
[OUT/LOC2] key, or use “Wave.”
4. RolTime ..................................................................
Specify the pre-roll and post-roll.
When using auto punch recording, you can specify
a
pre-roll
time so that you can be ready to start
recording at the punch-in (
IN
) point. Set the
post-
roll
time so that you can confirm the transition from
the end of recording (
OUT
) to the material that fol-
lows.
4a. PreRoll .................................................[00…10]
Set the pre-roll time.
4b. PostRoll................................................[00…10]
Set the post-roll time.
4c. Unit ..............................[Second, Meas(Measure)]
Select the units for the pre/post roll times.
You can select either
seconds
or
measures
.
Press the “OK” button, and the specified pre/post-
roll times will take effect. If you press the “Cancel”
button, the times you set will be cancelled.
5. Wave......................................................................
You can view the waveform as you set
IN
and
OUT
,
which allows you to specify time locations with
greater precision.
The play-from/play-to and slow play functions can
also be used. (
→
p.101)
5a. In...............................................[000:00.000…]
5b. Out............................................[000:00.000…]
Set
IN
and
OUT
.
When you place the cursor at “
In
” or “
Out
,” the
track selected by “TrackSelect” will automatically
be set to Solo and Scrub On, so that you can rotate
the [VALUE] dial to hear only the sound of that
track.
5c. TrackSelect......................................[Track1…16]
Select the track whose waveform will be shown and
which will be played. Press the “ ” button and
select from the list.
5d. Zoom In/Out/Up/Down
Adjust the size of the waveform display and the
playback speed.
: Expand the waveform display vertically.
: Shrink the waveform display vertically.
: Expand the waveform display horizontally.
: Shrink the waveform display horizontally.
When you press the “OK” button, the times you
specified for “
In
” and “
Out
” will be overwritten
onto the respective keys ([IN/LOC1], [OUT/
LOC2]). If you press the “Cancel” button, the times
you selected will be cancelled.
11. AUTO PUNCH
1
4
5
2
3
4a
4c
4b
IN(LOC 1)
OUT(LOC 2)
Stop recording
Begin recording
PreRoll
Auto punch-in/out recording
Loop recording (this region will be repeated)
PostRoll
Playback
Playback
Recording
5a
5c
5d
5b
Summary of Contents for D1600
Page 1: ...2 E ...
Page 22: ...20 ...
Page 28: ...26 ...
Page 36: ...34 ...
Page 44: ...42 ...
Page 60: ...58 ...
Page 145: ...143 Block diagram Appendices Block diagram MIDI ...