OPERATING INSTRUCTIONS
This portable icemaker uses a fully automatic control system, with an advanced microcomputer for
easy and convenient ice making. Making ice is simple and fast. Just add water, plug into an outlet, and
press the ON button. You can select one of the two ice cube sizes with the touch of a button.
There are warning indicators that alert you to fill water when the reservoir is empty and to remove ice
when the ice basket is full. The icemaker also has built-in safeguards that can limit accidental damage,
automatically shutting down the system when necessary.
BEFORE FIRST USE Please read carefully.
1. Unpack the appliance, then check and make sure that all the accessories including ice basket and
ice scoop etc. are complete. Please contact with the customer service department if some accessories
are missed.
2. Please ensure the ice maker is level and on a stable table or platform to avoid malfunction.
3. The incline angle of the ice maker cabinet should not exceed 45°during transportation or use.
Do not turn the ice maker upside down. Doing so could cause the compressor or refrigerating system
to operate incorrectly. Please allow time for the fluids in the compressor to settle after the ice maker is
moved or transported. Before using the ice maker for the first time, please wait for 2 hours after
the unit has been leveled and positioned in the proper place.
4. The appliance must be placed on a dry and level surface with sufficient ventilation, far from heat
sources such as ovens, heaters and corrosive gases.Leave about a 6” (15cm) clearance on all sides
of the ice maker for proper ventilation.
5. Do not fill the water reservoir with hot water. This may damage the ice maker. It is best to fill
the water reservoir with water of room temperature or lower.
6. Do not use the appliance at a very cold environment (lower than 41°F / 5
°C
).
7. Clean the appliance by following the operation of “CLEANING AND MAINTENANCE” before operate.
OPERATING PROCESS
1. Ensure that the drain plug at the bottom of water reservoir is closed well.
2. Plug the ice maker into the wall outlet, the “ICE” indicator blinks.
3. Open the top lid and remove the ice basket.
4. Fill the water reservoir with drinking water. NOTE: Do not fill above the MAX water level mark.
5. Replace the ice basket and close the top lid.
6. Press “ON/OFF” key, and the “ICE”indicator lights solidly. At that time, press ”SELECT” key to
select the ice size.
7. The ice-making cycle will last approximately 7-15 minutes, depending on the ambient temperature
and water temperature.
8. The ice-making cycle starts with water being pumped into the ice tray situated below the evaporator.
Over the next 7-15 minutes ice forms on the evaporator. Once this has completed, the ice tray will tilt
backwards and the remaining water in the ice tray is drained back into the water reservoir.
The ice cubes are then dropped from the evaporator and pushed forward into the ice basket by
the ice shovel. The ice tray will automatically move back into position under the evaporator and
start the next cycle.
9. The “ICE FULL” indicator will light up when the ice basket is full and then the ice maker will stop
the ice-making cycle automatically. Gently remove the ice from the ice basket with the ice scoop.
About 5 seconds later, the ice maker will restart its ice making function automatically.
10. The “ADD WATER” indicator will light up when the water reservoir is lack of water
11.If need to clean the appliance, press “SELECT” key to select “CLEAN” function under standby mode.
CLEANING AND MAINTENANCE
Before using your icemaker, it is strongly recommended that you clean the icemaker thoroughly.
1. When cleaning, please make sure the power has been turned off and the plug is disconnected from
the power outlet. When plugging or unplugging the unit from the outlet, pull directly on the plug.
Never pull on the power cord.
2. Remove the ice storage basket.
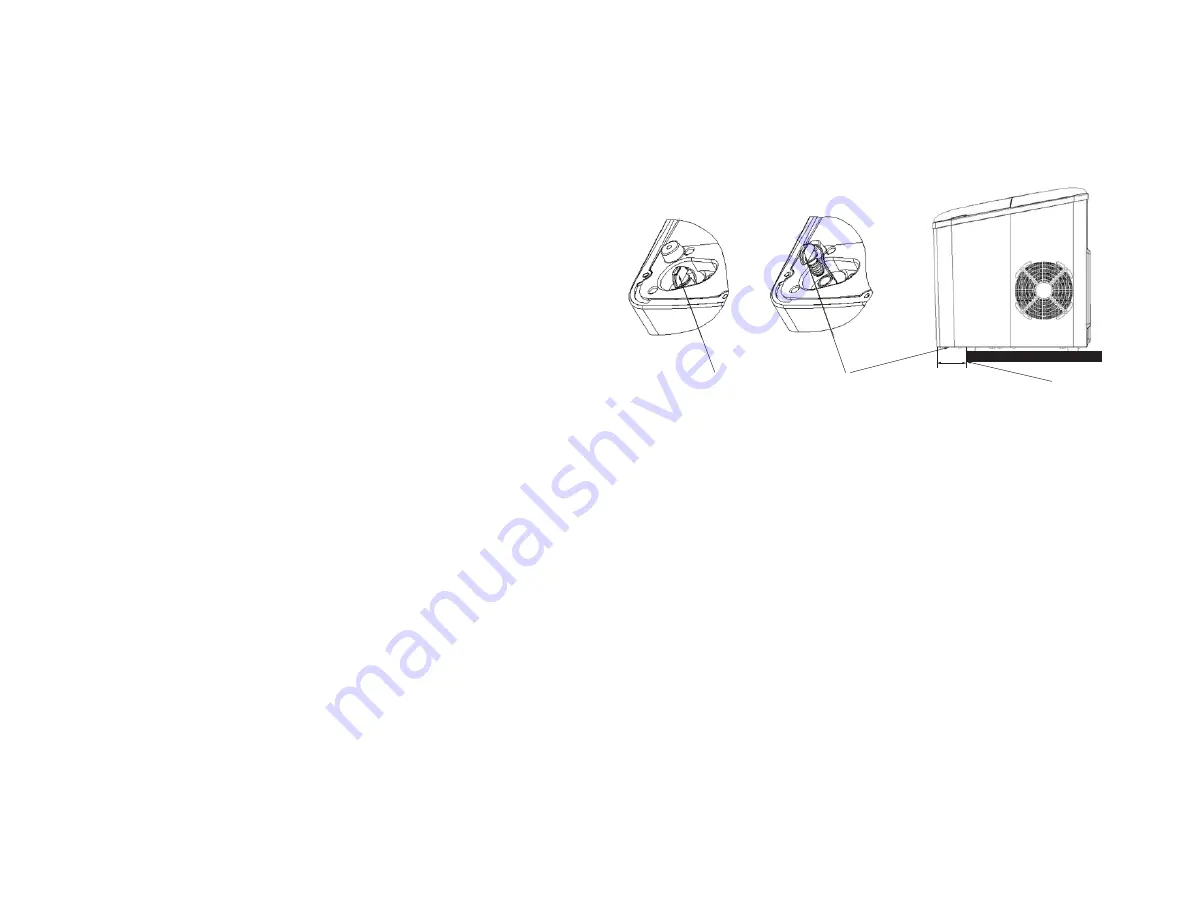
3. To drain out excess water, move the appliance forward 60mm away from the edge to be able
to reach and open the drain plug found at the bottom of the unit.
4. Use a mild detergent diluted in warm water and wipe with a soft towel or sponge.
WARNING Solvents, detergents and abrasives must never be used for cleaning.
5. Wipe the inner parts, such as the ice storage basket, water reservoir, water box, ice pusher, and
evaporator rods.
6. The outside of the icemaker should be cleaned regularly with a mild detergent solution, warm
water, and a soft cloth.
7. Dry the interior and exterior with a soft cloth.
8. To begin making ice once the unit has been cleaned, pour clean water into the water reservoir and
fill up to the level line follow operating instructions.
WARNING Never tilt or place the icemaker on its side, otherwise you must wait 10 hours for
compressor coolant to settle.
9. To ensure the cleanliness of the ice cubes, the water in the water storage tank should be replaced
every 24 hours.
10. When the machine is not in use or will not be used for an extended period of time, empty the water
reservoir completely, clean and let dry completely before storing.
Be sure to clean the icemaker regularly. To keep your ice tasting fresh, it is recommended to clean
the ice maker once per week.
“CLEAN” LED indicator lights up when the appliance needs to be cleaned. Fill the water reservoir with
cold water, making sure it doesn’t go above the MAX water level mark. Select the CLEAN function,
the water will wash the machine for 5 cycles.
4
5
table edge
drain plug
drain plug
2.4” / 60mm


