
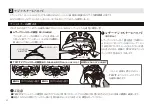


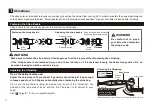


Hold the Adjuster around the mounting part firmly and move it up
and down among the three positions as illustrated (Fig.1, Fig.2.)
The fourth hole is for detaching the Adjuster (Fig.2).
In Adjustment, move the Adjuster slowly to avoid from accidental
detachment.
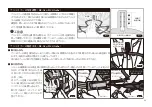
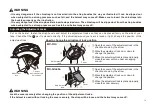
Hold firmly the Adjuster around the mounting part, move it to the fourth hole position, and twist it either right or
left a little as illustrated (Fig.3.) Be reminded that moving the mounting part past third slit to the fourth hole gets a
little tighter. Then, hold around the arm fixing base portion, pull the Adjuster slowly to detach the mounting part.
Place the thumb between the mounting part and the inner surface of the shell and lift it a little as illustrated in Fig.4.
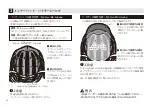
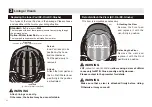
Align the Adjuster fourth hole with
the bump on the mounting part,
press the Adjuster hard and slide
it down. Press the bump on the tip
of the adjuster arm into the fixing
hole (basket) on each side. After
mounting the Adjuster, make sure
the chinstrap relative position to the
Adjuster as illustrated in Fig.5
Detach
Attach
Mounting part
Chinstrap
Chinstrap
Mounting part
Place the
thumb under
the part
and lift the
Adjuster a
little.
bump
アジャスター
The fourth hole
Adjustable at
3 angles
Fig. 1
Fig. 2
❶
❷
❸
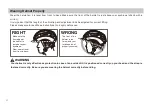
In adjustment, never fail to hold the mounting part, not other
part. Twisting forcefully moving the Adjuster may cause it
breakage. Please pay due caution in adjustment.
Detach/Attach the Adjusters (BC-Oro/BC-Glosbe)
Arranging the Adjuster Position (BC-Oro/BC-Glosbe)
Fig. 3
Fig. 4
Fig. 5
Let the chinstrap go
through the Adjuster as
illustrated.
Let the chinstrap go
through the Adjuster as
illustrated.
Adjuster
Move the
mounting hole to
the fourth hole
position and
twist a little.
Leather
Adjuster
TRIFIT-2
Adjuster
20
Adjuster
WARNING
Summary of Contents for BC-GLOSBE
Page 1: ...取扱説明書 Instruction Manual 2015年05月版 ...
Page 12: ...11 ...
Page 13: ...Instruction Manual English 12 ...


