background image


8. Assembly, Disassembly  


KISS 4U V2 – User's Guide (Version 1.01) 


3.


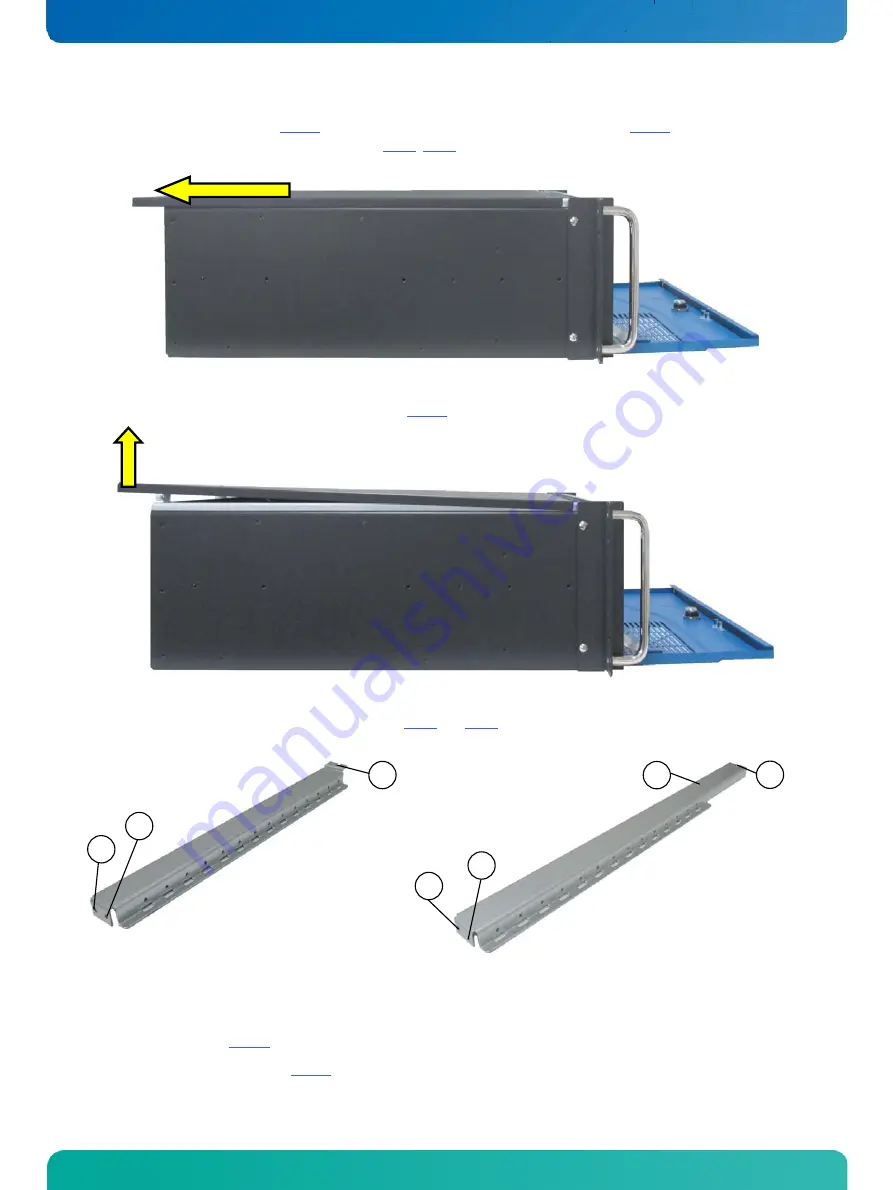
Pull the cover out a little bit (Fig. 30) to release the cover centering and fixing brackets (Fig. 26, pos.3 and pos. 4) 
from the retaining brackets of the chassis (see Fig. 8, Fig. 9, pos. 4).  


Fig. 30: Sliding back the cover will pull out the cover centering and fixing brackets from the retaining brackets of the chassis. 

4.


Lift the cover up (on the rear edge) and remove it (Fig. 31). 


Fig. 31: Removing the cover 

Two card hold down brackets and a retaining bracket (Fig. 8 and Fig. 9, pos 6, pos. 7 and pos. 8) secure the SBC card and 
the expansion cards to the corresponding expansion slots.  


Fig. 32:Card hold down bracket for long expansion cards 

Fig. 33: Card hold down bracket for long expansion cards 


1


Threaded holes for the externally accessible  
fastening screws (Fig. 25, pos. 5 and pos. 7)  

2


Holes for the internal bolts (Fig. 25, pos. 4 and  
pos. 6) 

3


Notches for the fastening screws that secure the card 
hold down brackets to the internal brackets 

4


Threaded hole for attaching the retaining bracket  


1

2

3

3

30


www.kontron.com


Summary of Contents for KISS 4U V2

Page 1: ...KISS 4U V2 User s Guide Version V1 01 0 0096 6766 If it s embedded it s Kontron...

Page 2: ...This page is intentionally left blank www kontron com...

Page 3: ...ement USA 10 5 3 EMC Compliance Canada 10 6 Scope of Delivery 11 6 1 Type Label and Product Identification 11 7 Product Description 12 7 1 Front Side 16 7 1 1 Interfaces on the Front Side 18 7 1 2 Con...

Page 4: ...he System Fans 40 10 3 Replacing the Lithium Battery 42 11 Slide Rails Option 43 12 Technical Data 44 12 1 Electrical Specifications 44 12 2 Mechanical Specifications 45 12 3 Environmental Specificati...

Page 5: ...side 19 Fig 16 Rear side of a KISS 4U V2 platform with motherboard and AC wide range PSU 21 Fig 17 Rear side of a KISS 4U V2 platform with Single Board Computer SBC and AC wide range PSU 22 Fig 18 Det...

Page 6: ...ter mat holder with inserted steel mesh guard and filte rmat 39 Fig 43 Steel mesh guard 39 Fig 44 Positioning of the steel mesh guard and of the filter mat in the filter mat holder for IP52 variant 39...

Page 7: ...cies for this reason Kontron Europe expressly informs the user that this manual only contains a general description of technical processes and instructions which may not be applicable in every individ...

Page 8: ...ponding warning notices are not observed This symbol indicates that the product or parts thereof may be damaged if the corresponding warning notices are not observed This symbol indicates general info...

Page 9: ...n of Accident Liability Obligation Kontron Europe shall be exempted from the statutory accident liability obligation if the user fails to observe the included document General Safety Instructions for...

Page 10: ...and locked Only when the cover is properly installed secured with the knurled screws on the rear and the cover fastening screw on the front and the access panel is locked with the key it is ensured t...

Page 11: ...3 Always handle electrostatic sensitive components by their edge or by their casing 4 Avoid contact with pins leads or circuitry 5 Turn off power and input signals before inserting and removing conne...

Page 12: ...s been tested and found to comply with the limits for a Class A digital device pursuant to Part 15 of the FCC Rules These limits are designed to provide reasonable protection against harmful interfere...

Page 13: ...Type Product Designation Product Identifikation KISS 4U V2 KISS 4U V2 xxxxxxxx y KISS 4U V2 System type The xxxxxxxxx group is replaced by up to a max 8 digit combination of numbers letter or space a...

Page 14: ...mputer designed for operation in harsh industrial environment The KISS 4U V2 platform is designed to be installed in 19 racks It is also offered as tower and desktop version Versions of the KISS 4U V2...

Page 15: ...washable filter mat which protects your system against dust and dirt is located on the front side of the system This filter mat can be replaced during operation The type label is attached to the righ...

Page 16: ...rives mounted on top of each other in a drive cage 6 Card hold down bracket for long expansion cards 7 Card hold down bracket for short expansion cards 8 Retaining bracket for the card hold down brack...

Page 17: ...Drives mounted on top of each other in a drive cage 6 Card hold down bracket for long expansion cards 7 Card hold down bracket for short expansion cards 8 Retaining bracket for the card hold down bra...

Page 18: ...uring lock mechanism 6 Light diffusers for the HDD LED and the power LED You can convert your rackmount system to a desktop unit by removing the two handle brackets one handle bracket on each side 4 3...

Page 19: ...n 4 2x USB 2 0 5 Securing lock mechanism two keys are provided 6 L4 one internal 3 5 drive bay for an internal SATA HDD or for a front accessible slim drive bay 7 L3 front accessible 5 25 drive bay sh...

Page 20: ...nd Fig 22 of the DC PSU on the rear of the system lights up Even when the system is turned off via the power button Fig 12 pos 3 there is still a standby voltage of 5 VSb on the motherboard or SBC War...

Page 21: ...filter mat holder and power button are not accessible The key should be kept somewhere where it is not accessible to unauthorized persons If USB devices are connected to the USB ports on the front of...

Page 22: ...V2 platform only with an additional inserted steel mesh guard and with closed front access panel 7 1 8 Drive Bays Depending on the ordered system configuration the system can be equipped with up to fi...

Page 23: ...nge PSU 1 AC power supply unit PSU 2 Power supply fan 3 AC input connector 4 On Off switch of the power supply unit 5 Interfaces of the SBC card or motherboard depending on the system configuration 6...

Page 24: ...ive knurled screws 9 Housing cover 10 Air exhaust openings 11 Externally accessible screw countersunk screw M3x6 for the fastening of the retaining bracket 12 Cut outs for optional customer specific i...

Page 25: ...supply is located on the rear side of the KISS 4U V2 platform On request the KISS 4U V2 platform can optionally be equipped with an AC wide rage PSU a redundant AC wide rage PSU or a DC PSU The integ...

Page 26: ...the system using the power button Fig 12 pos 3 or the ON OFF switch of this PSU there is still a standby voltage of 5 VSb on the motherboard or SBC 7 2 3 Grounding Stud Fig 16 pos 9 and Fig 17 pos 7...

Page 27: ...e view of a KISS 4U V2 platform 2 5x M4 tapped holes on both sides 3 Cover with captive knurled screws for mounting the cover 4 Internal bolt for the card hold down bracket for long expansion cards fu...

Page 28: ...ing two fixing brackets at the front side of the cover Fig 26 pos 3 and pos 4 two fixing brackets with captive knurled screws at the rear side of the cover Fig 26 pos 6 and the cover fastening screw F...

Page 29: ...y two temperature sensors One temperature sensor is located in the rear part near the ventilation openings and the second sensor is placed sideways in the mid part of the KISS 4U V2 platform 2 4 3 1 F...

Page 30: ...s have to be carried out by qualified personnel for this area Before removing the device cover ensure that your system is switched off and disconnected from the mains power supply Caution Energy hazar...

Page 31: ...loosen the cover fastening screw Fig 12 and Fig 13 pos 14 and Fig 28 on the front side the knurled screws Fig 16 and Fig 17 pos 8 and Fig 29 on the rear side 2 Loosen the knurled screws the cover fast...

Page 32: ...31 Removing the cover Two card hold down brackets and a retaining bracket Fig 8 and Fig 9 pos 6 pos 7 and pos 8 secure the SBC card and the expansion cards to the corresponding expansion slots Fig 32...

Page 33: ...re the retaining bracket see Fig 8 and Fig 9 pos 8 Fig 34 step 5 and 6 Lift the retaining bracket out Fig 34 step 7 Put the retaining bracket and the screws aside for later use 7 Loosen the internal a...

Page 34: ...d down brackets follow the steps in reversed order Tighten the corresponding screws half way at first Then tighten firmly the externally accessible screws and the retaining bracket Only then tighten f...

Page 35: ...eral Safety Instruction for IT Equipment The system has to be mounted and installed only by qualified personnel for this area familiar with the associated dangers Ensure there is sufficient air circul...

Page 36: ...ted at the rear side of the KISS 4U V2 system AC input connector Fig 35 KISS 4U V2 rear side with PE marked grounding stud AC input connector Fig 36 KISS 4U V2 rear side without PE marked grounding st...

Page 37: ...d wires according to the connectors of the screw terminal The minimum cross section of up to 4 00 mm2 for the 24VDC PSU and minimum cross section of up to 2 5 mm2 for the 48VDC PSU must be selected co...

Page 38: ...WS 7 PROFESSIONAL FOR EMBEDDED SYSTEMS operating systems The terms and condition for using the pre installed operating systems are defined in the document MICROSOFT SOFTWARE LICENSE TERMS This documen...

Page 39: ...stem Fig 37 Detail Filter mat holder on the front side of the KISS 4U V2 platform To replace the filter mat proceed as follows 1 Open the front access panel Fig 37 pos 5 2 Loosen the knurled screw tha...

Page 40: ...8 pos 1 at the fan slide in module Defective components may only be replaced by Kontron original spare parts Air filter mat part number 1035 6957 5 Fig 38 Detail without filter mat at the front side F...

Page 41: ...fter cleaning into the filter mat holder Fig 39 Reinsert the steel mesh guard The positioning of the protective guard and the filter mat in the filter mat holder is shown in Fig 44 Reattach the filter...

Page 42: ...replace fan slide in module proceed as follows 1 Remove the filter mat holder as described in chapter 10 1 Cleaning the Filter Mat step 1 to 3 and put it aside for later reassembly 2 Loosen the two k...

Page 43: ...apter 10 1 Cleaning the Filter Mat step 7 and step 8 see also Fig 48 7 Insert the positioning plate Fig 47 and Fig 48 pos 4 into the fan compartment Fig 46 pos 5 behind the fixing plate Fig 45 and Fig...

Page 44: ...tery into the battery holder 5 Pay attention to the polarity of the battery 6 The lithium battery must be replaced with an identical battery or a battery type recommended by Kontron Europe 7 Reinstall...

Page 45: ...1051 7200 Fig 49 Attaching the inner part to a KISS 4U V2 platform Fig 50 KISS 4U V2 platform with slide rail in pulled out position Fig 51 KISS 4U V2 platform with slide rail in pushed in position Le...

Page 46: ...ms Configuration Guides Lithium Battery See manual of the installed motherboard SBC Rated Voltage Range See type label KISS 4U V2 System type The xxxxxxxxx group is replaced by up to a max 8 digit com...

Page 47: ...midity 0 50 C 20 90 not condensing at 55 C 131 F at 10 POH per month 32 122 F 20 90 not condensing 55 C 131 F at 10 POH per month Storage Transport Temperature Relative Humidity 20 70 C 10 90 not cond...

Page 48: ...EC Elektrical Safety Harmonized Standards EUROPE Information technology equipment Safety Part 1 General requirements EN 60950 1 2006 A11 2009 A1 2010 A12 2011 AC 2011 U S A CANADA to meet UL60950 1 20...

Page 49: ...tor 1 DCD Data Carrier Detect 2 RXD Receive Data 3 TXD Transmit Data 4 DTR Data Terminal Ready 5 GND Signal Ground 6 DSR Data Set Ready 7 RTS Request to Send 8 CTS Clear to Send 9 RI Ring Indicator 13...

Page 50: ...nnector Type A Version 2 0 1 VCC 2 Data 3 Data 4 GND 13 1 4 PS 2 Keyboard Connector Pin Signal Name 6 pin Mini DIN Connector 1 Keyboard Data 2 N C 3 GND 4 5 V 5 Keyboard Clock 6 V C 13 1 5 PS 2 Mouse...

Page 51: ...ide Version 1 01 13 1 6 Parallel Port LPT Pin Signal Name 25 pin D SUB Connector female 1 STROBE 2 DATA0 3 DATA1 4 DATA2 5 DATA3 6 DATA4 7 DATA5 8 DATA6 9 DATA7 10 ACKN 11 BUSY 12 PE 13 SELECT 14 AUTO...

Page 52: ...al Authorization from our website www kontron com Support RMA Information contact our Customer Service department to obtain an RMA No e Mail service kontron com 2 Ensure that you have received an RMA...

Reviews: