background image


GETTING STARTED 
 

Install a hard disk drive into your DVR. 
Connect cameras (up to 4) to DVR. 
Connect other peripheral devices (mouse, external motion sensors or alarm) if necessary. And 
PS/2 Mouse must be connected to DVR before startup system. 
Plug the power cord into the power jack on the wall. 
Start TV Monitoring and Recording. 

  Make sure that a hard disk drive and camera(s) are properly installed. 

  The hard disk (IDE) jumper setting must be set to “master” jumper setting. 

  If the power is turned off while recording (i.e. a power failure), the DVR will enter “Power 

Recovery” modes at start up, detect that it has been shut down, and then reinitiate the 
recording process. 


HARDWARE SETUP 
 
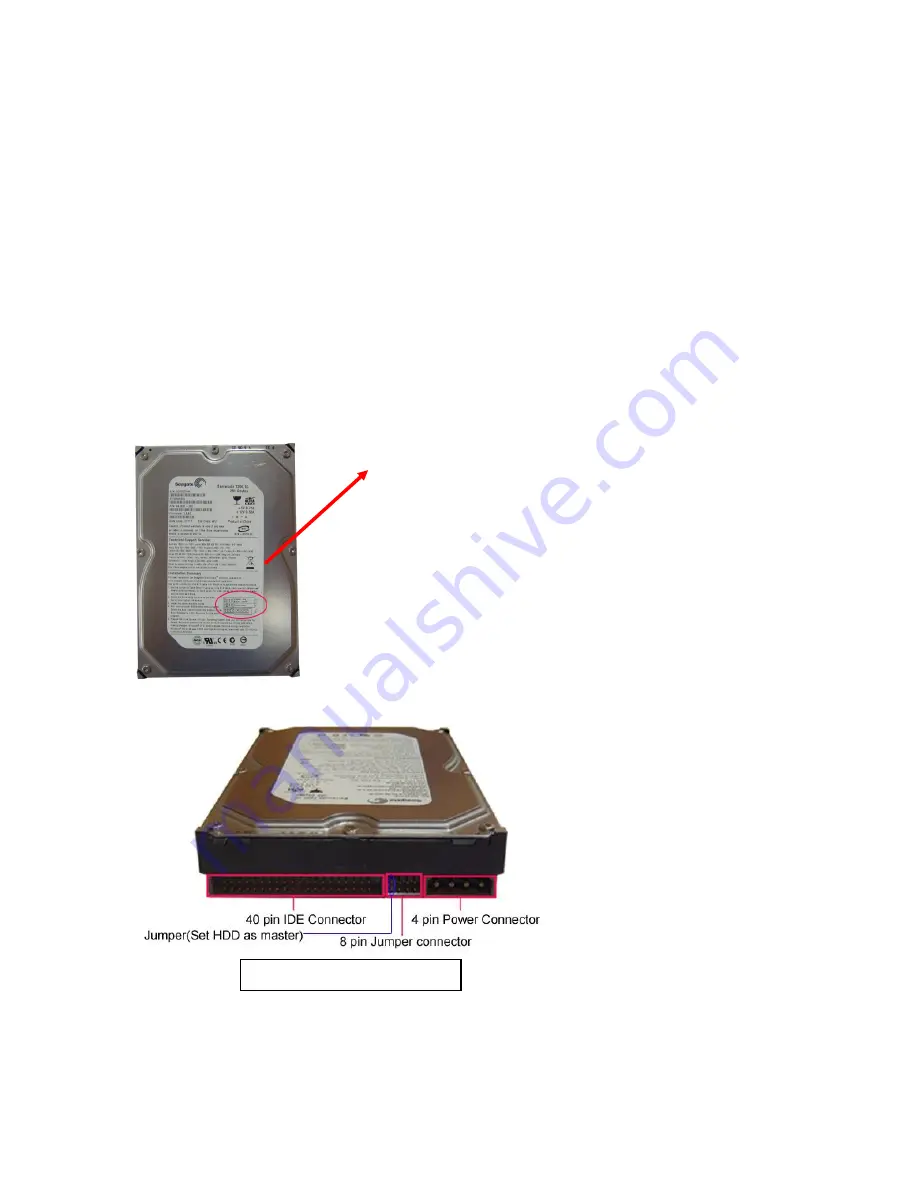
IDE Hard Disk Drive Installation 

(A) Make sure that HDD Jumper setting as “Master” 

Before installing hard drive, set jumper as “Master”. 
The master jumper setting varies depending on the hard 
drive manufactures. Refer to manufacture’s manual for 
master jumper setting. For example, the model of HDD 
is Seagate.  


(B) Connect the ribbon cable (IDE) cable & power cable 


Back side of hard disk 

Summary of Contents for SEC-DVRMON20

Page 1: ...monitor For full details of using the DVR monitor refer to advanced manual MANUAL ANLEITUNG MODE D EMPLOI GEBRUIKSAANWIJZING MANUALE MANUAL DE USO HASZN LATI TMUTAT K YTT OHJE BRUKSANVISNING N VOD K P...

Page 2: ...screen Then short Press Menu Power to move the cursor leftwards or rightwards to select the option that user want to modify Press UP of Down to move the cursor upwards or downwards Then press or to in...

Page 3: ...l 1 CH1 CH2 CH3 CH4 QUAD Channel selection of QUAD display Also cursor buttons for navigation through the DVR menu 2 REWIND REW Rewind picture during playback To stop rewind press the REW button again...

Page 4: ...SCAPE Enter the menu Escape for exit the menu 12 UP To select a field in the menu upwards 13 SELECT SEL EDIT To change values in main menu or sub menu setting 14 DOWN To select a field in the menu dow...

Page 5: ...ew Audio2 IN is audio for CH2 and only hearable if CH2 is selected and not if quad view is chosen 6 PS2 MOUSE Connection for mouse included 7 HDD POSITION Position for HDD installing remove the 4 scre...

Page 6: ...Quad view 6 Z Rewind or zoom 7 F Play record list or focus 8 Z Forward or zoom or channel auto sequence switch 9 Manual recording or stop manual recording or Level scan 10 F Pause or focus 11 Stop pla...

Page 7: ...ting must be set to master jumper setting If the power is turned off while recording i e a power failure the DVR will enter Power Recovery modes at start up detect that it has been shut down and then...

Page 8: ...d be transferred to your TV set or monitor Connect VIDEO IN of the monitor to VIDEO OUT of the DVR system Camera Connection Connect between VIDEO IN of your DVR and VIDEO OUT of camera with video cabl...

Page 9: ...dure for sensor install action is as shown below After you install sensor s change the recording mode as Sensor record or MD Sensor record on RECORD SCHEDULE in the DVR menu to enable sensor recording...

Page 10: ...for HDD formatting before a system starts to run Below Fig Choose format option pressing PLAY button Below is the information of input output voltage for the power adapter Input AC 100 240V 50 60Hz 1...

Page 11: ...on to click the order of Account and input correct account Then left click the order of Password and input correct password At last left click Login to enter system There is one factory preset login a...

Page 12: ...panel or remote control The Mouse Control Move the mouse up or down to move the cursor Hold a left mouse click button to change the settings Click a right mouse to previous CAMERA Use this option for...

Page 13: ...ck icon to decrease the record frame rate for each channel If you make the record frame rate off the channel won t record B RECORD QUALITY Choose record quality among 1 2 3 The best record quality is...

Page 14: ...DVR front panel or remote control then move the prompt to enlarge area CH1 for upwards CH2 for downwards CH3 for leftwards CH4 for rightwards and then press SEL to adjust video record method Using Mou...

Page 15: ...ress SEL once to pitch on the area press SEL twice to cancel the area CH1 Up CH2 Down CH3 Left CH4 Right Using Mouse button While holding a left mouse click button move the mouse to select deselect or...

Page 16: ...eave the mute OFF SYSTEM Fig c Fig d In this menu you can see the information of the hard disk drive installed on the system change the system password adjust keypad tone browser event list or adjust...

Page 17: ...e hard disk drive all the video data stored on the hard disk drive will be deleted Remind that the system has no restore option once the hard drive is formatted When you choose this option it will ask...

Page 18: ...r to change the highlighted option to Account and then press SEL to call up Account Password as shown All numbers letters and sign in the pane can be used as user account or password Press SEL to inpu...

Page 19: ...be cleared when you logout the system If you choose OFF the account information will be kept when you logout the system Logout Logout can be set as 1 10 in minutes Off It decides how much time the sy...

Page 20: ...number CH3 for Page Up or CH4 for Page Down key on the front panel or remote control select the event that you want to playback and press PLAY button Another way move the mouse up and down or click t...

Page 21: ...is consistent with Dome s You can make use of buttons to control dome and save the preset If user wants to call preset user can modify the value of preset to come true Press Select button to finish th...

Page 22: ...he system is upgrade you must stop recording LANGUAGE Our system supports multi language OSD As a whole it includes two types of language system western and east The language is provided with user s r...

Page 23: ...r the video data image recorded on the hard drive to USB memory stick drive Before you back up a stream of video data have the USB memory stick to be ready and attach them into DVR system In order to...

Page 24: ...your PC when it s done Press PLAY button to continue with a system To view the video image saved on back up devices on the computer you need our software provided with this package RECORDING LENGTH V...

Page 25: ...ATA ON PC Install 1 Put the Driver Program CD in your CD ROM 2 Go for installing by setup 3 Set up the install directory 4 Execute Start Program VxViewer Vx4SLPlayer Program Interface Double click ico...

Page 26: ...n VVF format 1 Open File 2 Fast Backward 3 Play Reverse 4 Previous Frame 5 Pause 6 Next Frame 7 Play 8 Fast forward 9 Still Capture 10 Split 1 11 Split 4 12 Volume Scroll Bar 13 Mute On Off 14 Playing...

Page 27: ...top A The client window will always display on top of all the windows Use DirectDraw If your PC s graphic card supports DirectDraw images can be displayed via the method DirectDraw on your PC s graphi...

Page 28: ...he selects is matching with his computer whether or not Or else the transposition AVI file will be failed possibly 2 1 Audio The audio will be backup if the video data include audio 2 Audio The audio...

Page 29: ...layback the record data in the HDD directly through the client software User can install the HDD to PC directly Click the option Open Disk and there will be a dialog of Disk Select Select the HDD incl...

Page 30: ...640 224 PAL 640 272 Compression Method Enhanced MJPEG Video Quality Low 13K Bytes Normal 16K Bytes High 20K Bytes HDD Support Over 1 0TBytes SATA or IDE ATA 100 Interface HDD 1 Sensor Alarm 4 Input No...

Page 31: ...em Connect Sketch Map Fitting Come Along With DVR 1 Power Adapter 1pcs 2 Power Cord 1pcs 3 Remote Control Optional 1pcs 4 User Manual 1pcs 5 USB Drive CD 1pcs 6 Mouse Optional 1pcs 7 Batteries of Remo...

Page 32: ...doesn t operate normally For example in case of PC it might not cause any problem under this kind of situation because it is immune to process this kind of exceptional cases However in case of our pro...

Page 33: ...of this product General Designs and specifications are subject to change without notice All logos brands and product names are trademarks or registered trademarks of their respective holders and are...

Page 34: ...l Mod le Modello Modelo T pusa Malli SEC DVRMON20 Description Beschreibung Description Omschrijving Descrizione Descripci n Megnevez se Kuvaus Beskrivning Popis Descriere EN 10 MONITOR WITH INTEGRATED...

Reviews: