- Load bearing weight: Microphone
- The handling of a fishing pole microphone can bear significant risks for: a. operator, b. persons and
-
c. objects within reach (structures, lamps etc.). Careful handling is indispensable.
- We especially warn against the risks associated with lightening and electrical cables.
- Other fishing pole microphones that are nearby may also be a source of danger,
-
e.g. the risk of tripping if it is not properly stowed. After use, the tube combination should be retracted
-
and securely stored away immediately.
- To avoid the unintended extension or retraction of the tube, only one clamp element is always in the
-
open position and the tube can be extended or retracted.
- All clamping elements must be in a closed position during use, transport and storage.
- When using an internal cable, please ensure that the cable opening is not damaged. Cable is not included
-
with the delivery. Because only a segment of the users work with cables, the rubber cap does not come
-
with a hole in it, if needed cut a hole into the thin wall (ø 12 mm) of the cap.
-
NOTE: Please protect yourself from the risk of cuts.
- The operator must be able to use the fishing pole microphone in a responsible manner.
- Attach the microphone after the tube has been extended - and remove the microphone prior to retracting the tube.
- The carbon tubes are very strong and sturdy. However, improper use and excessive force can result in
-
damage to the tubes. Damaged tubes may not be used in any case, because:
-
a. possible sharp edges can result in painful injuries for the operators or third parties,
-
b. the perfect functioning of the pole is no longer guaranteed.
- The fishing pole microphone comes pre-assembled and can be used at once.
- The carbon material unifies strength and sturdiness at a minimal weight.
- The cable opening provides for the use of a cable that is threaded inside the tube.
- A basic rule states that when setting up the fishing pole microphone - attach the microphone as a last step -
-
and when putting it away removing the microphone is a first step.
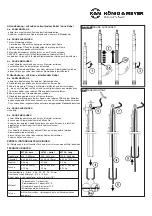
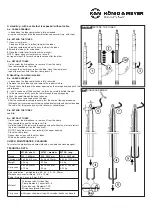
- The 3/8" microphone threaded connector is protected by a rubber cap (see
X
).
-
We recommend that the cap is placed on the threaded connector after each use.
- Screw on the microphone i.e. the microphone holder (see
Y
) onto the 3/8" threaded bolt as far as it will go.
-
-
This is important for two reasons:
-
1. The microphone sits snuggly on the threaded bolt and does not twist out of position.
-
2. The threaded bolt is protected against bending forces and damage caused by dirt and abrasion.
- The variable clamp lever can be adjusted individually (see
Z
).
Thank you for choosing this product. The instructions provide directions to all of the important set up
and handling steps. We recommend you keep these instructions for future reference.
KÖNIG & MEYER
GmbH & Co. KG
Kiesweg 2, 97877 Wertheim, www.k-m.de
23780-000-55 Rev.04 23785-000-55 Rev.04 23790-000-55 Rev.03 03-80-325-00 8/15
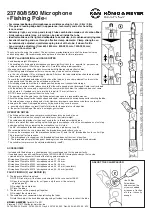
23780/85/90 Microphone
»Fishing Pole«
- For manual positioning of microphones over distances of up to 1.8 m / 2.8 m / 3.8 m
- This pole is leading edge both in appearance, technically and as far handling
-
is concerned
- Extremely light, very strong and sturdy 5 tube combination made out of carbon fiber
- A microphone cable (max. ø 6 mm) can be placed inside the tube
- Ideal for mobile use: it is light and collapsible to a small size, incl. cushioned carrying case
- Excellent handling and use through effective clamp elements: Clamp strength can
-
be individually adjusted; quiet telescoping in/out of the tube; it doesn't rattle
- Long variable adjustment from 600-1830 mm, 800-2830 mm, 1000-3830 mm;
-
Threaded Connector: 3/8"
SAFETY and HANDLING and USAGE NOTES
OPERATOR NOTES
- Included with the delivery is a shoulder bag that is cushioned and fits the pole perfectly.
- If needed you can purchase different sizes of KÖNIG & MEYER microphone clamps, that can be
-
screwed onto the connector thread of the fishing pole microphone:
-
Microphone Clamp No. 85035: microphone size ø 17 - 22 mm,
-
Microphone Clamp No. 85050: microphone size ø 22 - 28 mm,
-
Microphone Clamp No. 85055: microphone size ø 28 - 34 mm,
-
Microphone Clamp No. 85060: microphone size ø 34 - 40 mm (cone form),
-
Microphone Clamp No. 85070: microphone size ø 34 - 40 mm (parallel)
ACCESSORIES
F: The tubes are difficult to extend
F:
R: NOTE: Risk of injury if the tubes are damaged. In this case contact K&M.
F:
R: Open the clamp handle as far as it goes, only then can it be set easily
F: R:
adjusted (see
Z
).
F:
R: Re-adjust the clamp lever
F:
R: Clean the tubes
F: The tubes cannot be properly put together
F:
R: Re-adjust the clamp lever
F: The cable does not cooperate when retracting the tubes
F:
R: Hold the cable at the base tube opening and pull without any force to retract the tube
FAULT-FINDING (F) and REPAIR (R)
ADJUST THE CLAMP LEVER
Use Phillips
Screwdriver
and unscrew the
screw as needed
or loosen -a fraction
of a turn - is usually
enough.


