Konica Minolta bizhub pro 1100 Additional Information Download Page 27

4-4

bizhub PRO 1100

Shortcut Key Register

4

4.1

20

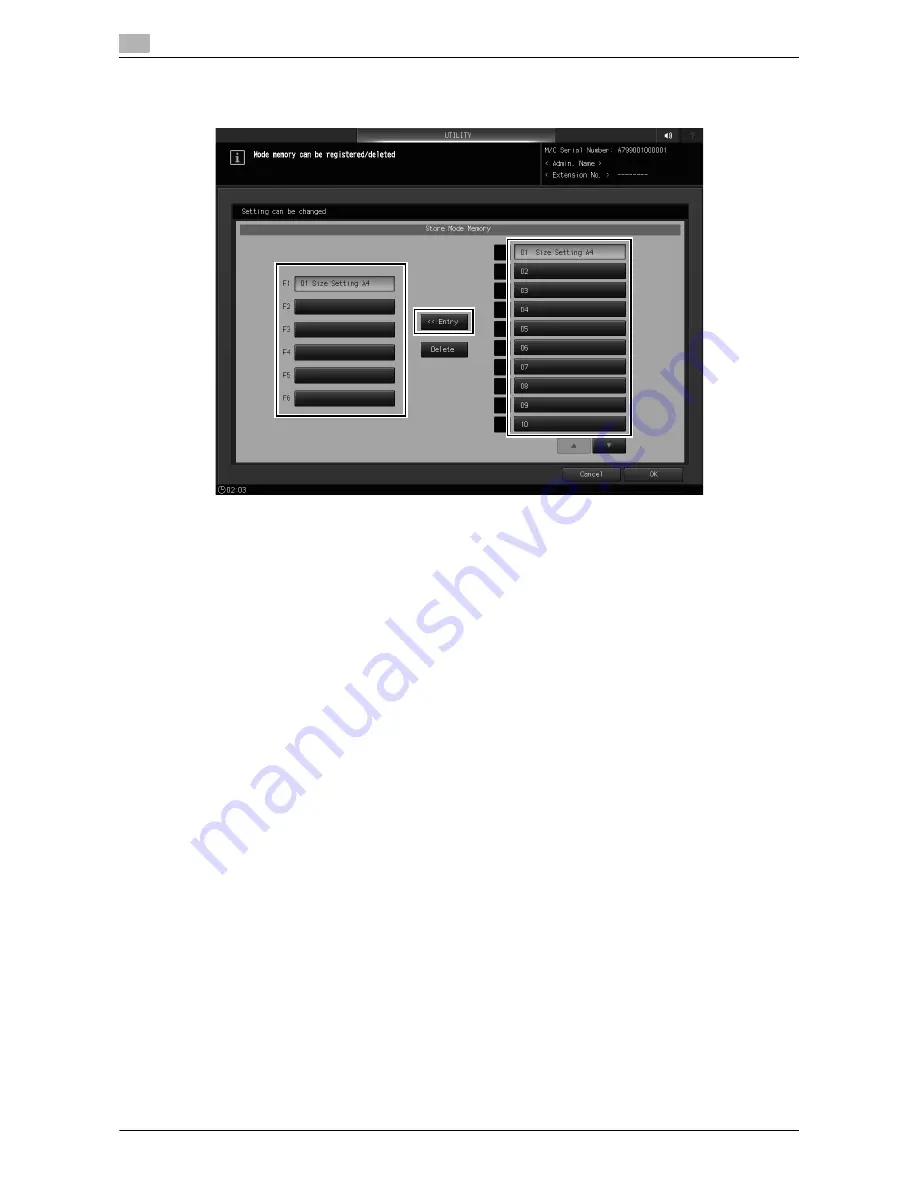
To display Store Mode Memory shortcut keys at the bottom of the [STORE] screen, press [Store Mode 
Memory] to display the registration screen.

%

Select the desired option from [F1] to [F6] as a shortcut key you want to register Store Mode Mem-
ory in, select the desired option from [01] to [30] as a button that has a store condition registered, 
then press [<<Entry].

%

To display buttons [11] to [20] or [21] to [30], press [

,

] or [

+

].

NOTICE

Store conditions must be registered in advance. For the setting procedure, refer to [Job Operations] 

)


[Hold Job and Save on HDD] 

)

 [STORE Screen] 

)

 [Mode Memory: Register/Call Save Settings] 

)

 [Stor-

ing save conditions] in the HTML User's Guide.

21

Press [OK] to complete the setting.

%

To cancel the change, press [Cancel]. In either case, the display returns to the [Shortcut Key Reg-
ister Menu] screen.

Summary of Contents for bizhub pro 1100

Page 1: ......

Page 2: ... 6 2 Audit Log Manual Transmission 5 6 5 7 Items Saved in Audit Log 5 8 5 7 1 Table of items saved in audit log 5 8 5 8 Possible Troubles in Outputting all Audit Log Data to USB Flash Drive 5 9 6 Others 6 1 Default Settings for 2 Sided Printing 6 2 6 1 1 Layout 6 2 6 1 2 Installing the PS Plug in driver 6 2 6 2 Default Punch Setting 6 3 6 3 Hot Folder Setting 6 3 6 4 Software Switch Setting 6 4 6 ...

Page 3: ...Contents 2 bizhub PRO 1100 6 11 Scan Meas adjustment 6 12 7 Trademarks and Copyrights 7 1 SOFTWARE LICENSE AGREEMENT 7 2 ...

Page 4: ...1 Copy Job Output ...

Page 5: ...l jobs with the same contents The punch setting in output mode cannot be configured for each job However you can specify the punched or unpunched mode to output jobs by setting Pre Punched in Paper Setting for the tray in which the punched sheets are loaded and then specifying the paper tray for each job When changing the output mode or the number of copies after loading has been completed press M...

Page 6: ...bizhub PRO 1100 1 3 1 1 Application 1 1 Press Application on the COPY screen The Application screen is displayed 2 Press Program Job The incompatible function keys will be dimmed to show inactivity ...

Page 7: ...he Program Job icon and shortcut key are displayed under Application on the COPY screen And Separate Scan is automatically selected 4 Position the original 5 Press Start on the control panel The original is loaded When loading is completed the Program Job Edit screen is displayed ...

Page 8: ... Adjustment can be specified as copy condi tions For the setting procedure refer to Saving and Editing Jobs Hold Job and Save on HDD Hold Job Screen Job Ticket Edit Screen in the HTML User s Guide 7 Press either Bunch Done or Done Division Bunch Done Press this button to combine the loaded jobs and define them as a single job ...

Page 9: ...el Press this button to cancel all the loaded jobs and return to the COPY screen 8 Repeat steps 4 to 7 to load all the originals When the last original is loaded press Complete All Output processing starts To change copy conditions after combining all jobs press Complete Edit to display the Program Job Edit screen as shown below After the change has been completed press Complete All ...

Page 10: ...you press Bunch Done or Done Division without pressing Complete All or you press Bunch Done on the Program Job Edit screen that is displayed by pressing Complete Edit press Mode Check on the control panel to return to the Program Job Edit screen Press Complete All to output job data ...

Page 11: ...1 8 bizhub PRO 1100 Application 1 1 1 MEMO ...

Page 12: ...2 Paper Setting ...

Page 13: ... guide Correction po sition Description HTML User s Guide Settings and Adjustments Utility Counter User Setting System Setting Paper Tray Setting Paper Setting Registering the Paper Condi tions Adding Editing the Paper Con ditions Registration Deleting the Paper Conditions Importing Paper Setting Data Exporting Paper Setting Data Step 2 in items above Operation correction by addition of an operati...

Page 14: ... 1100 2 3 2 1 Paper Setting Registering the Paper Conditions 2 3 Press Paper Profile Setting The Register Delete Paper Setting screen is displayed After this read the user s guide while shifting steps one by one ...

Page 15: ...2 4 bizhub PRO 1100 Paper Setting Registering the Paper Conditions 2 2 1 MEMO ...

Page 16: ...3 Paper Tray Setting ...

Page 17: ...delete or search for a registered profile on each screen To add a new preset profile to this machine a service setting is required For details contact your service representative Adding the Preset Profile to the Paper Profile 1 Press Utility Counter on the control panel to display UTILITY then press User Setting to display the User Setting Menu screen 2 On the User Setting Menu screen press System...

Page 18: ... 1100 3 3 3 1 Paper Tray Setting 3 3 Press Preset Profile Management The Preset Profile Management screen is displayed 4 Select the preset profiles to add then press Add Profile The preset profiles are marked by ...

Page 19: ...ess OK Deleting the Preset Profiles 1 Press Utility Counter on the control panel to display UTILITY then press User Setting to display the User Setting Menu screen 2 On the User Setting Menu screen press System Setting Paper Tray Setting Paper Setting ...

Page 20: ...bizhub PRO 1100 3 5 3 1 Paper Tray Setting 3 3 Press Preset Profile Management The Preset Profile Management screen is displayed 4 Select the preset profiles to delete then press Delete ...

Page 21: ...hing for the Preset Profiles or Paper Profiles 1 Press Utility Counter on the control panel to display UTILITY then press User Setting to display the User Setting Menu screen 2 On the User Setting Menu screen press System Setting Paper Tray Setting Paper Setting ...

Page 22: ... The Preset Profile Management screen is displayed 4 Press Preset Profile or Paper Profile to suit the profile to be searched The preset profiles are marked by The paper profile added from the preset profile is also marked by If the profile is edited and saved it is not marked by ...

Page 23: ...3 8 bizhub PRO 1100 Paper Tray Setting 3 3 1 5 Press SearchCondition The Profile Search Condition screen is displayed 6 Specify search conditions then press Search ...

Page 24: ...4 Shortcut Key Register ...

Page 25: ... User s guide Addition posi tion Description HTML User s Guide Settings and Adjustments Utility Counter User Setting System Setting Shortcut Key Register Registering the Customized Operation Description under the title Display up to six Copy Mode Memory shortcut keys at the bot tom of the COPY screen Display up to six Scan Mode Memory shortcut keys at the bot tom of the SCAN screen Display up to s...

Page 26: ...creen press Scan Mode Memory to display the registration screen Select the desired option from F1 to F6 as a shortcut key to register Scan Mode Memory in select the desired option from 01 to 30 as a button that has a scan condition registered then press Entry To display buttons 11 to 20 or 21 to 30 press or NOTICE Scan conditions must be registered in advance For the setting procedure refer to SCA...

Page 27: ...ion from 01 to 30 as a button that has a store condition registered then press Entry To display buttons 11 to 20 or 21 to 30 press or NOTICE Store conditions must be registered in advance For the setting procedure refer to Job Operations Hold Job and Save on HDD STORE Screen Mode Memory Register Call Save Settings Stor ing save conditions in the HTML User s Guide 21 Press OK to complete the settin...

Page 28: ...5 Security ...

Page 29: ...or password and account password the machine recog nizes the last entered character as the eighth character if 8 or more characters are entered If the account password is specified with eight or more characters the last entered character will be identified as the eighth character User s guide Deletion posi tion Incorrect Correct HTML User s Guide Security Enhanced Security Mode Overview of Enhance...

Page 30: ... customer engineer 1 Press Utility Counter on the control panel to display UTILITY then press Administrator Setting to display the Administrator Setting Menu screen 2 On the Administrator Setting Menu screen press Security Setting Service Login Allow Setting The Service Login Allow Setting screen is displayed User s guide Addition posi tion Description HTML User s Guide Security Enhanced Security ...

Page 31: ...s to 1 Press Utility Counter on the control panel to display UTILITY then press Administrator Setting to display the Administrator Setting Menu screen User s guide Deletion posi tion Description HTML User s Guide Security Enhanced Security Mode Audit Log Output ting audit log Output Audit Log Audit log printing and file output became unavailable User s guide Addition posi tion Description HTML Use...

Page 32: ...ecurity Setting Audit Log Setting Audit Log Address Server 3 Press ON in Audit Log Trans then configure the WebDAV server setting For the WebDAV server setting refer to Settings and Adjustments Utility Counter Scan Address Register Registering a WebDAV Server as a Destination in the HTML User s Guide ...

Page 33: ... 6 4 Press OK 5 6 2 Audit Log Manual Transmission Audit logs are automatically sent in general use but they can be sent manually if necessary 1 On the Administrator Setting Menu screen press Security Setting Audit Log Setting Audit Log Manual Trans ...

Page 34: ...bizhub PRO 1100 5 7 5 6 Transmitting Audit Log 5 2 Press Transmission 3 Press Yes When message Transmitted audit log is displayed transmission is completed ...

Page 35: ... ID OK 9 Delete user by administrator User ID OK 10 Change user attribute by administrator User ID OK 12 Change the user attributes according to the user change the user password etc User ID OK Use of management functions and change of security setting 3 Set Change Enhanced Security mode Administrator ID OK NG 19 Change HDD lock password Administrator ID OK 41 Change the password rules setting Adm...

Page 36: ...d of job and operations 16 Delete store job User ID OK 21 Print copy job User ID Unregistered ID OK NG 22 Store copy job User ID Unregistered ID OK NG 23 Print print job User ID Unregistered ID OK NG 24 Store print job User ID Unregistered ID OK NG 25 Execute scan job User ID Unregistered ID OK NG 26 Print store job User ID Unregistered ID OK NG 27 Change or restore store job move or copy User ID ...

Page 37: ...5 10 bizhub PRO 1100 Possible Troubles in Outputting all Audit Log Data to USB Flash Drive 5 5 8 MEMO ...

Page 38: ...6 Others ...

Page 39: ...Layout In the table 2 Sided Descrip tion Set this to perform a 2 sided printing The default setting for 2 Sided is On Set this to perform a 2 sided printing Whether to set the de fault of 2 Sided to On or Off varies depending on the option that is selected when the driver is installed User s guide Addition posi tion Description HTML User s Guide Settings and Adjustments Initial Settings and Adjust...

Page 40: ...ltiple options are provided as the number of punch holes the default number of punch holes can be changed For details con tact your service representative HTML User s Guide COPY Output Setting Using Z Folding Unit ZU 608 Punch Punching File Holes in Copies Under Important beneath the title User s guide Addition position Description HTML User s Guide Settings and Adjustments Utility Counter Adminis...

Page 41: ... supported Setting value Off Do not support the PostScript Level 1 commands On Support the PostScript Level 1 commands Important If turned On the following commands for Level 1 become available lettertray legaltray ledgertray a3tray a4tray b5tray 11 e 17tray copies Important After the change turn OFF On the sub power switch to fix the setting 110 On the direct printing for a specific PS job the nu...

Page 42: ...is different from that for the Plug in driver Version 3 0 or later All the printing po sitions are the same in PSDP Job Cen tro and the Plug in driver You can use this switch to select the setting information or color bar printing position Setting value Off The setting information or color bar printing position is the same as that for the Plug in driver Default position from version 3 0 On The set...

Page 43: ...can before making the first scan When the last scan is completed cancel Separate Scan Bind Direction Right Left Top Direction Normal Left Upside Down Right Type Text Photo Print Text Photo Photo Photo Print Photo Photo Text Dot Matrix Special Normal Same Width Different Width Z Folded User s guide Correction po sition Description HTML User s Guide SCAN Scanning Functions of Image Controller Overvi...

Page 44: ...number of original pages OK Applies the setting Cancel Cancels the setting Default Set Returns the setting to the default dReference For details refer to COPY Basic Setting Setting Originals If blank pages are not correctly detected while the original is scanned with BlankPage Removal enabled ad just the level to detect blank pages For details refer to 6 5 2 Copy Setting Setting the Various Operat...

Page 45: ...ing At the end of table Addition of function For details refer to the following HTML User s Guide Settings and Adjustments Utility Counter User Setting Copy Setting Setting the Var ious Operations When Copying At the end of table BlankSheetDetectionLevelAdj Adjust the level to detect blank pages when BlankPage Re moval is enabled 2 1 0 1 2 User s guide Correction posi tion Description HTML User s ...

Page 46: ... recalled is known press No Recall You can enter the profile number and easily recall the profile for setting 6 Press Recall Change Set or New Setting Pressing Recall displays the Recall screen on which registered paper specifications can be selected Proceed to step 7 Pressing Change Set or New Setting displays the Change IndividualSet screen to change the spec ifications individually Proceed to s...

Page 47: ...of the Register button on the Paper Setting screen For details refer to the following HTML User s Guide Utilize useful functions Reg istering Paper Profile Paper Cat alog Paper Profile Setting and Registering the Paper in the Change Individual Set Screen Registering paper setting to pa per profile Step 6 User s guide Correction po sition Incorrect Correct HTML User s Guide Settings and Adjustments...

Page 48: ...nts Utility Counter Scan Ad dress Register Registering an SMB Server as a Destination Supplemental statement under lead sentence You can register up to 30 SMB servers You can register up to 150 SMB servers User s guide Correction posi tion Description HTML User s Guide Settings and Adjustments Utility Counter User Setting System Setting Service Port Device Setting Selecting Whether or Not to Use a...

Page 49: ... Setting Setting the Default Scan Conditions Store Initial Setting Set the ini tial conditions for file saving Step 3 in the item above Press ADF to select the ADF mode ADF is pressed in Initial Setting therefore this explanation is de leted because it is unnecessary User s guide Addition position Incorrect Correct HTML User s Guide Machine Information MACHINE Screen Both Sides Adj Procedure of Bo...

Page 50: ...7 Trademarks and Copyrights ...

Page 51: ...ware without specific prior written permission THIS SOFTWARE IS PROVIDED BY THE COPYRIGHT HOLDERS AND CONTRIBUTORS AS IS AND ANY EXPRESS OR IMPLIED WARRANTIES INCLUDING BUT NOT LIMITED TO THE IMPLIED WARRANTIES OF MERCHANTABILITY AND FITNESS FOR A PARTICULAR PURPOSE ARE DISCLAIMED IN NO EVENT SHALL Intel Corporation OR THE CONTRIBUTORS BE LIABLE FOR ANY DIRECT INDIRECT INCIDENTAL SPECIAL EXEMPLARY...

Page 52: ...t This product includes software developed by the University of California Berkeley and its contributors 4 Neither the name of the University nor the names of its contributors may be used to endorse or promote products derived from this software without specific prior written permission THIS SOFTWARE IS PROVIDED BY THE REGENTS AND CONTRIBUTORS AS IS AND ANY EXPRESS OR IMPLIED WARRANTIES INCLUDING ...

Page 53: ...tribution and use in source and binary forms with or without modification are permitted provided that the following conditions are met Redistributions of source code must retain the above copyright notice this list of conditions and the following disclaimer Redistributions in binary form must reproduce the above copyright notice this list of conditions and the following disclaimer in the documenta...

Page 54: ...mstances For example on rare occasions there may be a special need to encourage the widest possible use of a certain library so that it becomes a de facto standard To achieve this non free programs must be allowed to use the library A more frequent case is that a free library does the same job as widely used non free libraries In this case there is little to gain by limiting the free library to fr...

Page 55: ... an exception to the Sections above you may also combine or link a work that uses the Library with the Library to produce a work containing portions of the Library and distribute that work under terms of your choice provided that the terms permit modification of the work for the customer s own use and reverse engineering for debugging such modifications You must give prominent notice with each cop...

Page 56: ...rporate parts of the Library into other free programs whose distribution conditions are incompatible with these write to the author to ask for permission For software which is copyrighted by the Free Software Foundation write to the Free Software Foundation we sometimes make exceptions for this Our decision will be guided by the two goals of preserving the free status of all derivatives of our fre...

Page 57: ...he above license grant this restriction and the following disclaimer must be included in all copies of the Software in whole or in part and all derivative works of the Software unless such copies or derivative works are solely in the form of machine executable object code generated by a source language processor THE SOFTWARE IS PROVIDED AS IS WITHOUT WARRANTY OF ANY KIND EXPRESS OR IMPLIED INCLUDI...

Page 58: ...http konicaminolta com 2016 ...

Reviews: