


Manual EDU 2AE/TOP/MITO
Page 4
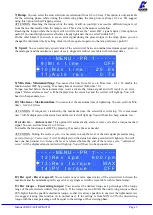
1) Program number:
you can select the desired program from 1 to 8.
2) Screws number:
The EDU2AE/TOP/MITO can act as screw counter. You can set the number of screws
from 1 to 99. To disable the function select OFF by pressing
as many times as needed.
If the number of correct screws is equal to the number of set screws,
“
CYCLE END
” will appear on the
status bar and the yellow led will light up. If the
“
Reset aut
”
function is disabled (see point 16
), “
CYCLE
END
” will automatically disappear at n
ext screwing cycle or any time you enter the menu. Otherwise, press
OK at the end of each cycle.
ATTENTION: Every time you enter the menu, the number of screws will reset.
- - - - - M E N U - - P R : 1 - - - - -
3 ) M o d e l :
M I T O 1 5
4 ) T o r q u e :
1 0 %
5 ) J o i n t :
S O F T
3) Model:
you can select the screwdriver to be used. Your choice will automatically change the default
settings.
It’s important to select the correct model you’re going to use since most parameters regarding the
motor software are specific to every single model.
4) Torque:
you can select the desired torque as a percentage of the torque range of the selected
screwdriver.
The torque range is always referred to the MAX speed. In case you’re not working at maximum
speed, the torque range will progressively lower in order to avoid motor stalling. If the torque level is
reached correctly, it will be shown on the display and you will hear a beep sound, too.
Such torque level is indicated as “ T: ..% ” on the main screen.
5) Joint:
You can select the type of joint you are working on. A soft joint is typically a self tapping screw
on plastic or sheet metal, or a metric (machine) screw on a material subject to strain (for example: gasket, o
ring etc.) A hard joint is typically a fastener joining metal with metal.
If you select the option SOFT the screwdriver will run the complete cycle at the selected speed (see point
6.). When selecting the option HARD the screwdriver will maintain the selected speed for a selected time
after the start (see point 4.) and then the speed will be reduced automatically to apply a pre-torque before
reaching the preset torque. The type of joint is indicated as “J” on the main screen.
IMPORTANT: An incorrect selection of the joint type can result in inaccurate torque output.
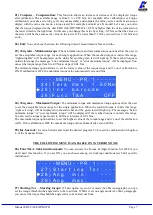
- - - - - M E N U - - P R : 1 - - - - -
6 ) B r a k e
t i m e :
O F F
7 ) R a m p :
0 . 2 s
8 ) S p e e d :
6 0 0 r p m
6) Brake time:
This option can be selected
U
only
U
in combination with the option JOINT: HARD.
It indicates how long the selected speed (higher speed) will be on before switching to “pre
-
torque speed”
(lower speed). The “pre
-
torque speed” will be automatically chosen by the unit depending on the preset
torque. You can set the brake time from 0.3 to 10.0 sec.
To disable the function select OFF by pressing
as many times as needed. In this case the screwdriver will
automatically start at pre-torque speed, which cannot be set by the user.
CAUTION: The aim of the BRAKE TIME is only to speed up the approach time in case of long screws.
Reaching the torque at higher speed will result in inaccurate torque output. To avoid inaccurate torque
values we suggest selecting a shorter time, and then increase it step by step until finding the optimum time.
Torque reached during the Brake Time won’t activate the torque signal and the message “
Error brake
time
” will be displayed on the main screen together with 2 beep sounds. The red led will turn on, too.


