


17
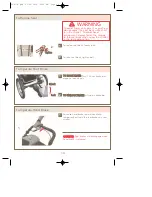
To Set Up Odometer
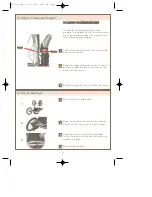
Mode Symbol
SET/RESET button
Current Speed
Kilometers/Miles
Selected Function Display
MODE Button
T
TO
O T
TU
UR
RN
N O
OD
DO
OM
ME
ET
TE
ER
R O
ON
N:: Press
SET/RESET button once.
T
TO
O T
TU
UR
RN
N O
OD
DO
OM
ME
ET
TE
ER
R O
OF
FF
F:: The
odometer will automatically shut off
after 2 minutes of inactivity.
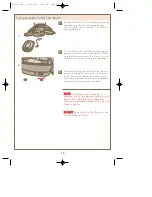
IIN
NIIT
TIIA
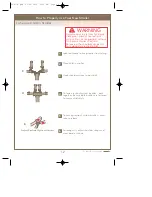
ALL S
SE
ET
T U
UP
P -- The following steps
allow you to change the wheel
diameter setting on your odometer, to
16 inches. This must be done in order
for the odometer to work properly with
this jogging stroller. There is also an
option to set the odometer to
kilometers (Km) or miles (ML). This is a
one time set up, but they can be
changed in the future if desired, using
these steps.
Turn odometer on.
Push
MODE button until either a “T”
or “D” is displayed in the
Mode
Symbol area.
Press and hold
SET/RESET button until
a set up screen appears. A number
between 5” and 30” may be present.
Hold the
SET/RESET button down,
until 16” appears, then STOP. Once
the 16” is flashing, immediately hit the
MODE button so that ML or Km are
flashing. Once it is flashing, hit the
SET/RESET button to select your
desired setting. After you have made
your selections, wait a few seconds
and the odometer will return to the
orginal screen.
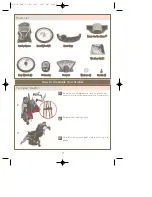
1
2
3
S56J-A.qxd 03/06/2006 9:53 AM Page 17


