background image

2

111864-2-

BA

 (-)

Kohler Co., Kohler, WI

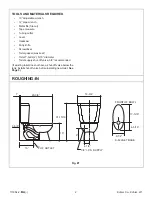
TOOLS AND MATERIALS REQUIRED

10” adjustable wrench

12” pipe wrench

Metal file (file cut)

Tape measure

Tubing cutter

Level

Hacksaw

Putty knife

Screwdriver

Toilet gasket (wax seal)

Toilet T-bolts (2), 5/16” diameter

Toilet supply shut-off valve, 3/8” recommended

(If existing toilet does not have a shut-off valve below the
tank, install shut-off valve before installing new toilet.  See
Page 3.
)

ROUGHING-IN

29-3/8”

15”

Fig. #1

3/8” I.P.S.  SUPPLY

C

L OF OUTLET

FRONT OF BOWL

K-4229-ET BASE

1”

19-3/4”

17-5/16”

4-5/16”

9-1/2”

4-1/8”

9”

31-15/16”

3-5/8”

10”

Summary of Contents for WELLWORTH LITE K-4229

Page 1: ...e leave instructions for the consumer NOTES Seat post holes on 5 1 2 centers Water depth from rim is 6 11 16 1 3 4 passageway Ensure that the new toilet has the correct roughing in dimension The K 3407 has a 10 roughing in dimension See Fig 1 Be very careful while working with vitreous china products Vitreous china can break and chip if you overtighten bolts and nuts or carelessly handle the produ...

Page 2: ...wdriver Toilet gasket wax seal Toilet T bolts 2 5 16 diameter Toilet supply shut off valve 3 8 recommended If existing toilet does not have a shut off valve below the tank install shut off valve before installing new toilet See Page 3 ROUGHING IN 29 3 8 15 Fig 1 3 8 I P S SUPPLY C L OF OUTLET FRONT OF BOWL K 4229 ET BASE 1 19 3 4 17 5 16 4 5 16 9 1 2 4 1 8 9 31 15 16 3 5 8 10 ...

Page 3: ...scard NOTICE If a new toilet is not installed immediately temporarily stuff a rag in the closet flange Fig 2 Closet Flange Install new 5 16 diameter T bolts Fig 3 T Bolts Closet Flange TO INSTALL NEW SUPPLY SHUT OFF VALVE Install toilet supply shut off valve so it is 9 above floorline and 4 1 8 to the left of the centerline of the closet flange Centerline of supply shut off outlet should extend 4 ...

Page 4: ...ses washers and nuts on exposed T bolts Hand tighten nuts then tighten additional 1 2 turn with wrench CAUTION Overtightening may cause breakage or chipping If T bolts extend more than 1 4 from top of nut cut off ex cess Wipe away any residue Install bolt caps Fig 6 Nut Washer Bolt Cap Base Bolt Cap TO INSTALL NEW TANK Make sure the three tank bolts extend fully through the holes in the gasket Set...

Page 5: ...tightened to design specifications If re tightening is required wrench tighten one turn past finger tight Fig 8 Tubing Ferrule Supply Shank Seal Washer Coupling Nut Compression Nut Shut Off Valve Tubing Ferrule Supply Shank Compression Washer Coupling Nut Compression Nut Shut Off Valve Turn shut off valve on and check for leaks If connections are squarely assembled a slight retightening of the nut...

Page 6: ...ew times Clean float valve seal surface located under float valve cap Replace float valve cap assembly by engaging lugs and rotating 1 8 turn clockwise Turn water on Install filter in supply line to prevent recurring problems B Replace seal 3 Incorrect water level height A Valve float cup does not contain enough water to provide required ballast A During fill cycle hold float under water a few sec...

Page 7: ...ler Distributor and the KOHLER TECHNICAL SPECIALIST THIRD If you are unable to obtain warranty service through either your contractor or Kohler Co distributor please write us directly at Kohler Co Attn Customer Service Department Kohler WI 53044 U S A FOURTH Include all pertinent information regarding your claim including a complete description of the product model numbers colors finishes and the ...

Page 8: ...8 111864 2 BA Kohler Co Kohler WI ...

Reviews: