Kohler TAUT 26259K-4 Installation Instructions Manual Download Page 3

INSTALLATION 

Ø76mm Min.  

Bracket

3M Double 

sided Tape

Way 2

For Dry Wall

For Sheet

Bracket

Way 1

How to Connect the Hoses 

Tighten the check valve housings(8) onto water supplies. 

Tighten the supply hoses(9) to the check valve housings. 

The hose with blue mark should be connected to cold 

water. The hose with red mark should be connected to 

hot water. 

Open hot and cold water supplies. Turn on the faucet. 

Flush hot and cold water for about one minute to remove 

any debris. Shut off faucet and water supplies.

NOTE: 

Supply hoses must not be taut, kinked, or twisted 

during installation. If the supply hoses must be coiled, 

maintain an inside diameter of minimum Ø76mm.

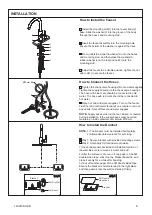
How to Install the Bracket

NOTE: 

1) The bracket must be installed horizontally.                                

            2) Allow adequate clearance for servicing.

Way 1: Secure bracket with provided mounting screws.

Way 2: Only apply for flat and smooth walls. 

1) Clean the bracket backside and installed location of 

the wall. Be sure to remove oil, water and dust. 
2) After the surface is dry, tear off one paper of the 3M 

double sided tape, stick it on the bracket backside, and 

press it evenly for a while after bonding.  
3) Tear off another paper of the 3M double sided tape. 

Ensure the bracket is horizontal and in the right place, 

and then paste it onto the wall and press it firmly. 


1439198-H2-B


3


9

8

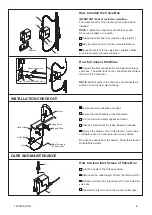
How to Install the Faucet 

Install the mounting stud(1) into the faucet body(2) 

base. Slide the washer(3) into the groove of the body 

through the hoses and mounting stud.

Insert the faucet assembly into the mounting hole. 

Ensure the bottom of the washer is against the deck.

From underside, slide the washer(4) onto the hoses 

and mounting stud, and then place the washers(5, 

rubber washer is on the top) and nut(6) onto the 

mounting stud.

Adjust the faucet to a suitable position, tighten the nut 

with tool(7) to secure the faucet.

1

5

4

2

3

6

7

Summary of Contents for TAUT 26259K-4

Page 1: ...damage Please read all instructions thoroughly before beginning installation 4 Follow all plumbing electrical and building codes 5 Risk of fresh water contamination This faucet contains back siphonage protection Do not remove any internal components 6 Risk of product damage This product contains sensitive electronic components Do not store open containers of chemical or cleaning products near this...

Page 2: ...nsor away from the steam Do not place anything within 200mm from the sensor to avoid accidentally activating the sensor and power consumption Valve Box LED Indicators Green LED Indicates that the AC plug is installed and connected Red flashing LED Indicates low batteries Features Automatic shut off After 4 minutes of inactivity the water will automatically shut OFF Manual Sensor Override In case of...

Page 3: ...g screws Way 2 Only apply for flat and smooth walls 1 Clean the bracket backside and installed location of the wall Be sure to remove oil water and dust 2 After the surface is dry tear off one paper of the 3M double sided tape stick it on the bracket backside and press it evenly for a while after bonding 3 Tear off another paper of the 3M double sided tape Ensure the bracket is horizontal and in t...

Page 4: ...e sure it is securely connected in place Ensure that all connections are tight Ensure that the handle is in the off position Turn on the main water supplies and drain Check all connections for leaks Repair as needed Remove the aerator Turn on the faucet run hot and cold water about one minute to remove any debris Remove any debris from the aerator Shut off the faucet Reinstall the aerator How to C...

Page 5: ...ed If coiled maintain an inside diameter of minimum Ø76mm D Check for a red flashing LED on the sensor If it flashes red refer to valve box installation instruction 1441903 K2 for batteries replacement E Refer to the Care and maintenance section A Confirm the supply stops are fully open B Rotate the handle to the full open position C Confirm the supply hoses are not kinked or twisted If coiled mainta...

Page 6: ...de must be specified when ordering 1439198 H2 B 6 1209778 1209777 1441910 1441911 1228834 1474445 1466824 1492098 1176162 1377106 1410195 1292054 1243532 1309847 833438 833730 3008523 836549 1031238 3002868 1441898 836589 871624 1459525 1455660 1128531 1455661 1441912 ...

Reviews: