background image

1070157-T01-E

B.

B.

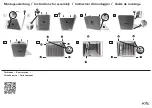
Install hook

Drill 2 mounting holes on the wall and install hook. Fix hook
on the wall by tightening screws.

-6-

Supply Pipe

C

.

C

.

Install the inlet hose of valve assy.

Take out the bracket of valve assy. Install the limited board (1).
Tighten the tighten screw (2).The inserting depth postion is
shown

Connect the inlet pipe with the water supply on the wall.

(1)

(2)

(3)

as (3).

Limited Board

Tighten Screw

Bracket of Valve Assy.

(1)

Bracket of Valve

Tighten Screw

(2)

(3)

(600~700)

180

Summary of Contents for PATIO K-16320T-M

Page 1: ...make changes in product characteristics packaging or availability at any time without notice These instructions contain important care cleaning and warranty information please leave instructions for t...

Page 2: ...batteries 16321T MC05 0 18 0 55MPa 1L 1 55 C 0 05 0 86MPa 70cm 50 70cm 2 5 220V 50 60Hz 16321T M 2 7 AAA 2 30 30cm2 SENSOR SPECIFICATIONS SENSOR SPECIFICATIONS 2 Model Power Liter per flushing Temper...

Page 3: ...3 Unit mm Notice To ensure an effective flush performance strongly recommended inner diameter of water supply including water meter valve etc is no less than 25mm and supplied water pressure sensor in...

Page 4: ...ION When installing the power unit on the ceiling please chisel out a slot and layout bushing according to Fig and thread wire through the bushing One AC power unit can supply two sensors at most C Ou...

Page 5: ...ad AC power supply must be protected with appropriate fuse e Please confirm the AC power supply and water supply should be shut off before maintaining the products with AC power related 2 2 a Keep the...

Page 6: ...e C C Install the inlet hose of valve assy Take out the bracket of valve assy Install the limited board 1 Tighten the tighten screw 2 The inserting depth postion is shown Connect the inlet pipe with t...

Page 7: ...on is inserted the S trap way can be crutched by hard exterded via the gap in the bottom of the urinal to install it decently Then fix the urinal on the hook a Avoid the urinal fallen on the floor to...

Page 8: ...ontrol box assy with the same color wires 16321T M 16321T MC05 3 A 2 7 16320T M 16321T M 16320T MC05 16321T MC05 B Note B Press the two sides spring hooks of bracket of valve assy close to the center...

Page 9: ...he limited board to the urinal withstanding the wall 4 and then tighten the tighten screw 5 a When installing the 16320T MC05 16321T MC05 AC do not connect to power supply until finish installation b...

Page 10: ...sing range would cause the indicator to flash fast The sensor would generate a flushing cycle to indicate the setup of the sensor has been adjusted to afteruse flushing If the action is not completed...

Page 11: ...ow water pressure Only for 16321T M 16321T MC05 If the flushing amount is limited due to low water pressure you can set a long time washing with flushing control stick Operate as follows Ten minutes a...

Page 12: ...a Turn off the water supply before cleaning the filter also power off when used the AC power supply b Avoid damaging or losing the filter during cleaning Caution a b MAINTENANCE Filter Inlet Hose Brac...

Page 13: ...small hole of valve core with thin steel wire 2 Wash the filter of valve core with a brush Replace batteries Please make following checks before repair Symptoms Probable causes Corrective actions If...

Page 14: ...moving cleaning organic liquid to the sensor directly 7 Urinal is designed for use with potable water Avoid water that includes a lot of contaminants or acid alkali water and impure water 8 When AC po...

Reviews: