2
112766–2–
AA
(0993)
Kohler Co., Kohler, WI
INSTALLATION
Install 1/2” I.P.S. nipple to extend from finished wall as
listed below:
1” for K-9511 Shower Arm
3-3/4” for K-9512 Shower Arm
Ensure O-ring and escutcheon are on shower arm and
thread shower arm onto nipple. Tighten shower arm using
clean strap wrench.
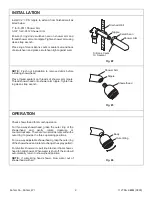
Place ring of clear silicone caulk or sealant around back
of escutcheon and press escutcheon tight against wall.
Fig. #2
Escutcheon
Shower Arm
Finished Wall
Nipple
Silicone Caulk
Or Sealant
NOTE: Flush out installation to remove debris before
installing showerhead.
Place thread sealant on threads of shower arm nipple.
Thread showerhead onto shower arm nipple. Tighten us-
ing clean strap wrench.
Fig. #3
Shower Arm
Showerhead
Nipple
OPERATION
Check showerhead for smooth operation.
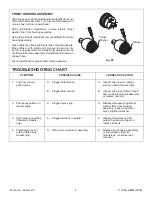
For three-way showerhead, grasp the outer ring of the
showerhead and gently rotate clockwise or
counterclockwise. There are two small detents within the
outer ring to provide the three operating positions.
For one-way adjustable showerhead, grasp the outer ring
of the showerhead and rotate to change the spray pattern.
For diverter shower arm, pull knob to divert from shower-
head to hand shower. When water is shut off, the knob will
automatically return to showerhead position.
NOTE: If winterizing hand shower, blow water out of
showerhead with air.
Fig. #4
Body
Outer Ring


