background image

Determine Mounting Block Location (cont.)

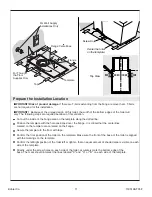
Insert a pencil into the holes in the mounting blocks and mark the center of the holes after positioning the 
mounting block.

Remove the mounting blocks.

At the locations where the centerline in the slots marked on the template and the pencil mark
indicating the hole locations meet, drill a 13mm hole if anchors will be used.

If anchors will be used, insert one of the supplied anchors in each of the holes.

Remove the template.

Position a mounting block in the area indicated on the right side of the template. Align the outside edge of the

mounting blocks with the inside line. Then move parallel 2mm to the inside. 
Insert a pencil into the holes in the mounting blocks and mark the center of the holes 

after positioning the 

mounting block.


Kohler Co.

13

1195109-T01-F

Summary of Contents for K-3900T-2

Page 1: ...Installation Guide K 3900T 2 English page 2 22 23 43 Numi Intelligent Toilet 1195109 T01 F...

Page 2: ...er surface that is green with or without yellow stripes is the grounding wire Check with a quali ed electrician or service personnel if the grounding instructions are not completely understood or if i...

Page 3: ...en water in tank could damage the tank resulting in leaking NOTE Risk of personal injury Do not insert hands into the slot of the battery box Wax Ring Floor Flange Bushings 2 PCS Caps 2 PCS 10 x 1 1 2...

Page 4: ...s 1 Supply Hose 1 Clip 2 4 5x45DING Lag Bolts 2 UX6x35 Lag Bolt Anchors User Guidelines Homeowner s Guide Installation Guide Quick Reference Guide Toilet Installation Template Confirm all parts below...

Page 5: ...difficult to remove the back panel IMPORTANT Do not install any items behind the toilet that will interfere with the lid when it is raised All decorative items should be at least 37 94 cm high to allo...

Page 6: ...ically open the seat when movement is sensed Sensitivity can be adjusted using the User Interface The toilet is equipped with a motion sensor ring actuator located on the right side of the toilet This...

Page 7: ...d embed the in wall cable conduit to route the docking station power cord concealed type If the finished wall is installed use the slot board cable to route the cord to the docking station location ou...

Page 8: ...dicated 220V 50Hz 10A or more grounding type receptacle protected by a GFCI or RCD within 56 142 cm of the back of the toilet Install External Speaker Wires optional If external speakers will be used...

Page 9: ...ning Position the docking station in the installation position and mark the screw locations using the dock as a template Drill appropriate size mounting holes at the screw mounting locations The size...

Page 10: ...shown according to the color and tighten each screw to secure the wires in place connect the cover plate plug Snap the cover plate back into place Remove the screw and tape from the cover plate and se...

Page 11: ...t will vary The following steps are required because of this variation Confirm the front position of the toilet on the template Make sure the front of the base of the toilet is aligned with the markin...

Page 12: ...ks on each of the lines labeled A Measure the width of the base dimension B on the right side of the toilet From the mark indicating the outside edge of the base measure inward and mark dimension B on...

Page 13: ...hole locations meet drill a 13mm hole if anchors will be used If anchors will be used insert one of the supplied anchors in each of the holes Remove the template Position a mounting block in the area...

Page 14: ...supply hose be firmly secured by the clip The supply hose could be displaced when under pressure if the clip is not correctly installed resulting in water damage IMPORTANT Confirm the clip is firmly...

Page 15: ...essary external FM antenna Connect the external speaker wires not shown to the toilet if external speakers are installed RCA plug Place the remote control on the docking station Connect the power Turn...

Page 16: ...st effective tool when tightening the screws due to their close proximity to the floor It is difficult to achieve enough force with a standard screwdriver There is a greater risk of stripping the scre...

Page 17: ...the battery box cover Eight AA batteries are loaded correctly according to the mark on the battery box Tighten the screw on the battery box cover Insert the battery box properly into the slot accordi...

Page 18: ...g station cord through the slot in the cover and snap the cover into place on the supply hose inlet Align the spring clip on the cover with the supply hose inlet NOTE The clip will easily snap into pl...

Page 19: ...e remote control has not charged enough to be removed from the docking station perform these steps with remote control attached to the docking station NOTE Chinese is the default language Skip this st...

Page 20: ...ndicators to adjust the hour and minute Select the radio button for the am or pm option 12hr setting Select home to return to the main screen or back to return to the previous screen 12 34 am 05 17 20...

Page 21: ...s maintenance reconnect back factory menu learn remote home shutdown reset flush full flush eco close seat cover settings stop users lighting heating dryer rear front music home 12 34 am back system s...

Page 22: ...flushes Remove the protective film from the toilet and remote Apply caulk around the base of the toilet following the caulk manufacturer s instructions flush full flush eco close seat cover settings s...

Page 23: ...Kohler Co 23 1195109 T01 F...

Page 24: ...Kohler com 220V 50Hz 10A GFCI RCD 55 121 1 C 0 C 2 2 10 x 1 1 2 2 2 5 16 x 2 1 2 4 5 16 4 4 5x45DING 2 UX6x35 2 1195109 T01 F 24 Kohler Co 0...

Page 25: ...5 16 x 2 1 2 4 5 16 4 2 2 10 x 1 1 2 2 2 1 1 1 FM 1 1 1 1 4 5x45DING 2 UX6x35 2 1 1 Kohler Co 25 1195109 T01 F...

Page 26: ...16 10cm 3 15 16 75cm 29 1 2 31cm 12 31cm 12 1 4 40cm 15 5 8 6cm 2 1 4 6cm 2 1 5 92cm 36 1 4 142cm 56 10cm 4 1 16 15cm 5 15 16 104cm 41 168cm 66 97cm 38 168 cm 66 5cm 2 45cm 17 7 8 15cm 6 20cm 8 1 2 9...

Page 27: ...64cm 25 1 4 28cm 10 13 16 75cm 29 1 2 31cm 12 31cm 12 1 4 40cm 15 5 8 6cm 2 1 4 45cm 17 7 8 92cm 36 1 4 10cm 4 1 16 15cm 5 15 16 104cm 41 168cm 66 4 cm 1 1 2 3cm 1 1 4 10cm 3 15 16 6cm 2 1 5 4cm 1 1...

Page 28: ...220V 50Hz 10A GFCI RCD GFCI RCD 46cm 18 15 2 cm 6 30cm 11 3 4 20cm 8 10 2 cm 4 6cm 2 4cm 1 1 2 D 3cm 1 1 4 D 7cm 2 5 8 4cm 1 5 8 8cm 1195109 T01 F 28 Kohler Co...

Page 29: ...RCA 142cm 56 220V 50Hz 10A 142cm 56 Kohler Co 29 1195109 T01 F...

Page 30: ...5 16 1 2 3 4 3 2cm 1195109 T01 F 30 Kohler Co...

Page 31: ...Kohler Co 31 1195109 T01 F...

Page 32: ...T T C A B 1195109 T01 F 32 Kohler Co...

Page 33: ...A A B B C C A A A B C A B C Kohler Co 33 1195109 T01 F...

Page 34: ...2mm 2mm 13mm 1195109 T01 F 34 Kohler Co...

Page 35: ...2 Kohler Co 35 1195109 T01 F...

Page 36: ...FM Antenna Connection FM FM FM RCA FM 1195109 T01 F 36 Kohler Co...

Page 37: ...Kohler Co 37 1195109 T01 F...

Page 38: ...8 5 1195109 T01 F 38 Kohler Co...

Page 39: ...Kohler Co 39 1195109 T01 F...

Page 40: ...12 34 am 12 34 am 12 34 am Fran ais Portugu s Espa ol Deutsch English 12 34 am 1195109 T01 F 40 Kohler Co...

Page 41: ...12 24 am pm 12 12 34 am 12 34 am 12 34 am 12 34 am 10 21 2010 12 34 am 10 51 12 24 pm am Kohler Co 41 1195109 T01 F...

Page 42: ...12 34 am 12 34 am 12 34 am 12 34 am 2 1195109 T01 F 42 Kohler Co...

Page 43: ...12 34 am Kohler Co 43 1195109 T01 F...

Reviews: