ÍÍÍ
ÍÍÍ
ÇÇ
ÇÇ
ÇÇ
ÇÇ
ÇÇ
ÍÍ
ÍÍ
ÇÇÇ
ÇÇÇ
ÇÇÇ
ÇÇÇ
ÇÇÇ
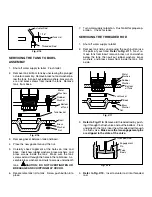
Threaded Rod
Tank Lid
Actuator
Actuator Rod
Fig. #19
5. Lower tank back onto base, carefully aligning the holes
on tank and base. Reinsert rubber washers, brass
washers, and brass screws inside the tank. Make sure
the tank screws extend through the holes in the toilet
base. Assemble brass washers and nuts to screws un
derneath tank
CAUTION: DO NOT OVERTIGHTEN.
BREAKAGE OR CHIPPING MAY OCCUR.
6. Reassemble tank lid to tank. Screw actuator into place.
7. Turn water supply to toilet on. Flush toilet.
HOW TO REPAIR THE FLEUR FLOAT VALVE
INTRODUCTION
The following instructions are used to replace the plunger
assembly on the plastic float valve used on Kohler's Fleur
Toilet.
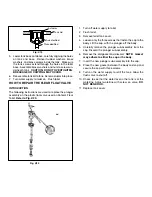
Refer to Fig. #20.
Float Rod
Cap
Plunger
Gasket
Fig. #20
1. Turn off water supply to toilet.
2. Flush toilet.
3. Remove toilet tank cover.
4. Loosen only the three screws that fasten the cap to the
body. Lift the cap, with the plunger, off the body.
5. Carefully remove the plunger subassembly from the
cap. Discard the plunger subassembly.
6. Remove the old gasket and discard.
NOTE: Gasket
may adhere to either the cap or the body.
7. Insert the new plunger subassembly into the cap.
8. Place the new gasket between the body and cap and
secure the cap with three screws.
9. Turn on the water supply to refill the tank. Allow the
flush valve to shut off.
10. Check to see that the water level in the tank is at the
waterline. Adjust waterline with screw on valve,
DO
NOT BEND ROD.
11. Replace tank cover.


