1018323-2-
A
Español, Página 5
Français, Page 9
REMOVABLE
BATH/WHIRLPOOL APRONS
BEFORE YOU BEGIN
INTRODUCTION
Please read these instructions carefully to familiarize
yourself with the required tools, materials, and installation
sequences. Follow the sections that pertain to your
particular installation. This will help you avoid costly
mistakes. In addition to proper installation, read all
operating and safety instructions.
All information in these instructions is based upon the
latest product information available at the time of
publication. Kohler Co. reserves the right to make
changes in product characteristics, packaging, or
availability at any time without notice.
These instructions contain important care, cleaning, and
warranty information – please leave these instructions
for the consumer.
TOOLS AND MATERIALS REQUIRED
Square
Screwdrivers
Pencil
Measuring tape
Shimming material (as needed)
ORDERING INFORMATION
5’ (152.4cm) x 18-1/2” (47cm) Apron
(for K-1226/27, K-1206/07, K-1239/42)
K-1278
. . . . . . . .
5’ (152.4cm) x 15-1/2” (39.4cm) Apron
(for K-1266/67, K-1201/1510)
K-1279
. . . . . . . . . . . . . . . .
6’ (182.9cm) x 18-1/2” (47cm) Apron
(for K-1231/32, K-1257/59)
K-1283
. . . . . . . . . . . . . . . . . .
PRODUCT REQUIREMENTS
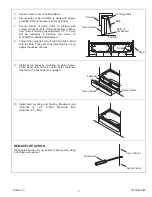
The apron must be installed before the finish floor and wall
materials are installed.
This apron system is designed to have the finish wall
materials (1-1/2” (3.8cm) max.) go over the apron
columns. It is also designed to have the finish floor
materials (2” (5cm) max.) butt up against the channel.
The apron can be used as access to the whirlpool pump
and controls, when applicable. Additional access,
however, may make servicing of the pump and controls
easier.
NOTE :
Before installing the apron, fill the bath with water
and test the drain system for leakage. If applicable, test
the whirlpool system for leakage and proper operation.


