background image

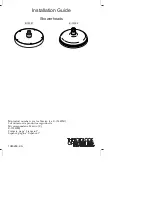
1. Install the Showerhead

NOTE:

The shower arm with wall flange are not provided.

Remove the existing showerhead and shower arm, if applicable.

Install the shower ell.

Apply a bead of plumbers putty or other sealant to the back of
the wall flange according to the manufacturer’s instructions.

Place the wall flange onto the long end of the shower arm just
below the threads, as illustrated.

Apply thread sealant tape to the threads of each end of the
shower arm.

Place the shower arm in the shower ell.

Carefully tighten the shower arm onto the shower ell with a clean
strap wrench.

Press the wall flange against the finished wall.

Secure the flange to the shower arm by tightening the setscrew
with a hex wrench.

Remove any excess putty.

Turn on the water and allow water to flow through the shower
arm to flush the system of any debris.

Turn off the water.

Thread the adapter onto the showerhead until hand-tight.

Hand tighten the showerhead to the shower arm.

Wall Flange 
(Not Provided)

Shower 
Arm (Not 
Provided)

Apply 
plumbers 
putty.

Shower Ell

Showerhead

Adapter

Setscrew

Kohler Co.

3

1046289-2-A

Summary of Contents for K-10121

Page 1: ...Guide Showerheads M product numbers are for Mexico i e K 12345M Los números de productos seguidos de M corresponden a México Ej K 12345M Français page Français 1 Español página Español 1 K 10121 K 10122 1046289 2 A ...

Page 2: ...please don t hesitate to contact us Our phone numbers and website are listed on the back cover Thanks again for choosing Kohler Company Before You Begin Observe all local plumbing and building codes Shut off the main water supply Kohler Co reserves the right to make revisions in the design of products without notice as specified in the Price Book Adjustable Wrench Strap Wrench Thread Sealant Plumb...

Page 3: ... the shower arm Place the shower arm in the shower ell Carefully tighten the shower arm onto the shower ell with a clean strap wrench Press the wall flange against the finished wall Secure the flange to the shower arm by tightening the setscrew with a hex wrench Remove any excess putty Turn on the water and allow water to flow through the shower arm to flush the system of any debris Turn off the w...

Page 4: ...Install the Showerhead cont Use a clean strap wrench to completely tighten the showerhead to the shower arm Check for proper operation 1046289 2 A 4 Kohler Co ...

Page 5: ...fonctionnement Nos numéros de téléphone et notre adresse du site internet sont au verso Merci encore d avoir choisi la compagnie Kohler Avant de commencer Respecter tous les codes de plomberie et de bâtiment locaux Couper l alimentation d eau principale Kohler Co se réserve le droit d apporter toutes modifications sur le design des produits et ceci sans préavis tel que spécifié dans le catalogue d...

Page 6: ...etages de chaque extrémité du bras de douche Placer le bras de douche dans le coude Serrer délicatement le bras de douche sur le coude avec une clé à sangle propre Presser la bride murale contre le mur fini Sécuriser la bride au bras de douche en serrant la vis avec une clé hexagonale Retirer tout excès de mastic Permettre à l eau de circuler à travers le bras de douche pour purger le système de t...

Page 7: ...r la pomme de douche cont Visser la pomme de douche sur le bras de douche Utiliser une clé à sangle pour serrer la pomme de douche au bras de douche Vérifier la bonne opération Kohler Co Français 3 1046289 2 A ...

Page 8: ... números de teléfono y nuestro sitio web se encuentran en la cubierta posterior de esta guía Gracias nuevamente por escoger a Kohler Antes de comenzar Cumpla con todos los códigos locales de plomería y de construcción Cierre el suministro principal de agua La empresa Kohler se reserva el derecho de modificar el diseño de los productos sin previo aviso tal como se especifica en la lista de precios ...

Page 9: ...scas a cada extremo del brazo de la ducha Instale el brazo de ducha en el codo de ducha Con cuidado apriete el brazo de la ducha al codo de la ducha utilizando una llave de correa limpia Presione la brida mural contra la pared acabada Fije la brida al brazo de ducha apretando el tornillo de fijación con la llave hexagonal Limpie el exceso de masilla Abra el agua y deje que el agua fluya por el bra...

Page 10: ...eza de ducha hasta que esté apretado a mano Apriete con la mano la cabeza de ducha en el brazo de ducha Utilice una llave de correa limpia para apretar completamente la cabeza al brazo de la ducha Verifique que funcione correctamente 1046289 2 A Español 3 Kohler Co ...

Page 11: ...1046289 2 A ...

Page 12: ...USA 1 800 4 KOHLER Canada 1 800 964 5590 México 001 877 680 1310 kohler com 2005 Kohler Co 1046289 2 A ...

Reviews: