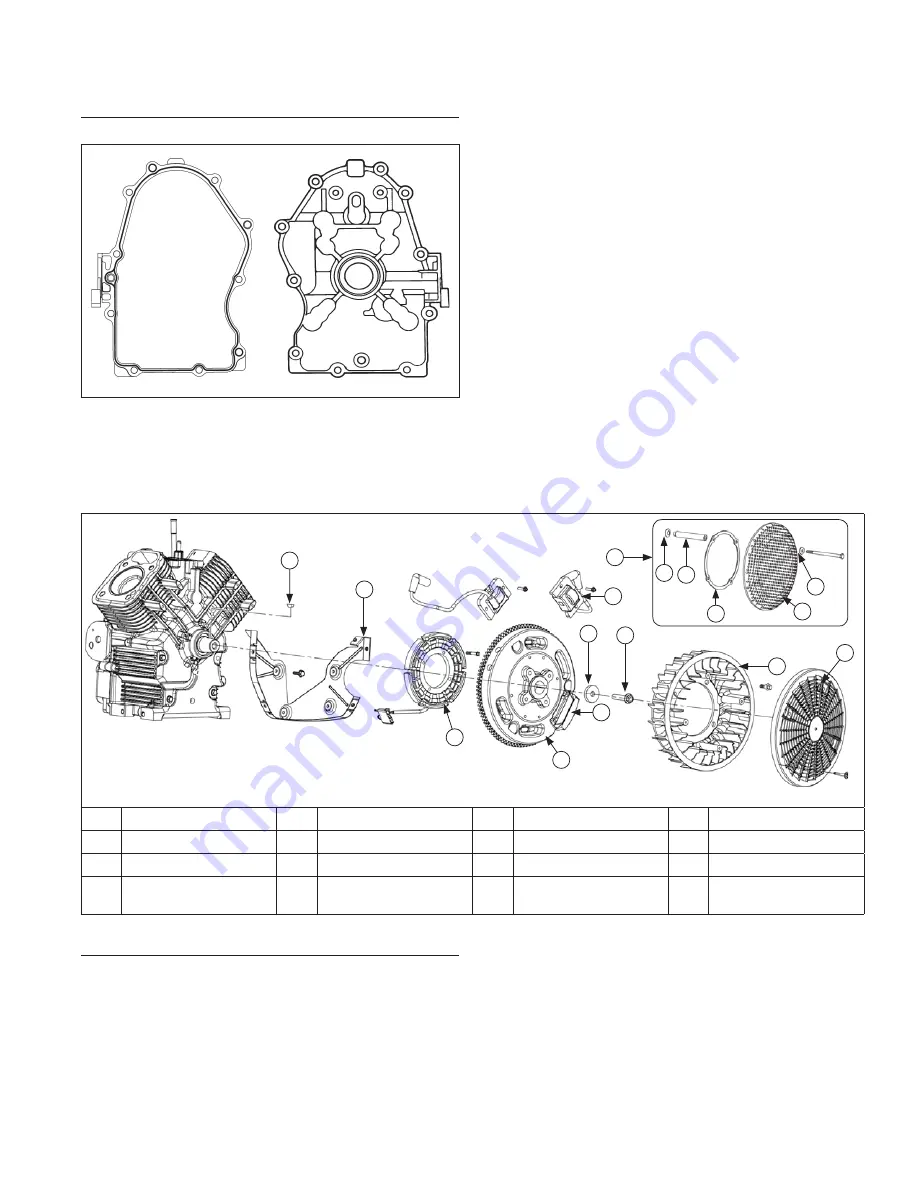
Install Closure Plate Assembly
Sealant Pattern and Torque Sequence
1
10
8
6
4
2
9
7
5
3
Install Stator and Backing Plates
1. Apply pipe sealant with Te
fl
on
®
(Loctite
®
592™
Thread Sealant or equivalent) to stator mounting
holes.
2. Position stator aligning mounting holes so leads are
at bottom, towards crankcase.
Flywheel/Ignition Components
F
G
E
C
K L
O
M
N
H
P
B
I
D
J
A
A
Debris Screen
B
Fan
C
Flywheel Screw
D
Washer
E
Flywheel
F
Magnet
G
Stator
H
Ignition Module
I
Backing Plate
J
Woodruff Key
K
Spring Washer
L
Spacer
M
Ring Support
N
Metal Debris Screen
O
Washer
P
Metal Debris Screen
Assembly
RTV sealant is used as a gasket between closure plate
and crankcase. Always use fresh sealant. Using
outdated sealant can result in leakage.
1. Be sure sealing surfaces have been cleaned and
prepared. Install a new O-ring in closure plate.
2. Check to make sure there are no nicks or burrs on
sealing surfaces of closure plate or crankcase.
3. Apply a 1.5 mm (1/16 in.) bead of sealant to sealing
surface of closure plate.
4. Make sure end of governor cross shaft is lying
against bottom of cylinder 1 inside crankcase.
5. Install closure plate to crankcase. Carefully seat
camshaft and crankshaft into their mating bearings.
Rotate crankshaft slightly to help engage oil pump
and governor gear meshes.
6. Install screws securing closure plate to crankcase.
Torque fasteners to 24.4 N·m (216 in. lb.) following
sequence. On some engines one mounting screw is
plated. Plated screw is typically installed in hole
location 6.
3. Install and torque screws to 6.2 N·m (55 in. lb.).
4. Route stator leads in crankcase channel, then install
backing plates and stator wire bracket (if used).
Secure using screws. Torque screws to 7.3 N·m
(65 in. lb.).
Reassembly
59
24 690 34 Rev. D
KohlerEngines.com


