


10
Cleaning & Maintenance
By ensuring proper cleaning and maintenance of your Stirling rangehood, you can ensure that it will
have a long and fault free operation.
CLEANING THE GREASE FILTERS
Keeping this filter clean will keep the rangehood extraction performance at an optimum level.
Please strictly follow the guidelines below.
•
The grease filter mesh is made of high-density stainless steel. Please ensure you never use a
corrosive detergent during cleaning.
•
Method 1: Put the mesh into 40-50°C clean water with a small amount of regular dishwashing
liquid, and soak for 2-3 mins. Wear gloves and clean with a soft brush. Please do not apply too
much pressure, as the mesh is delicate and will damage easy.
•
Method 2: You can wash your rangehood grease filters in your dishwasher, however please
ensure they aren’t washed at a temperature above 60° C degrees.
CLEANING THE COOKER HOOD
•
To protect the main body of your rangehood from corrosion or stains, the cooker hood should
be cleaned with hot water with a non-corrosive detergent every two months. For stubborn
stains or marks, you can try using a specific stainless steel cleaner available from most
supermarkets.
•
Warning! Please do not use a corrosive detergent, or abrasive clothes, as it will damage the
body.
•
Keep the motor and other spare parts free from water, as this will cause damage to the
appliance.
•
Before cleaning the rangehood, always switch the power off at the outlet and unplug the
rangehood.
•
If your rangehood has a damaged plug or cord, please ensure your rangehood remains
unplugged and contact the our Support Team for further assistance. Any electrical work should
only be completed by a suitably licenced and authorised person.
•
If you’re using a carbon filter, it should never be exposed to heat.
CHANGING A LIGHT GLOBE
In the event of a blown globe:
•
Disconnect the rangehood from the power supply.
•
Remove the filter.
•
Press down on the lamp from inside the rangehood to release the globe.
•
Disconnect the globe by unplugging the wiring.
•
After replacing the globe, reverse the above steps to reassemble the rangehood.
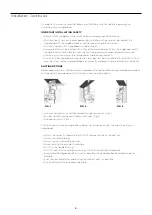
CARBON FILTER (OPTIONAL)
An optional carbon filter can be purchased separately and installed in your undermount rangehood.
Normally the activated carbon filter should be changed every three to six months according to
your volume of cooking. Activated carbon filter cannot be washed or recycled. The installation
procedure of activated carbon filter is as below.
•
Remove the grease filters.
•
Insert the first activated carbon filter into the unit
and turn it in anti-clockwise direction. Then repeat
the same on the other side. (Fig. 6)
•
Re-insert the grease filters.
Note: When the activated carbon filter installed,
the suction power will be lowered.
Fig. 6
Summary of Contents for KAUNDMTRNGA
Page 1: ...52cm Undermount Rangehood INSTRUCTION MANUAL INSTALLATION MANUAL MODEL KAUNDMTRNGA...
Page 2: ...2 THIS PAGE IS INTENTIONALLY LEFT BLANK...
Page 13: ...13 Warranty...
Page 14: ...14 THIS PAGE IS INTENTIONALLY LEFT BLANK...
Page 15: ...15 THIS PAGE IS INTENTIONALLY LEFT BLANK...
Page 16: ...16...


