background image


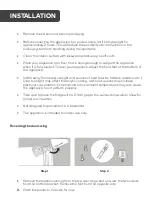
Remove the exterior and interior packaging 


Before connecting the appliance to a power source, let it stand upright for 

approximately 2 hours. This will reduce the possibility of a malfunction in the 

cooling system from handling during transportation. 


Clean the interior surface with lukewarm water using a soft cloth. 


Place your appliance on a floor that is strong enough to support the appliance 

when it is fully loaded. To level your appliance, adjust the front feet at the bottom of 

the appliance. 


Install away from direct sunlight and sources of heat (stoves, heaters, radiators etc.) 

Direct sunlight may affect the acrylic coating, and heat sources may increase 

electrical consumption. Extreme cold or hot ambient temperatures may also cause 

the appliance to not perform properly. 


Take care to place the fridge with a 2-3cm gap to the surrounding walls to allow for 

proper air circulation. 


Not designed for placement in a basement. 


The appliance is intended for indoor use only. 


Reversing the door swing 


Step 1 

Step 2 


1.


Remove the plastic covering from the top door hinge and unscrew the two screws 

from the bottom bracket. Remove the foot from the opposite side.  

2.


Place the pieces to one side for now. 


      INSTALLATION 

Summary of Contents for KAMNIBRFRGE

Page 1: ...46L MINI BAR FRIDGE KAMNIBRFRGE ...

Page 2: ......

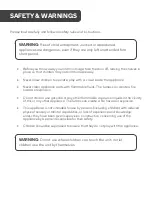
Page 3: ...ther appliance The fumes can create a fire hazard or explosion This appliance is not intended for use by persons including children with reduced physical sensory or mental capabilities or lack of experience and knowledge unless they have been given supervision or instruction concerning use of the appliance by a person responsible for their safety Children should be supervised to ensure that they d...

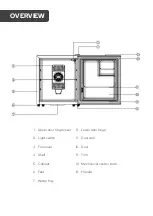
Page 4: ...1 Upper door hinge cover 8 Lower door hinge 2 Light switch 9 Door seal 3 Fan cover 10 Door 4 Shelf 11 Trim 5 Cabinet 12 Mechanical control knob 6 Feet 13 Handle 7 Water tray OVERVIEW ...

Page 5: ...ll away from direct sunlight and sources of heat stoves heaters radiators etc Direct sunlight may affect the acrylic coating and heat sources may increase electrical consumption Extreme cold or hot ambient temperatures may also cause the appliance to not perform properly Take care to place the fridge with a 2 3cm gap to the surrounding walls to allow for proper air circulation Not designed for pla...

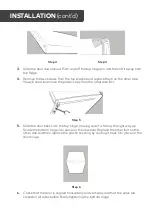
Page 6: ...de first Step 5 5 Slide the door back onto the top hinge making sure it is facing the right way up Screw the bottom hinge into place on the new side Replace the other foot on the other side and then replace the plastic covering by clicking it back into place on the door hinge Step 6 6 Check that the door is aligned horizontally and vertically and that the seals are closed on all sides before final...

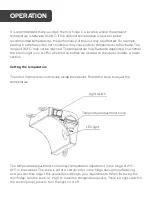
Page 7: ...ether the bottles are located on the upper middle or lower section Setting the temperature There is a mechanical control knob inside the cabinet Rotate the knob to adjust the temperature The temperature adjustment knob allows temperature adjustment in the range of 2 C 12 C in the cabinet The knob is set at a certain point in the fridge during manufacturing and you can then adjust this yourself acc...

Page 8: ...ater The outside of the mini fridge should be cleaned with a mild detergent and warm water Draw out the water box at the bottom and wash Moving your mini fridge Remove all bottles Securely tape down all loose items inside the mini fridge Turn the levelling legs up to the base to avoid damage Tape the door closed Ensure the mini fridge stays in the upright position during transportation CARE MAINTE...

Page 9: ...use Check to ensure that the fridge is level The fridge seems to make too much noise The fridge is not level Check that the fan is unobstructed The door will not close properly The fridge is not level The doors were reversed and not properly installed The seal is weak The shelves are out of position LED does not display Main control board does not work There is some problem with the plug Contact t...

Page 10: ...NOTES ...

Page 11: ......

Page 12: ...tion We hope that this user guide has given you the assistance needed for a simple set up For the most up to date guide for your product as well as any additional assistance you may require head online to help kogan com ...

Reviews: