background image

35

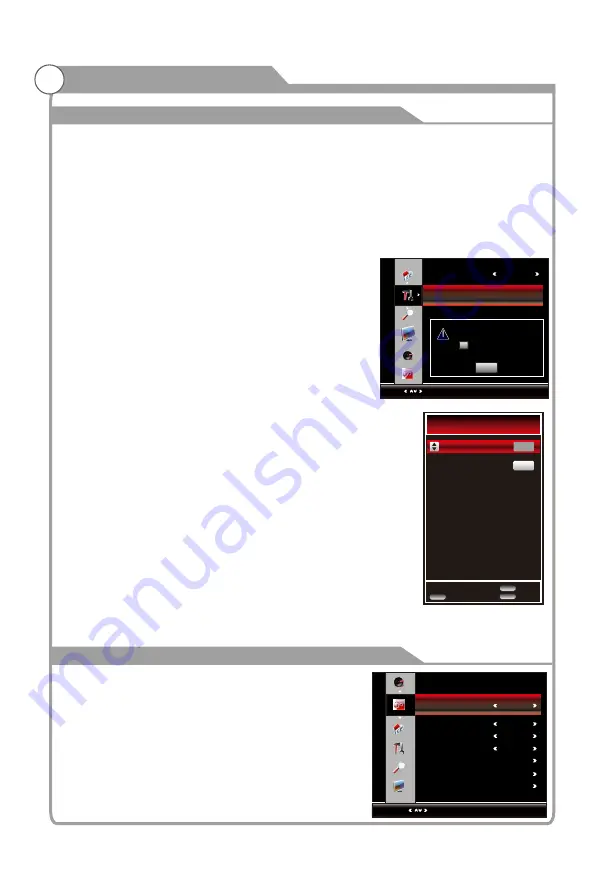
Menu system instruction

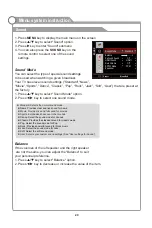
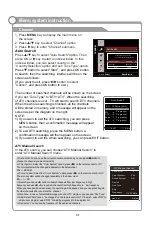
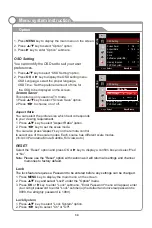
Set Password

 Password

1. Press 

/

 key to select "Set

" option. 

2. Enter your 4-digit password to enter

 "Change 

    Password" submenu. Choose any 4-digits for your 
    new password and enter them. As soon as the 4 
    digits are entered, the cursor 

 to “Confirm 

will skip

    Password” item, re-enter the same 4 digits, and your 
    new password has been memorized.

Block Program

1. Press 

/

 key to select “Block Program” option. 

2. Press OK or 

 key to enter Block Program list.

   In the program list, use Green key to lock or 
    unlock the program. Once the program is locked 
    and Lock System is on, password is needed to 
    enter it.

Parental Guidance

This option only used in DTV mode.
1. Press 

/

 key to select “

” option. 

Parental Guidance

2. Press 

 key to select the lock level of the Parental 

/

    Guidance: NO BLOCK,


BLOCK ALL,


G,


PG,


M,


MA,


AV,


R.


Software Update(USB)

1. Press 

/

 key to select “Software Update(USB)” option. 

Press OK or 

2. 

 key to software update process.

Note: In the software update process, do not turn off the power.

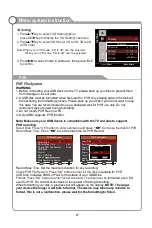
Hearing Impaired

Specific Hearing Impaired subtitles can be activated subject to 

availability from broadcaster.

Note: Only available in DTV mode.

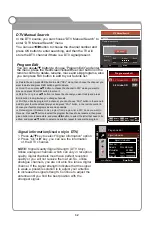
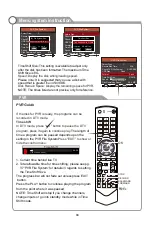
PVR File System

1. Press 

MENU

 key to display the main menu on the screen.

2. Press 

/

 key to select “PVR File System” option. 

3. Press 

OK

 or 

 key to enter “PVR File System" submenu, 

for

 detailed

 operation refer to 

    “PVR File System” in page 37.

Option

Menu:Return

OPTION

Select

Set Password

Block Program

Parental Guidance


           Off

Lock System                      Off

Please enter password

Cancel

New

        --  --  --  --

Confirm

     --  --  --  --

 Block Program

5.1 Globo HD

5.2 Globo SD

DTV

DTV

LOCK

Return

Exit

EXIT

MENU

FUNCTION

Select

Menu:Exit

NoSignal PowerOff

RGB Range

NoAct PowerOff              
Window Adjust

16-235

Off

Off

Noise Redution

Off

Advanced Setting

Function

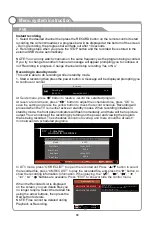
1. Press 

MENU

 key to display the main menu on the screen.

2. Press  

/

 key to select "Function" option. 

3. Press 

 key to enter “Function” submenu.

Noise Reduction
1. Press

/

key to select "Noise Reduction" option. 

2. Press

/

 key to select "Off", "Low", "Middle", "High"

 

    and  "DEFAULT” to improve the picture sharpness. 
Note: Noise Reduction doesn't work in PC-RGB Mode.

3D Setting

Summary of Contents for KALED503DZA

Page 1: ...USER MANUAL...

Page 2: ...illed with liquids such as vases shall be placed on the apparatus 1 If the following problems occur Turn off the TV set and unplug the power cord immediately if any of the following problems occur Ask...

Page 3: ...be fatal Ensure the television is not overhanging the edge of the supporting furniture Installation The ventilation should not be impeded by covering the ventilation opening with items such as newspa...

Page 4: ...surface of the LED panel cracks do not touch it until you have unplugged the AC power cord Otherwise electric shock may result Do not throw anything at the TV set The LED panel may break from the impa...

Page 5: ...Set Top Box 19 Connecting a DVD Player Set Top Box via DVI 20 Connecting DVD Player Set Top Box via HDMI 21 Connecting Digital Audio System 22 Connecting PC 23 Supporting signals 23 Basic operation 2...

Page 6: ...act the Kogan support team Accessories 5 Remote Control Batteryx2 CAUTION Do not dispose of batteries in a fire Do not short circuit disassemble or overheat the batteries Danger of explosion if batter...

Page 7: ...x SPDIF output 1 x Headphone output TV adopts 50 TFT display screen LED Zero X radiation complies to green environment protection requirement Connect to computer directly to realize TV monitor combo...

Page 8: ...nel resolution Power supply TV receive system Frequency range Video in Antenna Input Speaker output power Power consumption Standby consumption Work Temperature Model Controller power Analog Antenna 4...

Page 9: ...tion 1 Assemble the stand and the unit together with five M4 12 screws Figure 1 To disconnect the stand from the TV perform the above steps in reverse order Securing the TV Stand Caution Pulling pushi...

Page 10: ...ED TV on the wall 1 After detaching the stand fasten 4 mounting screws Not supplied Please contact your local hardware store into the 4 screw holes on the rear cover see the figure below 2 Fasten wall...

Page 11: ...as DVD VCD player VCR and video camera to enjoy the high quality picture USB2 USB1 Camcorder DVD player PC HDMI output Blu ray disc player Audio system DVD player VCR DVD player with component output...

Page 12: ...on the TV 3D Sync Signal emitter 3D sync signal for shutter glasses POWER INDICATOR Green In power on mode Red In standby mode INPUT Toggles between all the available input sources MENU Press to displ...

Page 13: ...remote control to set the sleep timer Press SLEEP button on the remote control then press this button again to set sleep time off 10 20 30 60 90 120 180 240 min Press MENU button to exit when you hav...

Page 14: ...o source language 23 Red Green Yellow Blue Command These four buttons are used to request linked buttons with the current menu page 24 Teletext buttons Detail operation please refer to Teletext in the...

Page 15: ...den data answers to quizzes for example Press the REVEAL button again to return to normal screen 13 14 Teletext General Description Teletext is an information system broadcast by certain channels whic...

Page 16: ...select certain subcode pages of a Teletext page Entry of digits within the range 0 9 for current subcode entry If the digit completes the entry a page request is started Press PROG PROG buttons to ch...

Page 17: ...le Antenna feeder ANT IN 75ohm coaxial cable Antenna cable Antennas with 300 flat twins Leads Antennas with 75 Round Leads External Connection Installing Batteries Point the remote towards the remote...

Page 18: ...ANT IN terminal on the back of the VCR 3 Connect an RF Cable between the ANT OUT terminal on the VCR and the ANT IN terminal on the TV 4 Connect a Component Cable between the COMPONENT Y Pb Pr jacks o...

Page 19: ...order 2 Connect Audio Cables between the AUDIO L and AUDIO R jacks on the TV and the AUDIO OUT jacks on the camcorder 3 Connect a Video Cable between the component IN Y on the TV and the VIDEO OUT jac...

Page 20: ...ce to your TV make sure that power on the unit is turned off 2 When connecting an external device match the color of the connection terminal to the cable White Red Red Blue Green White Red VIDEO OUT D...

Page 21: ...apter between the HDMI 1 HDMI 2 HDMI 3 or HDMI 4 connector on the TV and the DVI connector on the DVD player Set Top Box 2 Connect Audio Cables between the PC AUDIO IN jack on the TV and the AUDIO OUT...

Page 22: ...io 5 1 channels The difference between HDMI and DVI is that the HDMI device is smaller in size has the HDCP High Bandwidth Digital Copy Protection coding feature installed and supports multi channel d...

Page 23: ...rnal device supporting 5 1 CH 1 Connect an Coaxial Cable between the SPDIF jacks on the TV and the Digital Audio Input jacks on the Digital Audio System When a Digital Audio System is connected to the...

Page 24: ...0Hz 576i 576p 23 576p 50Hz Each PC has a different back panel configuration The HDMI jacks do not support PC connection 1 Connect a D Sub Cable between VGA PC IN connector on the TV and the PC output...

Page 25: ...nt to completely switch off the power for this unit unplug the power cord plug for this unit 6 After switching off the unit you should wait at least 5 seconds before switching on again Status indicati...

Page 26: ...ss RECALL key to return to previous channel press it again to return to current channel To quickly switch between two channels that are far apart tune to one channel then use the number keys to select...

Page 27: ...ram of each channel is listed under the time axis Press button to select the channel and press button to highlight the p rogram The selected program s background colour will change to Press INFO butto...

Page 28: ...on the remote controller it will show the RECORDER page INFO you can press the INFO key on the remote controller to show information in regards to the program you have chosen OK you can press the OK k...

Page 29: ...and darkness between objects and the background Brightness Adjusts the brightness of the picture Color Adjusts the colors making them lighter or darker Sharpness Adjusts the outline of objects to eit...

Page 30: ...for news Movie Provides live and full sound for movies Sports Emphasizes bass over other sounds Dance Select the sound mode for dances Classic Provides the classical sound for classic music Pop Selec...

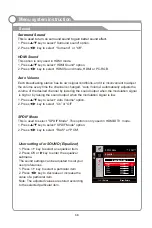
Page 31: ...is high or by raising the sound output when the modulation signal is low 1 Press key to select Auto Volume option 2 Press key to select On or Off SPDIF Mode This is used to select SPDIF Mode This opt...

Page 32: ...Menu Return CHANNEL Color System PAL Auto Search DTV Manual Search ATV Manual Search Programme Edit Signal Information Please select country first Then select Start to update info Cancel Start Country...

Page 33: ...remote control to choose your favorite programs as soon as possible Rename green Rename some program from program list in ATV mode you want to Rename Press button to selectthe program that need to be...

Page 34: ...ress key repeatedly until the desired time appears Off 10min 20min 30min 60min 90min 120min 180min 240min Notes The sleep timer you have set will be cancelled when the TV turns off or if a power failu...

Page 35: ...ss key to set the scale mode You can also press key on the remote control Aspect to select one of the scale modes Each source has different scale modes 16 9 4 3 Panorama Movie Subtitle Full view Auto...

Page 36: ...e software update process do not turn off the power Hearing Impaired Specific Hearing Impaired subtitles can be activated subject to availability from broadcaster Note Only available in DTV mode PVR F...

Page 37: ...nguage 1 Press key to select Secondary Subtitle Language option 2 Press key to set Secondary Subtitle Language FUNCTION Select Auto Adjust Menu Return H Position V Position Clock Phase 50 50 50 25 Win...

Page 38: ...ress OK button to enter format submenu The disk must be when first formatted used for PVR Do not disconnect disk or turn power off during formatting When formatting your disk a progress bar will appea...

Page 39: ...IT OK Exit PVR File System Select Disk C Record Max Time 4Hr Check PVR File System Start USB Disk Format Time Shift Size Speed Disk Remaining Space MB OK Exit Time Shift Size Time Shift Disk Size 512M...

Page 40: ...ises in standby mode the front panel indicators will flash momentarily and there will be no picture output You can intercept the recording by turning on the power and viewing the program that is being...

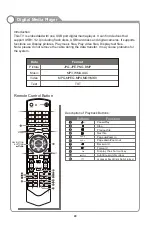
Page 41: ...Note please do not remove the cable during the data transfer It may cause problems for the system Data Picture Music Video Text Format JPG JPE PNG BMP MP3 WMA AAC TXT Description of Playback Buttons...

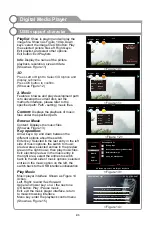
Page 42: ...own Enter Key Selected in the entry photo option on the left the switch to the image preview area was selected in the image preview area in the right section then play image files Exit Key Selected in...

Page 43: ...to return to the previous menu as shown in Figure 7 PlayMode Shown as Figure 8 1 Filmstrip loop all the pictures 2 Single Repeat the current picture Music Shown as Figure 9 Is set to open when the use...

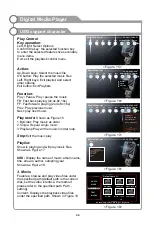
Page 44: ...n play music files Exit election preview in the music entry in the right area select the entries to switch back to the left side of music options selected entries in the music option on the left the s...

Page 45: ...se refer to the specified path Path setting Content Displays the playback video files under the specified path Shown in Figure 19 Figure 18 Figure 19 Bonnie Winds mp3 00 00 03 00 04 07 Figure 16 ByOrd...

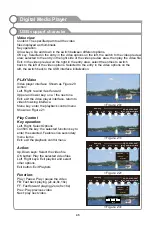
Page 46: ...ton Exit Playlists Function Play Pause Play pause the video FB Fast back playing 2x 4x 8x 16x FF Fast forward playing 2x 4x 8x 16x Prev Play previous video Next play next video Figure 20 Figure 21 Fig...

Page 47: ...ing button is pushed Stop Exit the video play Figure 25 Ad mpeg 00 00 03 00 04 07 FB FF Next PlayMode Prev Proportion Switch Play ByOrder Single PlayLoop Ad mpeg 00 00 03 00 04 07 Slow Stepping Set A...

Page 48: ...t it takes to be happy with your work but i also know there s no simple formula to achieve career success and satisfaction the workplace is chaotic if you re like most people you probably feel that yo...

Page 49: ...previous page Next Page Show next page Prev Show previous document Next Show next document Stop Exit document reading Music Shown as Figure 35 When set to open play music at the same time Rk it s not...

Page 50: ...o the right area when the focus is on the right side file display area if the focus on the folder then into the folder If movies music pictures text and then play the file Exit If the focus is on the...

Page 51: ...e sure a headphone jack is not connected Batteries of remote control may have exhausted if necessary please change the batteries Clean the remote control lens The distance between LED TV and remote co...

Page 52: ...ock small block dots pixelization etc Black bars on each side will be shown on HD channels when displaying SD 4 3 contents Black bars on Top Bottom will be shown on movies that have aspect ratios diff...

Page 53: ...Troubleshooting 52 Picture defects and the reason Ghosting may also occur when still pictures are displayed continuously It may disappear after a few moments...

Reviews: