background image

Event Triggering

In the event of an emergency, or for any other reason where you want to save the recorded 

moment, simply press the MENU button (#1) while the camera is recording. The camera will 

display the “!” symbol on the LCD display, and the current and previous file (2 min, 5 min or 10 

minutes – depending on your settings) will be locked and saved as a READ ONLY file. This will 

prevent the camera from overwriting it the next time it is under cyclic recording.

You can browse the Memory Card on your computer, or connect the camera via USB to view the 

file.

WARNING: Formatting the memory card will erase ALL of the information on the card, including 

“READ ONLY” files.

Menu Operation

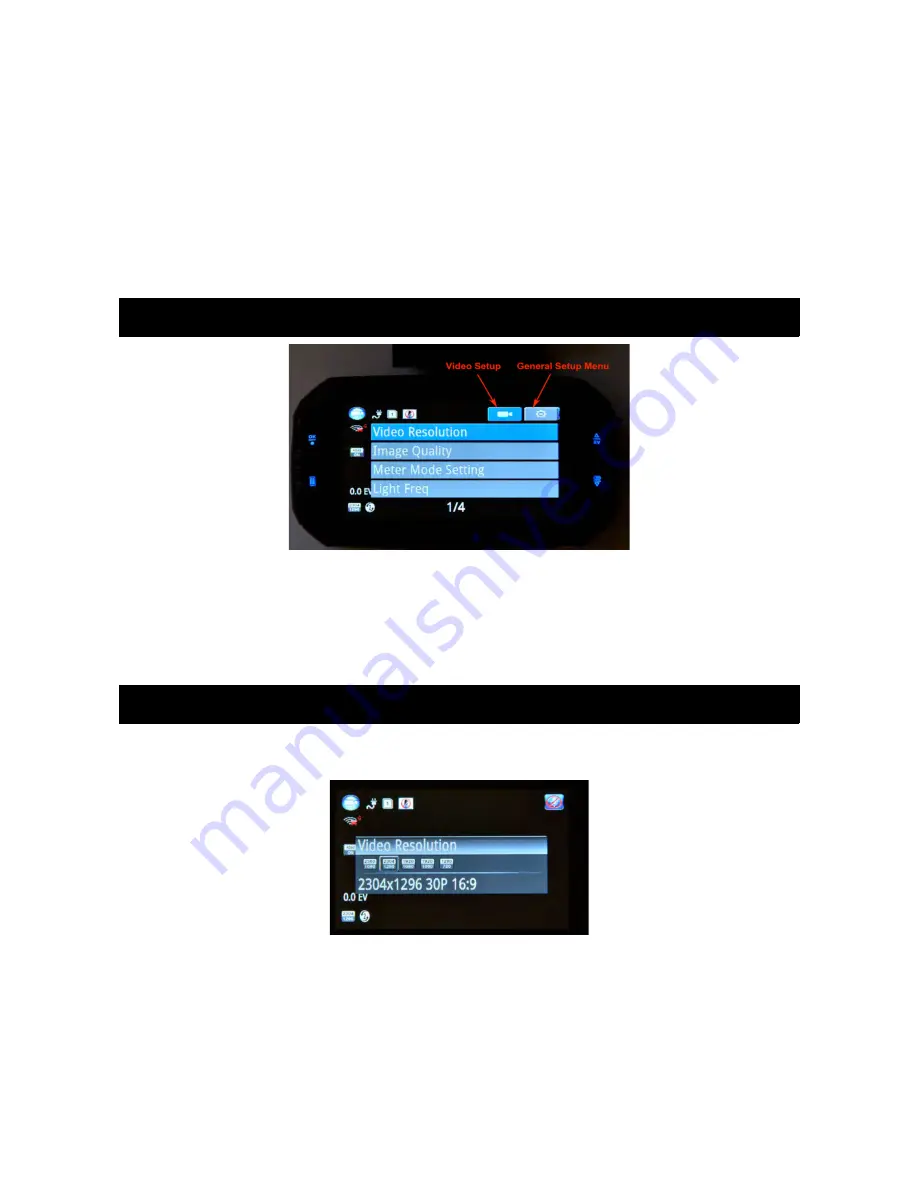
The camera has two menus. The Video Setup menu and the General Setup menu.

Press MENU while the camera is not recording to activate the Menu.

Press MENU button again to switch between Video and General Setup menus.

Use UP or DOWN buttons to highlight the desired option, then press OK to enter the submenu.

Confirm the selection by using the UP and DOWN buttons to select the item, then press OK to 

confirm the setting.

Video Setup Menu

Resolution

Video resolution can be selected up to 2304 x 1296P. Higher resolution produces a higher quality

image, however the higher the resolution, the higher the file size.

A standard 32GB microSD card will hold approximately 8 hours of the highest resolution mode 

available.

2560x1080 30P 21:9 / 2304 x 1296 30P / HDR 1920 x 1080 30P / 1920 x 1080 30P / 

1280 x 720 60P / 1280 x 720 30P

4

Summary of Contents for KACARDCFHDA

Page 1: ......

Page 2: ...ADAS Advanced Driver Assistance System 6 Record Time Loop Setting 6 Speed Setting 6 Time Zone 6 AE Bias Automatic Exposure 7 LED Setting 7 G Sensor Gravity Sensor 7 Motion Sensor 7 General Setup Menu 8 Language 8 System Mode 8 Driver ID Licence Plate Setting 8 Time Setup 8 Format 9 Default Setting 9 Backlight Off Setting 9 Beep Sound Setting 9 Version Info 9 Playback 9 Connecting To PC MAC 10 Micr...

Page 3: ...rtain camera functions such as Motion Sensor and G sensor should remain OFF under normal operating conditions They are intended to be used ONLY when the vehicle is stationary and would interfere with normal camera operations while driving Please only change the settings as required First Time Setup 1 Remove the protective tape from the Fixed plate then install the plate to the windscreen glass We ...

Page 4: ...oto Playback 2 External Power Connection Battery 3 Memory Card x no card or defective card 4 G Sensor status recommended mode is OFF as shown in image 5 Video file lock EVENT function will be active when an event is triggered 6 Recording 7 Recording time 8 Microphone ON OFF 9 GPS Status turns green with optional GPS module only 10 ADAS Advanced Driver Assistance System 11 Speed Limit Preset speed ...

Page 5: ...g READ ONLY files Menu Operation The camera has two menus The Video Setup menu and the General Setup menu Press MENU while the camera is not recording to activate the Menu Press MENU button again to switch between Video and General Setup menus Use UP or DOWN buttons to highlight the desired option then press OK to enter the submenu Confirm the selection by using the UP and DOWN buttons to select t...

Page 6: ...way in which the camera determines the exposure Average Center Spot Light Frequency Light frequency reduce flickering Auto 60Hz USA standard 50Hz European standard Date Stamp You can select to have the Date Time stamped onto the video ON OFF The current speed is also stamped when ON when the GPS module is present 5 ...

Page 7: ...d Time Loop Setting Using the record time function you can have the camera split the video files into either 2 5 or 10 minute files The recording is continuous but the files are split into smaller chunks so they are easier to work with 2 min 5 min 10 min Speed Setting Set the units at which the unit will measure your travelling speed M h KM h Time Zone Using the UP and DOWN buttons 4 and 5 set the...

Page 8: ...verwritten when the camera files loop Adjust the sensitivity parameter of the sensor so that the camera does not automatically lock all of the recorded videos High Medium Low Off Motion Sensor Set to OFF under normal operation Like the G sensor the motion detection function is used when the vehicle is stationary or under special application options If you have the camera hardwired you can set the ...

Page 9: ...s licence number here This number will then be stamped into the video at the bottom right corner along with the time and date Press OK then use UP and DOWN to select the first letter or number Press MENU to go to the next number or letter After you have set your identification number press OK to save Time Setup Adjust the current date and time Select Year Month Day Hour Minute then press OK to sav...

Page 10: ...fault Backlight Off Setting Off 1 min 3 min 5 min Beep Sound Setting ON OFF function for Power ON OFF chime and beep with each key press Version Info Current firmware version Playback Press MODE button to select the playback mode and thumbnail view Press UP to select the video files Press OK to play the video Press MENU to delete the file 9 ...

Page 11: ...nd where your cigarette lighter is located you may choose to use the included power adapter or opt for a hardwire stealth kit not supplied Some vehicles have a switched cigarette lighter output so if you connect it here the camera will always turn on and off with the car Other vehicles such as older European cars have an always on outlet so you will either have to manual connect disconnect the cam...

Reviews: