background image

11

12

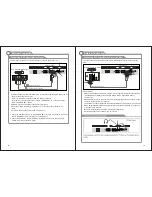
External Connection

Connecting VCR

These instructions assume that you have already connected your TV to an antenna or a

cable TV system. Skip step 1 if you have not yet connected to an antenna or a cable

system.

5

VCR Rear Panel

4

3

Audio Cable (Not supplied)

Video Cable (Not supplied)

RF Cable (Not supplied)

Follow the instructions in Viewing a VCR or Camcorder Tape to view your VCR tape.

Each VCR has a different back panel configuration.

When connecting a VCR, match the color of the connection terminal to the cable.

We recommend the use of cables with a Ferrite Core.

1. Unplug the cable or antenna from the back of the TV.

2. Connect the cable or antenna to the ANT IN terminal on the back of the VCR.

3. Connect an RF Cable between the ANT OUT terminal on the VCR and the ANT IN

terminal on the TV.

4. Connect a Video Cable between the VIDEO OUT jack on the VCR and the VIDEO IN

jack on the TV.

5. Connect Audio Cables between the AUDIO OUT jacks on the VCR and the AUDIO L and

AUDIO R jacks on the TV.

If you have a mono (non-stereo) VCR, use a Y-connector (not supplied) to hook up to

the right and left audio input jacks of the TV. If your VCR is stereo, you must connect

two cables.

TV Rear Panel

Installing Batteries in the Remote Control

Installing Batteries

Installing Batteries

1

Open the battery compartment

cover on the back side.

2

Insert two 1.5V AAA size batteries in

correct polarity. Don´t mix old or used

batteries with new ones.

3

Closed the cover.

Point the remote towards the remote

control sensor of the wireless TV and

use it within 7 meters.

Put the used batteries into the recyc-

ling bin since it can negatively affect

the environment.

Universal Remote Control operation please refer to Appendix 2.

General Description

Battery

Cover

2xsize AAA 1.5V

Battery

Cover

Antenna connection

Antenna input impedance of this unit is 75ohm. VHF/UHF 75ohm coaxial cable can be

connected to the antenna jack directly, if the antenna cable is 300ohm parallel flat feeder

cable, you need to use the 300ohm/75ohm converter to connect the antenna cable to the

antenna jack. For details Please refer to the following drawing.

Use a 75ohm - 300ohm converter

300ohm coaxial cable

Antenna feeder

ANT IN

75ohm coaxial cable

Antenna cable

Antennas with 300

flat twins Leads

W

Antennas with 75

Round Leads

W

External Connection

Summary of Contents for HDMI 1080p32

Page 1: ...1080p32 LCD TV 1080p32 USER MANUAL Full High Definition LCD TV...

Page 2: ...ury Caution To reduce the risk of electric shock do not remove cover or back No user serviceable parts inside Refer servicing to qualified service personnel Important Safety Precautions 2 12 Use only...

Page 3: ...ing DVD Player Blu ray Player via HDMI Connecting Digital Audio System Connecting Amplifier DVD Home Theater Connecting PC Supporting signals Basic operation Turning the TV On and Off Input Setup Chan...

Page 4: ...DIF ouput Warnings Features Introduction 6 Fine digital control AC 110 240v 50 60Hz 75 Unbalance W 2 x 10W 180W 1920 x 1080 32 81cm Color active matrix LCD display 796 x 232 x 573 13 7Kg PAL D K I B G...

Page 5: ...ew of front and side panel Accessories HDMI Connect to the HDMI jack of a device with an HDMI output VGA PC IN Connect to the video output jack on your PC PC AUDIO IN Audio input for external devices...

Page 6: ...ontrol to TV mode MUTE Mutes the sound VOL Changes your DTV s volume CH Changes channels ENTER Validation key MENU Displays the main menu EXIT Exit the menu FAV Selects favorite channels NICAM The but...

Page 7: ...not supplied to hook up to the right and left audio input jacks of the TV If your VCR is stereo you must connect two cables TV Rear Panel Installing Batteries in the Remote Control Installing Batterie...

Page 8: ...Core TV Rear Panel HDMI Cable Not supplied DVD Player Blu ray Player AUDIO OUT jacks on the DVD player External Connection Connecting DVD Player Blu ray Player The rear panel jacks on your TV make it...

Page 9: ...es with a Ferrite Core 1 SPDIF jacks on the TV and the Digital Audio Input jacks on the Digital Audio System When a Digital Audio System is connected to the SPDIF terminal Decrease the gain volume of...

Page 10: ...2 Basic Operation 3 Press the SOURCE button on either the remote control or the front panel of the LCD TV Repeat pressing the Source button to select the desired source DTV ATV AV1 AV2 S Video YPbPr V...

Page 11: ...ontrol to display the following OSD the indications of items in this OSD are listed in the following table EPG Menu Press key to enter EPG menu the first line displays current channel number EPG chann...

Page 12: ...21 22 Menu system instruction Menu system instruction t u t u t u SOUND ENTER SOUND Auto Volume t u Auto Volume t u SOUND Sound Time menu options...

Page 13: ...mote control and then use buttons and ENTER to select the setup menu t u 1 Press the button to move the cursor to the item to be selected q 2 Press the button to make adjustments t u 3 When you are sa...

Page 14: ...25 26 1 Auto Tving 2 ATV Manual Tunint TV SETTNG operations Auto Tving Menu system instruction Menu system instruction TV SETTNG operations ATV Manual Tunint...

Page 15: ...DELETE SKIP FAV Menu system instruction 28 27 Menu system instruction DTV Manual Tuning LOCK menu operations 8888 DTV Manual Tuning...

Page 16: ...Menu system instruction 30 29 8 Troubleshooting MUTE LOCK menu operations...

Reviews: