background image

18

A-61734  March 2012 

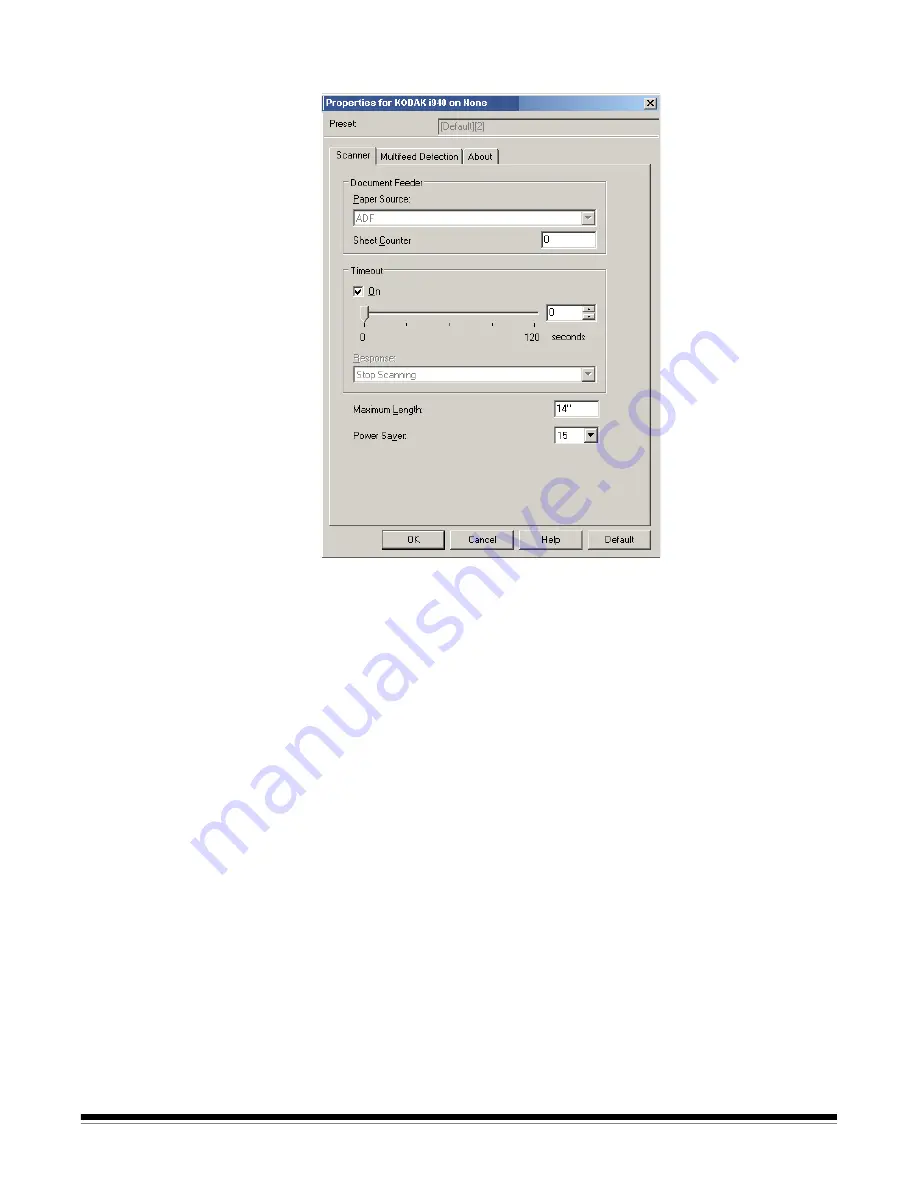
Scanner tab

The Scanner tab provides the following options.

Document Feeder

Paper Source: ADF

 — the scanner will only scan documents from the 

input tray.

Sheet Counter 

— enter the number to be assigned to the next physical 

sheet of paper entering the scanner. This is incremented sequentially 
by the scanner and is returned in the image header.

Timeout

On

 — click 

On

 to set the amount of time, in seconds, the scanner will 

wait once the last document enters the feeder before the timeout 
occurs.

Response

 — indicates the action that will be taken when the timeout 

has been reached. 

Stop Scanning 

is the only selection. When the 

timeout has been reached, scanning will stop and control will return 
to the scanning application (i.e., ends the job).

Maximum Length

 — enter a value that indicates the length of the 

longest document in your document set.

NOTES:

• Not all combinations of settings for 

Mode 

and

 Resolution

 are 

supported at the larger lengths. 

• The scanner’s throughput may be reduced for large lengths.

Power Saver

 — allows you to set the amount of time, in minutes, the 

scanner has to be inactive before going into power saver mode.

Summary of Contents for ScanMate i900 Series

Page 1: ......

Page 2: ...s provide the ability to process scanned images to improve their quality by using image processing features Image processing refers to features of the scanner that allow you to automatically adjust ea...

Page 3: ...to select a directory to store scanned images and their file names This option is only available when Save Images to Files is selected Start Scanning scans the documents in the input tray Scan One Pa...

Page 4: ...example to see every image enter a value of 1 To see every 10th image enter a value of 10 Total displays the total number of images scanned during the current Scan Validation Tool session To access t...

Page 5: ...box list the available sides front and back of an image where you can define individual image processing values Options include Front Image 1 Front Image 2 Back Image 1 and Back Image 2 The Kodak Scan...

Page 6: ...r black and white image settings on one side and transfer them to the other For example if you highlight and set up Front Image 1 you can use the Copy button to duplicate those settings for Back Image...

Page 7: ...r dual stream scanning color grayscale and black and white cropping must be the same per side Only one cropping option can be assigned per image Select one of the following options Automatic dynamical...

Page 8: ...foreground information varies in color quality and darkness Different types of documents may be scanned using the same image processing parameters and results in excellent scanned images iThresholdin...

Page 9: ...pe of a conventional portrait where height is greater than width Landscape displays the image orientation in the shape of a conventional landscape painting where width is greater than height Page Orie...

Page 10: ...change on the Scan Area dialog box the same selections will be displayed on the Layout tab and vice versa Page Layout Portrait displays the image orientation in the shape of a conventional portrait wh...

Page 11: ...ftone Removal enhances images containing dot matrix text and or images with shaded or colored backgrounds using halftone screens and effectively eliminates noise caused by the halftone screen Invert I...

Page 12: ...raft maximum compression which produces the smallest image size Good a fair amount of compression but still produces acceptable image quality Better some compression which produces decent image qualit...

Page 13: ...o that only the entered data is included in the electronic image i e remove the form s lines and boxes For black and white images these settings effect the grayscale version of the document which the...

Page 14: ...rast makes the image sharper or softer The values range from 50 to 50 The default is 0 Color Balance not available for grayscale images none Manual allows you to set specific values that will be used...

Page 15: ...is not recommended for use with photographs Automatic advanced for advanced users that want to further adjust the Automatic option Aggressiveness allows you to adjust the extent of the variation Incre...

Page 16: ...e Edge Fill be careful not to enter a value too large as it could fill in image data that you want to keep Fill Color allows you to select the color to fill the edges with none White Black Frame Mode...

Page 17: ...pecify a blank image size for each image type Black and White Grayscale and Color you want to delete If you do not make an entry in these fields all images are kept Content images will be considered b...

Page 18: ...ol as described earlier in this guide and access the ISIS Driver Click Scanner to configure settings associated with the scanner The following sections provide descriptions and procedures for configur...

Page 19: ...rs the feeder before the timeout occurs Response indicates the action that will be taken when the timeout has been reached Stop Scanning is the only selection When the timeout has been reached scannin...

Page 20: ...mple if you are scanning 8 5 x 11 inch A4 documents in portrait mode enter a value of 11 25 inches 28 57 cm in the Max Length field Auto Set automatically sets the maximum length value to 50 inch 1 27...

Page 21: ...20 A 61734 March 2012 About tab Displays information about your scanner and driver...

Page 22: ......

Reviews: