Kodak RODPJSFFSG120 User Manual Download Page 17

15

A replacement Product or part thereof shall enjoy the warranty of the original 
Product for the remainder of the Warranty Period, or ninety (90) days from the 
date of replacement or repair, whichever provides you longer protection. When a 
Product or part is exchanged, any replacement item becomes your property, while 
the replaced item becomes the Company’s property. Refunds can only be given if 
the original Product is returned.  

This Warranty does not apply to: 

(a)  

Any non-KODAK Portable Projection Screen 120” with Foldable Legs and 

      Front/Rear Projection product, hardware or software, even if packaged or 
      sold with the Product; 

(b)  

Damage caused by use with non-KODAK Portable Projection Screen 120” 

       with Foldable Legs and Front/Rear Projection products;

(c)  

Damage caused by accident, abuse, misuse, flood, fire, earthquake, 

      or other external causes; 

(d)  

Damage caused by operating the Product outside the permitted or 

       intended uses described by the Company; 

(e)  

Damage caused by third party services; 

(f)   

A Product or part that has been modified to alter functionality or 

      capability without the written permission of the Company; 

(g) 

Consumable parts, such as batteries, fuses, and bulbs; 

(h) 

Cosmetic damage; or 

(i)   

If any KODAK Portable Projection Screen 120” with Foldable Legs and 

      Front/Rear Projection serial number has been removed or defaced.

This Warranty is valid only in the country where the consumer purchased the 
Product, and only applies to Products purchased and serviced in that country.

The Company does not warrant that the operation of the Product will 
be uninterrupted or error-free. The Company is not responsible for damage arising 
from your failure to follow instructions relating to its use.

Summary of Contents for RODPJSFFSG120

Page 1: ...With Foldable Legs and Front Rear Projection KODAK Portable Projection Screen 120 User Guide RODPJSFFSG120...

Page 2: ...leitung auf Franz sisch Italienisch Deutsch oder Spanisch zu lesen besuchen Sie bitte www kodakphotoplus com oder nutzen Sie diesen QR Code Per visualizzare questa guida in francese italiano tedesco o...

Page 3: ...e Please keep all packaging materials out of reach of children and pets Properly dispose of all packing materials immediately after unpacking product as the bags used for packaging could present a suf...

Page 4: ...ved location Indoor or outdoor use Applicable uses Meetings parties conferences concerts and other events Product care Clean with damp soft cloth Adult assembly required Yes Installation required No C...

Page 5: ...ear screen fabric 2 Foldable screen frame 3 Foldable legs x 2 4 Front support braces x 2 5 Projection screen carrying bag 6 Hand screws x 12 7 Outdoor stakes x 4 8 Ropes x 2 9 Silver loops x 2 10 User...

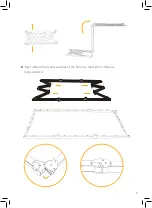
Page 6: ...rt brace ASSEMBLY INSTRUCTIONS NOTE This assembly may require two 2 people to complete 1 Remove the screen frame from the packaging and place it on a large flat surface Then carefully unfold the large...

Page 7: ...5 2 Next unfold the smaller sections of the frame so the width of frame is fully extended...

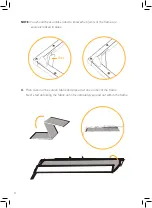
Page 8: ...und to know when joints of the frame are securely locked in place 3 Then take out the screen fabric and place it at one corner of the frame Next start unfolding the fabric until it is completely sprea...

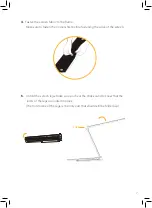
Page 9: ...the corners first before fastening the sides of the screen 5 Unfold the screen legs Make sure you hear the click sound to know that the joints of the legs are locked in place The front piece of the l...

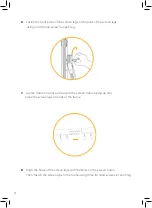
Page 10: ...nd screw for each leg 7 Lay the frame on a flat surface with the screen frame facing up and place the screen legs on back of the frame 8 Align the holes of the screen legs with the holes on the screen...

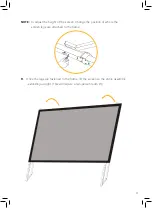
Page 11: ...d to the frame lift the screen so the entire assembly is standing upright This will require a two person team lift 9 NOTE To adjust the height of the screen change the position of where the screen leg...

Page 12: ...ht extend the front piece of the legs out 11 Connect the front support brace to the front piece of the screen leg using two 2 hand screws so the projection screen is stable Then do the same for the se...

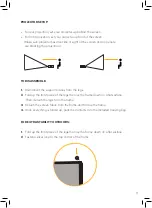
Page 13: ...king the projection 1 Disconnect the support braces from the legs 2 Fold up the front piece of the legs then lay the frame down on a flat surface Then detach the legs from the frame 3 Detach the scree...

Page 14: ...d tie it to a stake Then stick the stake into the ground behind the projection screen Use a hammer if needed 6 Grab the other end of the rope and tie it to another stake Then stick the stake into the...

Page 15: ...ith hands or sharp objects Clean the screen surface with a damp soft cloth Wipe the screen carefully When storing the product the screen is made from anti crease material so you can fold up the fabric...

Page 16: ...ional documents and or comply with registration requirements before receiving warranty service Please contact our customer service for details on obtaining warranty service USA kodak camarketing com 8...

Page 17: ...roducts c Damage caused by accident abuse misuse flood fire earthquake or other external causes d Damage caused by operating the Product outside the permitted or intended uses described by the Company...

Page 18: ...L CUMULATIVE LIABILITY ARISING FROM OR RELATED TO THE PRODUCT WHETHER IN CONTRACT OR TORT OR OTHERWISE EXCEED THE FEES ACTUALLY PAID BY YOU TO THE COMPANY OR ANY OF ITS AUTHORIZED RESELLERS FOR THE PR...

Page 19: ...erience any problems with your product please contact us before returning the item to the place of purchase We re here to help U S Support kodak camarketing com 844 516 1539 International Support koda...

Page 20: ...es company names and logos are trademarks of their respective owners used merely to identify their respective products and are not meant to connote any sponsorship endorsement or approval Distributed...

Reviews: