background image

www.kodak.com/go/aiosupport

81

KODAK HERO 7.1 All-in-One Printer

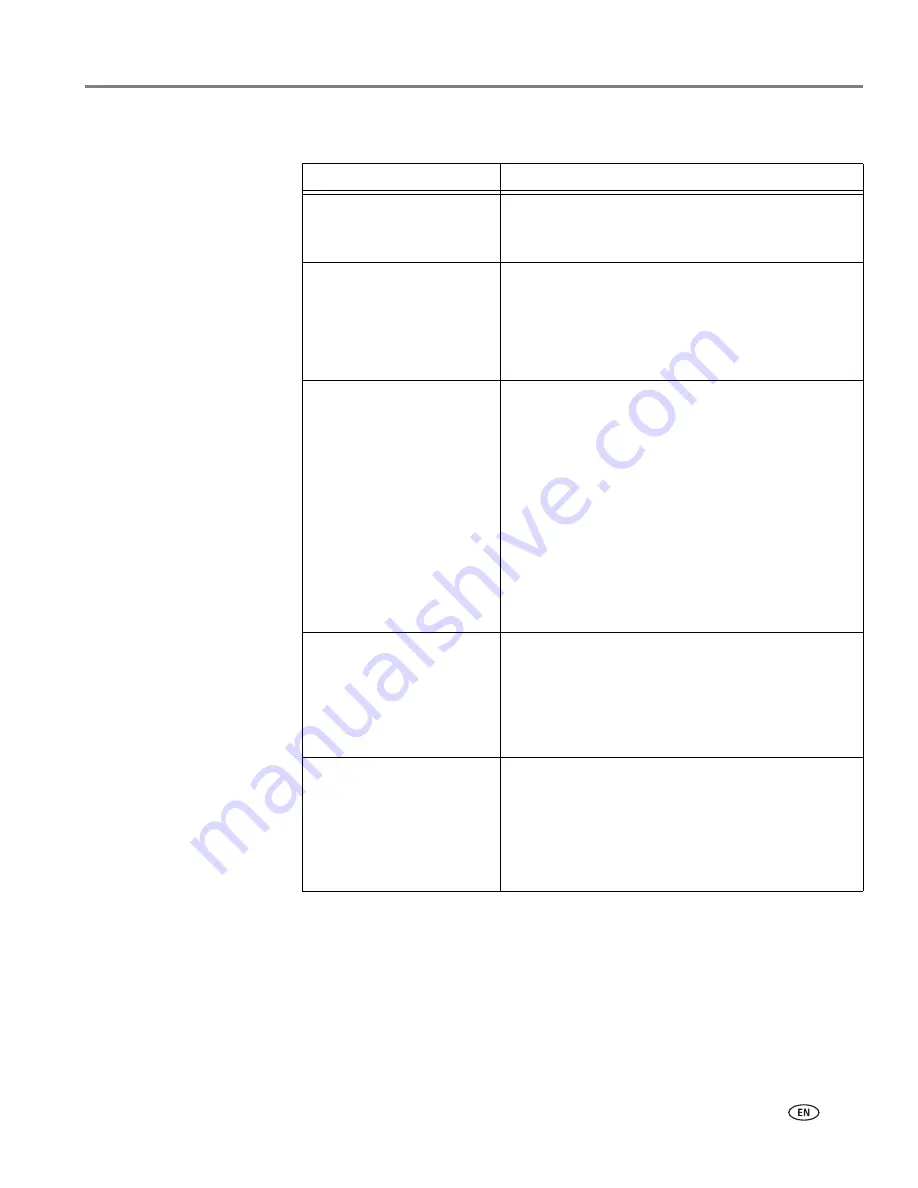
c. To adjust settings for scanning pictures, select the 

Picture

 tab, then select an 

option for each setting:

NOTE: Before you save a scanned file in Home Center Software, you can 
preview, crop, and sharpen the image, and adjust the color. On a computer with 
WINDOWS OS, see the Home Center Software Help (

?

 icon) for instructions.

Setting

Options

File format

.jpg
.bmp
.tif

Resolution (dpi)

75
150
200

300

600

Quality

When connected to a computer with WINDOWS 
OS:

• Best  for  E-mail

• Normal

• High

• Maximum

When connected to a computer with MAC OS, 
a slider bar with:

• Least

• Medium

• Best

Automatically Detect 
Pictures (when connected 
to a computer with 
WINDOWS OS) or Auto 
Crop (when connected to a 
computer with MAC OS)

When selected, multiple pictures placed on the 
scanner glass are saved as separate files.

File Save

Prompt for File Name and Location
Automatically Save - specify:

• Base name; by default, scanned files are names 

“scan1”, “scan2”, and so on.

• Location (folder) where the scanned files will be 

saved

Summary of Contents for HERO 7.1

Page 1: ...KODAK HERO 7 1 All in One Printer Extended User Guide ...

Page 2: ... Kodak Company Rochester NY 14650 Eastman Kodak Company 2011 Kodak EasyShare Hero and Perfect Touch are trademarks of Eastman Kodak Company Specifications subject to change without notice P N 1K5928 July 2011 ...

Page 3: ...nnecting to another KODAK All in One Printer 15 Connecting to an Ethernet network 16 Adding a wireless network connection to a USB connected computer 17 Changing from USB to a wireless connection 17 Changing from USB to an Ethernet connection 18 3 Online Printer Management Tool Accessing the Online Printer Management Tool 20 Using the Online Printer Management Tool 21 Configuring printer settings ...

Page 4: ...rinting pictures from a BLACKBERRY Device 65 Printing pictures from an ANDROID OS Device 66 7 Copying Copying a document 67 Using the default settings to copy a document 67 Adjusting the settings and copying a document 68 Changing the number of copies of a document 70 Enlarging or reducing the size of a copy 71 Darkening or lightening a copy 72 Copying a photo 73 Using the default settings to copy...

Page 5: ...els 104 Resetting factory defaults 104 10 Troubleshooting Basic troubleshooting 105 Getting help on the Web 107 Status lights 108 Power status light 108 Wi Fi status light 108 11 Product and Safety Specifications Features and Specifications 109 Print Performance 109 Photo Printing Features 109 Copy document features 110 Copy photo features 110 Scanning features 110 Main bottom paper tray 110 Photo...

Page 6: ...dian Statements 118 European Compliance Statement 118 German compliance statement 118 REACH Article 33 Declarations 119 Waste Electrical and Electronic Equipment Labeling 119 ENERGY STAR Qualified 119 Warranty Information 120 Declaration of Conformity 121 ...

Page 7: ... 1 Control panel 10 Output tray extender with paper stop 2 Power cord port 11 Output tray 3 USB port 12 Scanner glass 4 Ethernet port 13 Scanner lid 5 Duplexer rear access cleanout cover 14 Front paper edge guides 6 Access door 15 Main paper tray 7 Printhead with ink cartridges installed 16 Paper tray extender 8 Front USB port 17 Left paper edge guides 9 MS SD HC MMC Card slot 18 Photo paper tray ...

Page 8: ... Turns the printer on or off 4 Wi Fi connectivity LED When lit signals that the printer is connected to a wireless Wi Fi network blinks when searching for an available Wi Fi network 5 Start button Begins copying scanning printing maintenance tasks and file transfer 6 Help button Displays context sensitive help 7 Back button Displays the previous screen or the next highest screen in the menu hierar...

Page 9: ...ent settings and options Copy Photo settings and options View and Print Photos options and settings List of scan to options Scan to Computer Memory USB Flash Drive Email and Network Folder Touching a scan to option displays settings for that option The list of forms that you can print from the control panel Network settings Printer settings ...

Page 10: ... to scroll in that direction Touch the scroll bar to move to a different location Home Screen Status Icons Three status icons appear on the Home Screen Touch the Paper or Ink Levels status icons to see information regarding those items Touch the Wi Fi icon to open the Networking Menu Touch OK or back to dismiss the screen Cloud Printing options Maintenance options Feature Icon Displays Paper Level...

Page 11: ...er If an item requires attention the attention graphic appears on the corresponding status icon For example if the level of black ink is low the attention graphic appears on the ink icon Touch the icon to display instructions Touch OK to return to the Home Screen ...

Page 12: ...3D pictures from picture pairs taken to create 3D pictures print from video send images to or print images from KODAK Gallery send images to or print images from FACEBOOK Social Network FLICKR PHOTOBUCKET PICASA SMILEBOX Photo Management Systems and GOOGLE Docs configure your printer install new network printers upgrade to the latest printer software and firmware order supplies access the KODAK Ti...

Page 13: ...er supplies directly from Home Center Software 1 Open Home Center Software 2 Select Order Supplies on a computer with WINDOWS OS or select the Tools tab then click Order Supplies on a computer with MAC OS 3 Select the item s you want to buy then follow the on screen instructions To order supplies from the Web Ink www kodak com go printingsupplies Paper www kodak com go inkjetpaper ...

Page 14: ...our printer to go into a low power mode after a set amount of time Touch the time to low power select from 1 to 4 hours in 0 5 hour increments After the time to low power the printer enters a low power sleep mode Tagged Images Printing Touch On or Off to set Language Touch or to scroll through the languages then touch a selection Country Region Touch or to scroll through the countries or regions t...

Page 15: ...reless network To connect your printer to an 802 11 wireless Wi Fi network use the following procedures Before you connect You need a wireless router to determine whether your wireless router supports Wi Fi Protected Setup WPS NOTE If you have specific questions about your router see your router manufacturer s documentation for more information ...

Page 16: ...ecurity on your network you also need to know the security string which may be a Wired Equivalent Privacy WEP or a Wi Fi Protected Access WPA WPA2 passphrase Record your network information using the correct uppercase and lowercase letters Network Name SSID _______________________________________ Security String case sensitive ____________________________ 1 Press 2 Touch then touch Network Setting...

Page 17: ...ring The Security String is case sensitive When you are finished touch OK 6 When the confirmation message appears touch OK When the printer is successfully connected the Wi Fi connectivity LED will stop blinking and remain lit The printer with a wireless connection is listed as the name of the printer plus a number for example KodakHERO7 1 0229 7 If you haven t installed the KODAK All in One Print...

Page 18: ...the printer make sure you know where the router s push button is or where to enter the generated PIN If necessary consult your Internet Service Provider or router device manufacturer s documentation for more information Push Button Configuration Generate WPS PIN NOTE You will have two minutes to press or select the WPS button It may be a button on the device or a virtual button in the device s sof...

Page 19: ...an IP Address IMPORTANT You should only need to set up an IP Address for your printer if you are having a problem connecting your printer to a wireless network Typically it is not necessary to set up an IP Address This procedure is for advanced users who know how to obtain the IP Address for the printer To set up your IP Address on the printer 1 Press 2 Touch then touch Network Settings 3 Touch Ad...

Page 20: ...P Address IP Address Type Network Subnet Connected Network SSID Security Authentication Channel Region Radio on off MAC Address When the printer is connected to your network you will see the network name and the word CONNECTED 4 To scroll through the information touch 5 When you are done viewing your configuration touch OK Printing the network configuration To print the current network configurati...

Page 21: ...nter will be uninstalled and updates for the ESP 7250 Printer will be installed in addition to the driver for the HERO 7 1 Printer On a computer with WINDOWS OS 1 Select Start All Programs Kodak KODAK Printer Network Setup Utility If your wireless printer example KodakHERO7 1 0229 is not listed a Select No my printer is not listed then click Next b From the drop down list select your printer c Sel...

Page 22: ...cessfully installed and communicating To connect to an Ethernet network 1 Connect the Ethernet cable to the Ethernet port on the back of the printer 2 Connect the other end of the Ethernet cable to an available Ethernet port on your router switch or hub 3 If you haven t installed the KODAK All in One Printer Software a Go to www kodak com go aiodownloads b In the results list click the link for KO...

Page 23: ...ur printer from the list then click Next c Select Network Wireless Wi Fi then click Next When your printer is detected driver installation begins If your wireless printer example Kodak HERO 7 1 0229 is listed a Select the printer that is connected to your network b Select Yes my printer is listed then click Next When your printer is detected driver installation begins 5 When driver installation is...

Page 24: ...he back of the printer 3 Connect the other end of the Ethernet cable to an available Ethernet port on your router switch or hub If your printer is connected to a computer with WINDOWS OS 1 Select Start All Programs Kodak KODAK Printer Network Setup Utility 2 Select No my printer is not listed then click Next 3 Select HERO 7 1 from the printer drop down list 4 Select Network Ethernet cable then cli...

Page 25: ...our printer must be on the same wireless or Ethernet network The Online Printer Management Tool is not available if your printer is connected to a computer with a USB cable With the Online Printer Management Tool you can view printer status configure or change printer settings create Scan to Email and Scan to Network Folder profiles that you can access from the printer control panel add entries to...

Page 26: ...om of the window 4 Under Tools select Online Printer Management The Online Printer Management Tool will open On any printer supported computer 1 Get the IP Address of your wirelessly connected printer a On your printer control panel press b Touch then touch Network Settings c Touch View Network Configuration then touch until you see your printer IP Address in the format xxx xxx xxx xxx See Viewing...

Page 27: ...hange the standby time volume of the button sound or date and time 1 Open the Online Printer Management Tool see Accessing the Online Printer Management Tool page 20 2 Select the Settings tab 3 Select Device 4 Select General or Date Time and make any necessary changes 5 Click Save NOTE Select Reset to restore default settings if necessary ...

Page 28: ...printer name 1 Open the Online Printer Management Tool see Accessing the Online Printer Management Tool page 20 2 Select the Network tab 3 Select General then Friendly name if necessary 4 Highlight the text in the Friendly name field and type the name you want then click Save ...

Page 29: ...to an email recipient To do so you must first set up a profile for yourself and define the email address es to which you want to send scans Adding an outgoing email profile 1 Open the Online Printer Management Tool see Accessing the Online Printer Management Tool page 20 2 Select the Settings tab 3 Select Scan To Email Email Profile 4 Click Add New Outgoing Email Profile ...

Page 30: ...for example your initials and your email provider such as LR Hotmail or LR Gmail This name will appear on the printer control panel when you start a scan to be sent through email 6 In the From Email Address field type your email address Although the email will be sent from the printer any replies will go to this email address ...

Page 31: ...me or IP Address of your email service provider in the Email Server field b Type the port number of your email server in the Port Number field NOTE Locate this information in the email account properties fields in your email application or contact your Internet Service Provider c If your mail server supports secure connection mode select the Always use secure connection check box 8 If your email s...

Page 32: ...r all email messages sent from the printer check box 11 Click Test Profile to confirm that the printer can access your account If the printer can access your account Test profile Successful appears Click OK then click Save If the printer cannot access your account Test Profile Failed appears Click OK then make changes to your profile Setting up the email address book To enter email addresses of pe...

Page 33: ...end a scan to an email address the printer uses defaults subject line body and scan settings that you set up under email options 1 Open the Online Printer Management Tool see Accessing the Online Printer Management Tool page 20 2 Select the Settings tab 3 Select Scan To Email Email Option 4 Select and replace the default subject line and body text if necessary This subject line and body text will ...

Page 34: ... 5 Select the scan settings that will be used for all scans sent to email NOTE You can enter a Filename Prefix of your choice 6 Click Save then click OK You can now send a scan to an email address from the control panel See Scanning from the control panel page 82 ...

Page 35: ...ork folder profile Note the network name of the folder including the path information and the name of the computer where it is located To learn more about sharing folders see the information in the links below For computers with WINDOWS XP OS see www microsoft com windowsxp using networking maintain share mspx For computers with WINDOWS VISTA OS see technet microsoft com en us library bb727037 asp...

Page 36: ... To add a network folder profile that you can access from the control panel 1 Open the Online Printer Management Tool see Accessing the Online Printer Management Tool page 20 2 Select the Settings tab 3 Select Scan To Network Folder Network Folder Profile 4 Click Add New Network Folder Profile ...

Page 37: ... digit numeric PIN your choice You will need to enter this PIN each time you access your profile when scanning to a network folder 8 Click Test Profile to confirm that the printer can access the network folder If the printer can access the network folder Test profile Successful appears Click OK then click Save If the printer cannot access the network folder Test Profile Failed appears Click OK the...

Page 38: ...nter uses defaults that you set up under scan settings 1 Select Scan To Network Folder Scan Settings 2 Select the scan settings that will be used for all scans sent to a network folder NOTE You can enter a Filename of your choice 3 Click Save You can now send a scan to a network folder from the printer control panel See Scanning from the control panel page 82 ...

Page 39: ...oftware then click Cloud Printing Setup Depending on your Operating System use the path below to select Cloud Printing Setup WINDOWS XP OS Select Start Programs Kodak KODAK AiO Printer Tools then click Cloud Printing Setup WINDOWS VISTA and 7 OS Select WINDOWS icon All Programs Kodak KODAK AiO Home Center Printer Tools then click Cloud Printing Setup MAC OS Select KODAK AiO Home Center Tools then ...

Page 40: ...account You must sign in with the account you used to set up Google Cloud Print see Registering your printer with Google Cloud Print page 33 1 Go to www kodakeprint com 2 Sign in with the account you used to set up Google Cloud Print see Registering your printer with Google Cloud Print page 33 3 Click Get Email Address for KODAK Printer 4 Click Allow Access You will be redirected to the KODAK Emai...

Page 41: ...nd photos and for printing photos Changing Copy Document and Copy Photo settings To change the default printer settings for copying documents 1 Open the Online Printer Management Tool see Accessing the Online Printer Management Tool page 20 2 Select the Settings tab 3 Select Copy Print Copy Document or Copy Photo 4 Make the changes you want in the appropriate fields then click Save ...

Page 42: ...Online Printer Management Tool 36 www kodak com go aiosupport ...

Page 43: ...tings To change the default printer settings for printing photos 1 Open the Online Printer Management Tool see Accessing the Online Printer Management Tool page 20 2 Select the Settings tab 3 Select Copy Print Print Photo 4 Make the changes you want in the appropriate fields then click Save ...

Page 44: ...ndling photo paper Hold the paper by the edges avoid placing your fingerprints on it Do not touch the glossy side of photo paper Store paper flat away from direct sunlight and heat Paper types You can use Plain paper 16 to 24 lb 60 to 90 gsm Photo paper 7 to 12 mils 290 gsm maximum Card stock 110 lb 200 gsm maximum Envelopes 20 to 24 lb 75 to 90 gsm Transparencies all commercially available inkjet...

Page 45: ...x 22 cm US Executive 7 3 x 10 5 in 18 x 27 cm 8 x 10 in 20 x 25 cm US Letter 8 5 x 11 in 22 x 28 cm Legal 8 5 x 14 in 22 x 36 cm A4 8 3 x 11 7 in 21 x 30 cm A5 5 8 x 8 3 in 15 x 21 cm A6 4 1 x 5 8 in 11 x 15 cm B5 6 9 x 9 8 in 18 x 25 cm The photo top paper tray accepts the following paper sizes 4 x 6 in 10 x 15 cm 4 x 7 in 10 x 18 cm 5 x 7 in 13 x 18 cm A6 4 1 x 5 8 in 11 x 15 cm NOTE Do not load...

Page 46: ... the following envelope sizes in the main paper tray C5 6 4 x 9 in 16 x 23 cm C6 4 5 x 6 4 in 11 5 x 16 cm DL 4 3 x 8 7 in 11 x 22 cm US 7 3 9 x 7 5 in 10 x 19 cm US 9 3 9 x 8 9 in 10 x 23 cm US 10 4 1 x 9 5 in 11 x 24 cm IMPORTANT Do not load envelopes with cutout or clear windows ...

Page 47: ...ain paper tray The main bottom paper tray capacity is 100 sheets of plain paper 1 Raise the output tray and pull out the main paper tray 2 Move the left paper edge guide is to the far left 3 Move the front paper edge guide forward Main paper tray Output tray Left paper edge guide Front paper edge guide ...

Page 48: ...an and stack the paper then insert it into the tray 5 Move the paper forward until it stops 6 Move both the left and front paper edge guides until they touch the paper 7 Push in the main paper tray until it clicks into place and lower the output tray ...

Page 49: ...tender until it is fully extended 9 Lift the paper stop NOTES You can also load photo paper as small as 4 x 6 in 10 x 15 cm in the main paper tray To load legal size paper pull out the output tray extender until it is fully extended but do not lift the paper stop Output tray extender Paper stop ...

Page 50: ...y The photo top paper tray capacity is 40 sheets of photo paper 1 Raise the output tray and pull out the photo paper tray 2 Move the left paper edge guide to the far left 3 Move the front paper edge guide forward Photo paper tray Left paper edge guide Front paper edge guide ...

Page 51: ... side facing up and the glossy side down IMPORTANT If the photo paper is loaded the wrong way the ink on your pictures will be wet and the image quality will be affected 5 Move the paper forward until it stops 6 Move both the left and front paper edge guides until they touch the paper 7 Push the photo paper tray until it is even with the main paper tray ...

Page 52: ...IMPORTANT Do not load envelopes with cutout or clear windows 1 Raise the output tray and pull out the main paper tray 2 Remove any paper from the tray 3 Move the left paper edge guide is to the far left 4 Move the front paper edge guide forward Main paper tray Output tray Left paper edge guide Front paper edge guide ...

Page 53: ...he envelopes with the flap up and against the right side of the tray 6 Move the envelopes forward until they stop 7 Move both the left and front paper edge guides until they touch the envelopes 8 Push in the main paper tray until it clicks into place and lower the output tray ...

Page 54: ...the Paper settings field from the Tray drop down list select Top tray or Bottom tray 4 Click OK to close the Properties dialog box 5 Click OK to begin printing To manually select a paper tray when printing from a computer with MAC OS 1 Open the document you want to print then select File Print 2 In the Print dialog box make sure that Eastman Kodak Company HERO 7 1 AiO is selected 3 From the Copies...

Page 55: ...4 8 3 x 11 7 in 21 x 30 cm B5 6 9 x 9 8 in 18 x 25 cm NOTE The paper width must be 3 9 to 8 5 in 10 to 22 cm The paper length must be 7 to 11 7 in 18 to 30 cm The duplexer cannot print borderless prints poster layout Automatic two sided printing from a computer with WINDOWS OS To print two sided documents from a computer with WINDOWS OS using the duplexer 1 Load plain paper into the paper tray 2 O...

Page 56: ...be done on media that can absorb ink on both sides such as plain paper or two sided photo paper Do not print two sided on bar coded photo paper the bar code is on the back side Manual two sided printing from a computer with WINDOWS OS To print two sided documents from a computer with WINDOWS OS 1 Load paper into the paper tray 2 Open the document you want to print then select File Print 3 In the P...

Page 57: ...n the Print dialog box select the two sided check box 5 Click Print 6 When the even pages have finished printing follow the instructions on the control panel to reload the printed pages in the paper input tray 7 Press on the control panel to print the odd numbered pages Printing forms from the control panel You can print the following forms from the control panel Graph paper Wide ruled Narrow rule...

Page 58: ...follow the on screen instructions On a computer with either MAC OS or WINDOWS OS you can print pictures from KODAK EASYSHARE Software or any picture editing or photo management software Viewing pictures on a memory card or USB connected device When you insert a memory card into the card slot on your printer or connect a USB Device to the front USB port touch View Photos and touch or to scroll thro...

Page 59: ... insert and remove the adapter and the memory card as a unit do not remove the memory card while leaving the adapter in the printer MS SD HC MMC Card slot Front USB port MULTIMEDIA Card MMC SECUREDIGITAL SD Card SECUREDIGITALHigh Capacity SDHC Card Variations of the memory cards above that require an adapter for example MEMORY STICK Duo miniSD microSD and T Flash PICTBRIDGE Technology enabled came...

Page 60: ... card or USB connected device using the default settings 1 Insert the memory card into the appropriate slot or connect the digital camera or portable drive to the front USB port then touch View Photos IMPORTANT Use only one slot or port at a time 2 Touch or to locate the picture you want to print 3 Press to begin printing The printer prints a single 4 x 6 in 10 x 15 cm picture IMPORTANT To prevent...

Page 61: ...nd move the paper edge guides until they touch the paper 2 Insert the memory card into the appropriate slot or connect the digital camera or portable drive to the front USB port then touch View Photos IMPORTANT Use only one slot or port at a time 3 Touch or to locate the picture you want to print then touch or to select a quantity 4 Repeat step 2 for each picture you want to print 5 Press 6 Touch ...

Page 62: ...er tray the printer automatically arranges the pictures to best fit the paper size Tray Selection Top Tray default Picture prints on the paper in the top tray Bottom Tray Picture prints on the paper in the bottom tray Quality Best default The printer detects when you load photo paper and sets Best quality automatically Scene Balance On default Off Adjusts the image brightness to correct for undere...

Page 63: ...nted according to the default settings on your printer unless otherwise specified by the tag from the camera NOTE Refer to your camera user guide to determine whether your camera supports tagged pictures may also be called marked or DPOF functionality To print tagged pictures NOTE Make sure Tagged Images Printing is On see Configuring printer settings page 8 1 Insert the memory card or a connect a...

Page 64: ...ch as a flash drive to the front USB port then touch View Photos IMPORTANT Use only one slot or port at a time 2 Touch or to locate the picture you want to print then press 3 Press 4 Touch then touch View and Print Photos 5 Touch Options Tray Selection then Bottom Tray 6 Touch Print Size then touch and touch 4 x 12 to select 7 Press to begin printing IMPORTANT To prevent loss of data from your mem...

Page 65: ... shows the area that will be printed NOTE You can press Zoom repeatedly to enlarge the picture in increments of 0 25 up to a magnification of 5X Press Zoom to decrease the magnification in increments of 0 25 down to 1X 4 Use the navigation buttons to move the picture on the LCD up down left or right Only the part of the picture in the red box will print The crop window matches the aspect ratio of ...

Page 66: ... on your computer NOTE If you have large video files or a large number of pictures 400 or more we recommend that you use a memory card reader attached directly to your computer to transfer them Transferring pictures to a computer with WINDOWS OS 1 Insert the memory card into the memory card slot on the printer 2 Touch Options 3 Touch Transfer All to PC 4 Press 5 If your computer is connected to a ...

Page 67: ...computer is connected to a wireless network and with a USB cable select the USB connected printer no number after the printer name 6 Use iPhoto or Image Capture on your computer to complete the transfer NOTE You can adjust the Photo print settings using the Online Printer Management Tool When viewing the tool in your browser see Accessing the Online Printer Management Tool page 20 select the Setti...

Page 68: ...Printing 62 www kodak com go aiosupport ...

Page 69: ...figuring printer settings page 8 Printing using Google Cloud Print Print on the go from your smartphone computer or tablet using Google Cloud Print enabled apps Before you can use Google Cloud Print make sure your printer is set up for Google Cloud Print See Setting up Cloud Printing page 33 Printing varies by application For the latest update go to www google com cloudprint learn apps html To pri...

Page 70: ...Print lets you send emails and email attachments documents and pictures to your printer from anywhere using any device capable of sending email NOTE Before you can use KODAK Email Print your printer must be registered to Google Cloud Print see Setting up Cloud Printing page 33 and your printer must have an email address assigned by KODAK Email Print see Registering your printer with KODAK Email Pr...

Page 71: ... iPhone iPad or iPod touch device 2nd generation 1 Make sure your device is connected to the same Wi Fi network as your printer 2 Open the KODAK Pic Flick application on your device 3 Select the picture s you want to print then select Choose Device 4 Select your KODAK All in One Printer from the list of available devices 5 Select Send Printing pictures from a BLACKBERRY Device To print a picture f...

Page 72: ...e same Wi Fi network as your printer 2 Open the KODAK Pic Flick application on your device 3 Select the picture s you want to print 4 Select View Edit to edit the picture s or go to step 5 a Press and hold the screen to enter the edit mode b Rotate move pan zoom or crop the picture 5 Press Select Device then select your KODAK All in One Printer 6 Select the print size 7 Press Back then select Send...

Page 73: ...ghtness of your copies When you copy a document the printer will always use paper from the main bottom paper tray Using the default settings to copy a document The default settings are either the factory default settings see Resetting factory defaults page 104 or defaults that you have set on the printer see Save as defaults page 69 To copy a document using the current default settings 1 Lift the ...

Page 74: ...at print Color Mode Color default Prints full color Black White Prints black and white gray scale Copy Size Same Size default The copy is the same size as the original Fit to Page The printer detects the size of the original on the scanner glass and the size of the paper in the paper tray and automatically reduces or enlarges the original so that the copy fits on the paper Choose Percentage Reduce...

Page 75: ...utput prints faster than Best Best The highest quality but the slowest print speed eliminates the banding effect that sometimes occurs when printing Draft or Normal Draft The fastest print speed but the lowest quality Save as defaults No Yes To save settings as the new default touch Yes Copy Document Option Setting Description ...

Page 76: ...nging the number of copies of a document 1 Lift the scanner lid and place the document face down in the right front corner of the scanner glass 2 Close the lid 3 Press 4 Touch Copy Document 5 Touch or to select a number 6 Press to begin copying ...

Page 77: ...ducing the size of a copy 1 Lift the scanner lid and place the document face down in the right front corner of the scanner glass 2 Close the lid 3 Press 4 Touch Copy Document then touch Options 5 Touch Copy Size 6 Touch an enlargement or reduction selection 7 Press to begin copying ...

Page 78: ...he document face down in the right front corner of the scanner glass 2 Close the lid 3 Press 4 Touch Copy Document then touch Options 5 Touch then touch Lighter Darker 6 Touch to select a number below zero for a darker copy or press to select a number above zero for a lighter copy 7 Press to begin copying ...

Page 79: ...p paper tray unless you specify otherwise Using the default settings to copy a photo The default settings are either the factory default settings see Resetting factory defaults page 104 or defaults that you have set on the printer see Save as Defaults page 75 To copy a photo using the current default settings 1 Lift the scanner lid and place the photo face down in the right front corner of the sca...

Page 80: ... 4 Touch Copy Photo then touch Options 5 Touch or then touch the setting you want to change Copy Photo Option Setting Description Quantity 1 default to 99 The number of copies that print Color Mode Color default Prints full color Black White Prints black and white gray scale Tray Selection Top Tray default Copy is made on the paper in the top tray Bottom Tray Copy is made on the paper in the botto...

Page 81: ... automatically arranges the pictures to best fit the paper size Lighter Darker Normal 3 to 3 Normal is default Lightens or darkens the copy Normal is no change from the original 3 is the darkest 3 is the lightest Quality available only if bottom tray is selected Normal default Good quality output prints faster than Best Best when the top tray is selected The printer detects photo paper in the pape...

Page 82: ... Changing the number of copies of a photo 1 Lift the scanner lid and place the photo face down in the right front corner of the scanner glass 2 Close the lid 3 Press 4 Touch Copy Photo 5 Touch or to select a number 6 Press to begin copying ...

Page 83: ...t corner of the scanner glass 2 Close the lid 3 Press 4 Touch Copy Photo then touch Options 5 Touch Copy Size 6 Touch or then touch a size selection NOTE If you select a copy size larger than 5 x 7 in 13 x 18 cm touch Tray Selection then select Bottom Tray Make sure that the paper in the bottom tray is the size and type plain paper photo paper etc that you want 7 Press to begin copying ...

Page 84: ... place the photo face down in the right front corner of the scanner glass 2 Close the lid 3 Press 4 Touch Copy Photo then touch Options 5 Touch then touch Lighter Darker 6 Touch to select a number below zero for a darker copy or touch to select a number above zero for a lighter copy 7 Press to begin copying ...

Page 85: ... in a format and location that you determine see Changing the scan settings for scanning from the control panel page 80 Scanning from a software program on the computer such as Home Center Software gives you more options but you can also scan from the printer control panel Before you begin scanning If you are scanning to a computer make sure that the printer is connected to a computer using a USB ...

Page 86: ...Tools heading select Printer Scan Settings 3 Adjust settings for scanning documents and pictures a To select a program that your scanned images or documents will appear in when you scan from the printer control panel 1 Select the General tab 2 Under the Program List heading click next to the currently selected program 3 From the list select the program in which you want the scanned files to open b...

Page 87: ...mp tif Resolution dpi 75 150 200 300 600 Quality When connected to a computer with WINDOWS OS Best for E mail Normal High Maximum When connected to a computer with MAC OS a slider bar with Least Medium Best Automatically Detect Pictures when connected to a computer with WINDOWS OS or Auto Crop when connected to a computer with MAC OS When selected multiple pictures placed on the scanner glass are ...

Page 88: ...Memory Card scans to a memory card in the memory card slot Scan to USB Flash Drive scans to a flash drive attached to the front USB port Scan to Email scans to an email address that you select from the Email Profile you set up in the Online Printer Management Tool Scan to Network Folder scans to a shared network folder that you designated in the Online Printer Management Tool Before you can use th...

Page 89: ... Scan Option Settings Description Scan To USB connected Computer default The scanned file is sent to the USB connected computer Name of computer only if a computer is connected by wireless or Ethernet network The scanned file is sent to the computer on the wireless or Ethernet network Scan What Document default Sets the scan settings for scanning a document see Changing the scan settings for scann...

Page 90: ...Scan Action File default Sends the scanned file in the format and to the location on your computer that you designate Application available only when Home Center Software is installed on computer Sends the scanned file to Home Center Software Save as Defaults No Yes To save the settings as the new default press OK With Yes selected press OK Scan Option Settings Description ...

Page 91: ...Drive then touch the setting option you want to change Scan Option Settings Description Scan What Photo default Sets the scan settings for scanning a picture see Changing the scan settings for scanning from the control panel page 80 Document Sets the scan settings for scanning a document see Changing the scan settings for scanning from the control panel page 80 File Type JPG default The scanned fi...

Page 92: ...ified 7 When the message Scan complete appears touch OK Scan Size Auto default 2 x 3 3 5 x 5 4 x 6 4 x 7 4 x 8 5 x 7 4 x 12 8 x 10 8 5 x 11 A4 8 5 x 14 Determines the size that is scanned Save as Defaults No Yes To save the settings as the new default press OK With Yes selected press OK Scan Option Settings Description ...

Page 93: ...lid and place the original face down in the right front corner of the scanner glass then close the lid 2 Close the lid 3 Press 4 Touch Scan 5 Touch Email 6 Select an outgoing email profile the person from whom the email with the scan attachment is sent then press OK 7 If necessary enter the 4 digit PIN number see page 26 select Done then press OK 8 Select an email recipient then press OK 9 Repeat ...

Page 94: ...er options see Setting up Scan To Network Folder page 29 1 Lift the scanner lid and place the original face down in the right front corner of the scanner glass then close the lid 2 Close the lid 3 Press 4 Touch Scan 5 Touch Scan to Network Folder 6 Touch Sharing folder 7 If necessary enter the 4 digit PIN number see page 31 then touch OK 8 Press to begin scanning The scanned file appears at the de...

Page 95: ...ner glass 2 Close the lid 3 Open Home Center Software then On a computer with WINDOWS OS select Scan Documents and Pictures then follow the on screen instructions On a computer with MAC OS select the Tools tab click Scan Application then follow the on screen instructions NOTE If you are not using Home Center Software open a program that allows you to scan then follow the instructions ...

Page 96: ...icture tab 5 Select Automatically Detect Pictures if it is not selected then click OK 6 Click the Home icon in the top right corner then select Scan Documents and Pictures 7 Make sure that Picture is selected and Collage Combine all pictures is cleared then follow the on screen instructions NOTE Click Help icon for additional instructions Scanning multiple pictures when connected to a computer wit...

Page 97: ...ement Tool see Accessing the Online Printer Management Tool page 20 2 Select the Applications tab 3 Select Applications Webscan 4 Select the type of scan you want and place the original on the scanner glass 5 Click Preview to see what will be scanned If needed click Clear to reposition the original 6 When you are satisfied with the preview click Scan The scanned file will display in a new browser ...

Page 98: ...the printhead For recycling and or disposal information contact your local authorities In the US go to the Electronics Industry Alliance at www eia org or go to www kodak com go recycle General care and cleaning CAUTION Always disconnect the power to the printer before cleaning it Do not use harsh or abrasive cleaners on any part of the printer To clean the printer wipe the outside with a clean dr...

Page 99: ...ument backing under the scanner lid Periodically clean the scanner glass and document backing CAUTION Do not use harsh or abrasive cleaners on any part of the printer Do not spray liquid directly on the glass Do not use paper based wipes on the document backing as they can scratch it 1 Turn off the printer and unplug it from the power outlet 2 Lift the scanner lid Document backing Scanner glass ...

Page 100: ... clean the document backing with a soft cloth or sponge slightly moistened with mild soap and warm water 6 Dry the document backing with a chamois or soft lint free cloth NOTE If the document backing needs further cleaning use isopropyl rubbing alcohol on a soft cloth then wipe thoroughly with a cloth moistened with water to remove any residual alcohol 7 When you finish cleaning plug in the printe...

Page 101: ...n Home Center Software When an ink cartridge is out of ink the control panel displays a message stating that the black or color ink cartridge needs replacing IMPORTANT Do not use non Kodak brand or refilled ink cartridges 1 Make sure the printer is on 2 Lift the access door and wait for the carriage to move to the access position The ink cartridges are located in the printhead Color ink cartridge ...

Page 102: ...iosupport 3 Pinch the tab on the ink cartridge and lift it out of the printhead 4 Remove the new ink cartridge from its bag IMPORTANT To prevent the printhead from drying out insert the ink cartridge into the printhead immediately 5 Remove the cap ...

Page 103: ...www kodak com go aiosupport 97 KODAK HERO 7 1 All in One Printer 6 Insert the ink cartridge into the printhead 7 Press down on the ink cartridge tab until you hear a click 8 Close the access door ...

Page 104: ... Replacing the printhead is not a regular maintenance procedure Replace the printhead only if you receive a new printhead from Kodak 1 Make sure the printer is on 2 Lift the access door and wait for the carriage to move to the access position 3 Remove both ink cartridges and set them aside ...

Page 105: ...O 7 1 All in One Printer 4 Unlatch the existing printhead by lifting the button 5 Lift the printhead out of the carriage 6 Remove the new printhead from its bag CAUTION Do not touch the gold contacts on the printhead as doing so may damage it ...

Page 106: ...taining Your Printer 100 www kodak com go aiosupport 7 Remove the two plastic caps 8 Install the new printhead in the carriage 9 Push firmly against the target label on the printhead until you hear a click ...

Page 107: ...go aiosupport 101 KODAK HERO 7 1 All in One Printer 10 Insert the black ink cartridge into the printhead 11 Press down on the ink cartridge tab until you hear a click 12 Repeat steps 10 11 for the color ink cartridge ...

Page 108: ...re updates click Next and follow the on screen instructions To update the printer firmware 1 Make sure your computer is connected to the Internet 2 Connect the printer to the computer with a USB cable Ethernet cable or wirelessly if not currently connected 3 Open Home Center Software then select Printer Tools 4 Make sure that KodakHERO7 1 xxxx Connected or a similar name with Connected appears in ...

Page 109: ...Select the Tools tab 5 Click Check for Printer Firmware Updates 6 If there are updates follow the on screen instructions IMPORTANT Do not turn off or disconnect your printer or your computer during the update Doing so may cause the printer to become inoperable Your printer will restart during the upgrade Monitoring and adjusting printer performance From the control panel you can perform tasks to h...

Page 110: ...w when it s time to add more paper NOTE You can order paper online Go to www kodak com go inkjetpaper Resetting factory defaults To reset defaults to the factory default settings 1 Press 2 Touch then touch Printer Settings 3 Touch then touch Reset All Settings 4 When you see the message This will reset printer settings to factory defaults touch Yes NOTE Resetting factory defaults does not change t...

Page 111: ... was disconnected from the printer then reconnected or if power to the printer was interrupted If you are using a wireless connection make sure the Wi Fi connectivity LED remains lit the printer is connected to your wireless network To check a On the printer press b Touch then touch Network Settings c Touch View Network Configuration Make sure that the Active Connection Type is Wi Fi and that the ...

Page 112: ...e 41 Clean the printhead Press Touch then touch Maintenance Touch Clean Printhead Calibrate the printer Press Touch then touch Maintenance Touch Calibrate Printer For more information go to www kodak com go hero7_1support then type the problem in the search field Paper jam Check for paper behind the duplexer in the cleanout area Make sure the paper in the tray is free of tears or creases Make sure...

Page 113: ... for optimal printer performance www kodak com go hero7_1downloads Check the Extended User Guide for detailed instructions and the recommended system requirements www kodak com go hero7_1manuals Get help with problems you cannot resolve Contact Kodak at www kodak com go contact and have the following information available Kodak Service Number located inside the printer when you open the access doo...

Page 114: ... to finish the task On The printer is ready Wi Fi status light What it means Off The Wi Fi radio is either turned off or is turned on but not connected to a wireless network Blinks continuously The Wi Fi radio is turned on and the printer is searching for available wireless networks within range Blinks intermittently The Wi Fi radio is turned on and the printer cannot find any available wireless n...

Page 115: ...ty 1 to 99 Print sizes 2 x 3 in 5 x 8 cm 3 5 x 5 in 9 x 13 cm 4 x 6 in 10 x 15 cm 4 x 7 in 10 x 18 cm 4 x 8 in 10 x 20 cm 4 x 12 in 10 x 30 cm Panoramic 5 x 7 in 13 x 18 cm 7 x 10 in 18 x 25 cm 8 x 10 in 20 x 25 cm US Letter 8 5 x 11 in 22 x 28 cm A4 8 3 x 11 7 in 21 x 30 cm Quality Best Normal Draft modes on plain paper Best on photo paper Auto detect media Auto detect plain paper and photo paper...

Page 116: ...7 in 13 x 18 cm 7 x 10 in 18 x 25 cm 8 x 10 in 20 x 25 cm US Letter 8 5 x 11 in 22 x 28 cm A4 8 3 x 11 7 in 21 x 30 cm Quality Automatic Brightness 3 to 3 Scanner type Contact Image Sensor CIS Scan sizes Maximum size of original scanned from scanner glass 8 5 x 11 7 in 22 x 30 cm Resolution and Bit Depth Supports native scan resolution of 2400 dpi Scans at 8 bits per channel with 3 color scans at ...

Page 117: ...ck 110 lb 200 gsm index maximum Envelopes 20 to 24 lb 75 to 90 gsm Transparencies All commercially available inkjet varieties with a white stripe on the short edge Labels All commercially available inkjet varieties on 8 5 x 11 in 22 x 28 cm and A4 8 3 x 11 7 in 21 x 30 cm size sheets Iron on transfers All commercially available inkjet varieties on 8 5 x 11 in 22 x 28 cm and A4 8 3 x 11 7 in 21 x 3...

Page 118: ...3 x 18 cm 7 x 10 in 18 x 25 cm 8 x 10 in 20 x 25 cm US Letter 8 5 x 11 in 22 x 28 cm A4 8 3 x 11 7 in 21 x 30 cm Ink handling 2 cartridge 5 ink system Ink life 1 year warranty from date of purchase Protocols supported USB 2 0 High Speed DPOF Devices supported WINDOWS OS based and MAC OS Computers memory cards SD MS Duo MMC SDHC USB devices flash drives cameras Image formats supported Image printin...

Page 119: ...t on the back of the printer and a USB 2 0 high speed embedded host port accessible from the front of the printer PictBridge support Supports PictBridge CIPA DC 001 2003 features Ref 8 through the front panel USB host port Power Input 100 240 V AC 50 60 Hz The printer should only be used with the provided switching adapter Manufacturer and model Flextronics Sales Marketing A P Ltd model VP 0950008...

Page 120: ...ter Minimum Operating System WINDOWS 7 VISTA or XP SP2 or later CPU INTEL CELERON Processor Clock speed 1 2 GHz Memory 512 MB RAM Available hard disk space 500 MB available Interface USB 2 0 High Speed Removable drive CD ROM Computer Minimum Operating System MAC OS X 10 5 or later CPU PowerPC G4 G5 or INTEL based MACINTOSH Clock speed 1 2 GHz Memory 512 MB RAM Available hard disk space 200 MB avai...

Page 121: ...extends beyond the product s base in all directions This product will not operate properly if tilted or at an angle When storing or transporting this product do not tilt or stand it on its side Never turn this product upside down ink can leak out of the product Avoid placing this product in an environment that is subject to rapid changes in temperature or humidity mechanical shocks vibration or du...

Page 122: ...lay gets on your hands wash them thoroughly with soap and water Ink cartridge safety Keep all ink cartridges out of the reach of children If ink gets on your skin wash with soap and water If ink gets into your eyes flush immediately with water If any discomfort or change in vision persists after washing seek medical attention immediately For Material Safety Data Sheet MSDS information on inks go t...

Page 123: ...t off and on the user is encouraged to try to correct the interference by one or more of the following measures Reorient or relocate the receiving antenna Increase the separation between the equipment and receiver Connect the product into an outlet on a circuit different from that to which the receiver is connected Consult the dealer or an experienced radio TV technician for help CAUTION Pursuant ...

Page 124: ...t Hereby Eastman Kodak Company declares that this KODAK all in one wireless printer is in compliance with the essential requirements and other relevant provisions of Directive 1999 5 EC German compliance statement CAUTION This device is not intended for use in the direct field of view at visual display workplaces To avoid incommoding reflections at visual display workplaces this device must not be...

Page 125: ...tact your local authorities or go to www kodak com go recycle for recycling program information ENERGY STAR Qualified To conserve energy this printer will enter a reduced power sleep mode automatically after 1 hour You can adjust the delay time in 0 5 hour increments up to 4 hours Increasing the delay time may result in reduced energy savings ENERGY STAR and the ENERGY STAR mark are registered U S...

Page 126: ...ces beyond Kodak s control This warranty does not apply when failure is due to shipping damage accident alteration modification unauthorized service misuse abuse use with incompatible accessories or attachments such as third party ink or ink tanks failure to follow Kodak s operation maintenance or repacking instructions failure to use items supplied by Kodak such as adapters and cables or claims m...

Page 127: ...ms and conditions of this warranty may be different Unless a specific Kodak warranty is communicated to the purchaser in writing by a Kodak company no warranty or liability exists beyond any minimum requirements imposed by law even though defect damage or loss may be by negligence or other act Declaration of Conformity See www kodak com go declarationofconformity ...

Reviews: