background image

Diagrams

SM7648-1 – 11NOV05

99

Component Locator

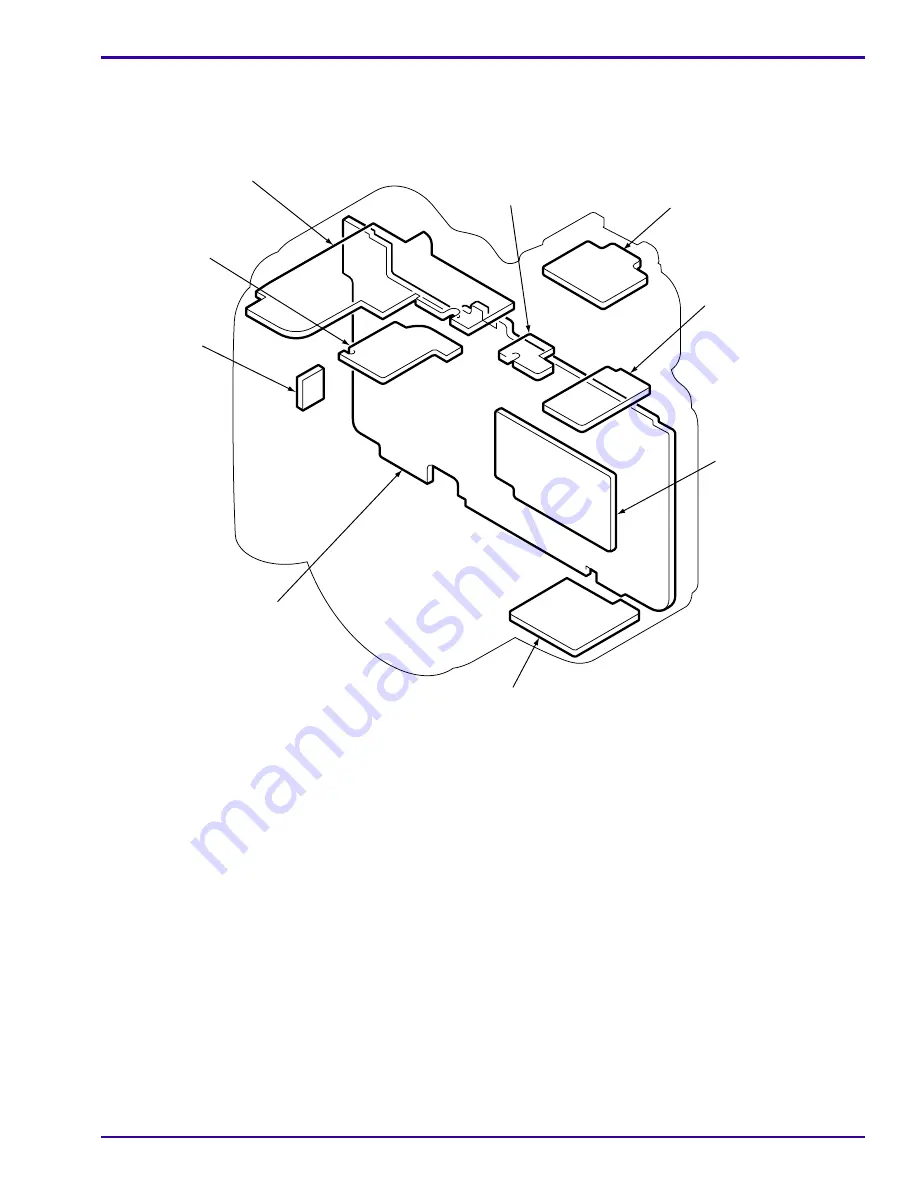
All BOARDS

P264_0031DC_

Board Locator

CA1 BOARD - CCD

TB3 BOARD - 
AC ADAPTER/USB CONNECTOR

CP1 BOARD - MCU

ST2 BOARD - 
STROBE POSITION

TB2 BOARD -
FOCUS AND
STROBE MODE

TB4 BOARD -
BATTERY
SENSOR

ST1 BOARD -
CAPACITOR

TB1 BOARD - 
SHUTTER AND
MODE DIAL

ST3 BOARD - 
HOT SHOE STROBE

Summary of Contents for EasyShare P850 zoom

Page 1: ...nformation ServiceManual Production KodakServiceSupport ExternalAndInternal Publication No SM7648 1 11NOV05 SERVICE MANUAL for the Kodak EasyShare P850 ZOOM DIGITAL CAMERA Service Code 7648 Important Qualified service personnel must repair this equipment ...

Page 2: ...8 Visual Index 9 Equipment Parts 10 BACK and SIDE COVER AYs and CARD DOOR AY 10 FRONT COVER VIEWFINDER and MONITOR LCD AYs 12 CP1 BOARD MCU TOP COVER AY and TB1 BOARD SHUTTER AND MODE DIAL 14 STROBE BATTERY COMPARTMENT and LENS AYs 16 Alphabetical Index 18 Diagnostics 20 Checkout Procedures 20 Checking the General Functions of the CAMERA 20 Checking the ACTUATION FLASH and POWER ON COUNTERS Withou...

Page 3: ...ENS FPC 83 STROBE CIRCUIT 84 Functional 85 Power Distribution 85 Subsystem Control 86 Schematics 87 System 87 CP1 BOARD MCU 1 of 6 88 CP1 BOARD MCU 2 of 6 and ST2 BOARD STROBE POSITION 89 CP1 BOARD MCU 3 of 6 90 CP1 BOARD MCU 4 of 6 91 CP1 BOARD MCU 5 of 6 92 CP1 BOARD MCU 6 of 6 and ST1 BOARD CAPACITOR 93 CA1 BOARD CCD 94 ST3 BOARD HOT SHOE STROBE 95 TB1 BOARD SHUTTER AND MODE DIAL and TB4 BOARD ...

Page 4: ...ible with a Pentium PROCESSOR 233 MHz or higher 256 MB RAM minimum recommended 200 MB hard disk space CD ROM DRIVE USB PORT 21 in color MONITOR 24 bit XGA VIDEO CARD Color VIDEO MONITOR Region Provided FEEDBACK SOFTWARE Region Provided Kodak LENS CLEANING PAPER Region Provided Kodak LENS CLEANER 1C8000 COVER CLEANER Johnson SHINE UP FURNITURE WAX TL 5182 LAMP Arrowin LBF 2001 light box EVC FGX Phi...

Page 5: ...N 2 CUSTOM TEXT FIXTURE optional 5E8164 GEN 2 CAMERA POST FABRICATION DRAWING optional 5E8161 GEN 2 CUSTOM TEST FIXTURE FABRICATION DRAWING optional 5E8163 Description Part No PATTERN BOX color viewer VJ8 0190 COLLIMATOR Region Provided TARGET Siemens star TL 5884 TARGET shift lens adjustment TL 5888 TARGET up and down adjustment TL 5885 TARGET parallax adjustment TL 5886 TARGET distance adjustmen...

Page 6: ...g the Kodak EasyShare P850 ZOOM DIGITAL CAMERA to the Kodak EasyShare CAMERA DOCK 6000 The Kodak EasyShare P850 ZOOM DIGITAL CAMERA is compatible with Kodak EasyShare CAMERA DOCK SERIES 3 other 26 PIN DOCKS CUSTOM DOCK INSERT CAMERA DOCK 6000 CUSTOM DOCK INSERT DOCK SERIES 3 DOCK ADAPTER KIT D 22 P252_0075BA Figure 1 Figure 2 CAMERA ...

Page 7: ...d the Middle East English French German 889 3901 Europe Africa and the Middle East Italian Spanish Portuguese 392 8835 Europe Africa and the Middle East Nordic 392 8843 Europe Africa and the Middle East Emerging 392 8850 Greater China and Taiwan English Chinese simplified traditional Korean 867 3428 People s Republic of China English Chinese simplified traditional Korean 145 2200 Asia Pacific and ...

Page 8: ...ns Adjustment 90 cm on Page 36 4 LENS Lens Adjustment Infinity on Page 38 5 CCD Auto White Balance AWB on Page 40 6 CCD White Point Defect Detect on Page 43 7 CCD Black Point and White Point Defect Detect on Page 46 8 PAF SENSOR Up and Down on Page 49 9 PAF SENSOR Uniform on Page 52 10 PAF SENSOR Parallax on Page 55 11 PAF SENSOR Distance on Page 58 12 Setting the Defaults for the CAMERA Set Defau...

Page 9: ...BACK and SIDE COVER AYs and CARD DOOR AY on Page 10 2 FRONT COVER VIEWFINDER and MONITOR LCD AYs on Page 12 3 CP1 BOARD MCU TOP COVER AY and TB1 BOARD SHUTTER AND MODE DIAL on Page 14 4 STROBE BATTERY COMPARTMENT and LENS AYs on Page 16 P264_1011DC_ 1 2 3 4 4 A B C A B C D D ...

Page 10: ... Dangerous Voltage You must do a discharge of the STROBE CAPACITOR 1 after removing the BACK COVER AY Figure 1 BACK and SIDE COVER AYs and CARD DOOR AY P264_1000DC P264_1000DCA 6 10 1 6 14 13 12 11 9 6 8 7 6 5 4 3 2 1 1 1 2 3 4 5 6 7 8 9 10 11 12 13 14 6 6 1 1 ...

Page 11: ...9172 SCREW PCS 1 7 x 3 0 1 5 7 3F9134 COVER viewfinder ay 1 1 8 3F9176 SCREW STPG 1 7 x 3 0 1 1 9 3F9124 BACK COVER AY 1 1 10 3F9108 COVER side 1 1 11 3F9174 SCREW PCS 1 7 x 3 5 1 2 12 3F9109 PLATE 1 1 13 3F9173 SCREW PCS 1 7 x 4 0 1 2 14 3F9111 HOLDER side cover 1 1 3F9187 CUSTOM INSERT dock 1 1 Not visible in the graphic 3F9188 CAP lens 1 1 Not visible in the graphic 3F9189 STRAP lens cap 1 1 No...

Page 12: ...8 1 Caution Dangerous Voltage You must do a discharge of the STROBE CAPACITOR 2 after removing the MONITOR LCD AY Figure 2 FRONT COVER VIEWFINDER and MONITOR LCD AYs P264_1001DC P264_1001DCA 10 9 8 7 6 5 4 3 2 1 1 2 3 4 5 6 7 8 9 10 ...

Page 13: ...uantity Notes 1 3F9177 SCREW STPG 1 7 x 3 0 2 2 2 3F9176 SCREW STPG 1 7 x 3 5 2 3 3 3F9123 VIEWFINDER AY 2 1 4 3F9175 SCREW PCS 1 7 x 2 5 2 2 5 3F6121 SCREW PCS 1 7 x 2 5 2 3 6 3F9120 MONITOR LCD AY 2 1 7 3F9107 TRIPOD MOUNT 2 1 8 3F9172 SCREW PCS 1 7 x 3 0 2 1 9 3F9173 SCREW PCS 1 7 x 4 0 2 3 10 3F9106 FRONT COVER AY 2 1 ...

Page 14: ...s Voltage You must do a discharge of both of the STROBE CAPACITORS after removing the TOP COVER AY and TB1 BOARD Figure 3 CP1 BOARD MCU TOP COVER AY and TB1 BOARD SHUTTER AND MODE DIAL P264_1002DC P264_1002DCA 8 9 8 7 6 5 4 3 2 1 1 1 2 3 4 5 6 7 8 9 1 8 ...

Page 15: ...utter and mode dial 3 1 3 3F9181 SCREW STPG 1 7 x 4 5 3 1 4 3F9119 COVER top 3 1 5 3F9166 FLEXIBLE CIRCUIT CP1 to TB1 3 1 6 3F9184 SCREW STPG 1 7 x 4 5 3 2 7 3F9170 BUTTON 5 way joystick 3 1 8 3F6121 SCREW PCS 1 7 x 2 5 3 3 9 3F9168 BOARD CP1 MCU 3 1 3F9185 FUSE 5 0 A 32 V 3 2 See CP1 BOARD MCU 1 of 2 on Page 101 CP1 BOARD MCU 2 of 2 on Page 102 3F6051 FUSE 2 0 A 32 V 3 3 See CP1 BOARD MCU 2 of 2 ...

Page 16: ...4 STROBE BATTERY COMPARTMENT and LENS AYs P264_1003DC 1 2 3 2 5 6 7 4 8 9 11 12 13 14 10 10 17 16 15 10 18 19 20 21 22 23 24 8 25 2 26 27 28 21 P264_1003DCA 1 2 3 4 5 6 7 8 9 10 11 12 13 14 15 16 17 18 19 20 21 22 23 24 25 26 27 28 2 2 8 10 21 ...

Page 17: ...cus and strobe mode 4 1 10 3F9174 SCREW PCS 1 7 x 3 5 4 2 11 3F9158 BOARD CA1 CCD 4 1 12 3F9183 SCREW STPG 1 7 x 4 0 4 2 13 3F9160 FLEXIBLE CIRCUIT CP1 to CA1 4 1 14 3F9162 SPACER CA1 flexible 4 1 15 3F9157 SPACER 4 1 16 3F9156 FILTER optical 4 1 17 3F9155 SPACER LPF 4 1 18 3F9154 LENS AY 4 1 19 3F9153 RING adhesive 4 1 20 3F9152 LENS DEC 4 1 21 3F9175 SCREW PCS 1 7 x 2 5 4 3 22 3F9176 SCREW TPG 1...

Page 18: ...USTOM INSERT dock 1 3F9125 DOOR card 1 3F9156 FILTER optical 4 3F9160 FLEXIBLE CIRCUIT CP1 to CA1 4 3F9166 FLEXIBLE CIRCUIT CP1 to TB1 3 3F9139 FLEXIBLE CIRCUIT CP1 to TB3 4 3F9106 FRONT COVER AY 2 3F6051 FUSE 2 0 A 32 V 3 3F9185 FUSE 5 0 A 32 V 3 3F9111 HOLDER side cover 1 3F9152 LENS DEC 4 3F9154 LENS AY 4 3F9120 MONITOR LCD AY 2 3F9151 PAF SENSOR parallax auto focus 4 3F9109 PLATE 1 3F9153 RING...

Page 19: ... 1 7 x 3 5 4 3F9127 SHAFT card door 1 3F9157 SPACER 4 3F9162 SPACER CA1 flexible 4 3F9155 SPACER LPF 4 3F9142 SPEAKER AY 4 3F9126 SPRING card door 1 3F9189 STRAP lens cap 1 3F6447 STRAP shoulder black 1 3F9148 STROBE AY 4 3F9107 TRIPOD MOUNT 2 3F9123 VIEWFINDER AY 2 Alphabetical Index Part No Description Figure No ...

Page 20: ... CAMERA 7 Remove CAMERA from the CAMERA DOCK BATTERY from the CAMERA 8 Connect the 5 V AC ADAPTER to the DC IN 5V port on the CAMERA 9 Energize the CAMERA 10 Check that the CAMERA energizes 11 De energize the CAMERA 12 Remove the 5 V AC ADAPTER from the CAMERA 13 Install a RECHARGEABLE BATTERY in the CAMERA 14 Energize the CAMERA 15 Check that the CAMERA energizes 16 De energize the CAMERA 17 Inse...

Page 21: ...LCD is in focus when the LENS stops moving from Wide to Tele position 31 Press the SHUTTER BUTTON to capture an image 32 Check that the MONITOR LCD displays image number of additional images that can be captured icons Flash mode quality of the image type of memory 33 Press the EVF LCD BUTTON to move the view to the VIEWFINDER AY 34 Check that the view is in focus 35 Move the ZOOM LEVER to check th...

Page 22: ...mage SHARE BUTTON 4 Check that options display 5 Press JOYSTICK left and right to display other images REVIEW BUTTON REVIEW BUTTON again to quit INFO 1 In Liveview mode press the INFO BUTTON 2 Check that only the Battery icon and the FRAMING MARKS display on the MONITOR LCD 3 Press the INFO BUTTON again 4 Check that only the FRAMING MARKS display 5 Press the INFO BUTTON again 6 Check that the icon...

Page 23: ...sync Off 3 Select the Off position 4 Check that the Exposure Compensation icon displays on the MONITOR LCD 5 Move the COMMAND DIAL left and right to select the Exposure Compensation icon 6 Press the SET BUTTON 7 Check that the icon changes color 8 Move the COMMAND DIAL to change the setting of the icon 9 Press the SET BUTTON 10 In low light press the SHUTTER BUTTON to the S1 position 11 Check that...

Page 24: ...displayed and the focus is returned to automatic EVF LCD 1 Press the EVF LCD BUTTON 2 Check that the view is through the VIEWFINDER AY 3 Press the EVF LCD BUTTON again 4 Check that the view is displayed on the MONITOR LCD MODE DIAL The MODE DIAL has 10 options Selected MODE DIAL Option Do AUTO 1 Move the MODE DIAL to AUTO 2 Check that Auto displays on the MONITOR LCD 3 Press the SHUTTER BUTTON to ...

Page 25: ...ght 11 Check that the video file plays back at a faster speed 12 Press the OK BUTTON 13 Check that the video stops 14 Press the MENU BUTTON 15 Check that the MONITOR LCD displays a list of options 16 Press MENU BUTTON to quit OK BUTTON 17 Check video file continues audio plays back 18 Press the REVIEW BUTTON to quit SCN 1 Press the SCN BUTTON to display the 16 scene icons at the bottom of the MONI...

Page 26: ...ically 3 Press REVIEW BUTTON to view images SHARE BUTTON 4 Check that the MONITOR LCD displays a list of options 5 Press the REVIEW BUTTON to quit DRIVE 1 Move the MODE DIAL to AUTO 2 Press the DRIVE BUTTON 3 Check that a list of options display for Single Self timer burst modes Exposure bracketing modes Time Lapse 4 Press the DRIVE BUTTON again to quit PROG 1 Move the MODE DIAL to P 2 Press the P...

Page 27: ...tomatic Exposure is the default mode 1 Press MENU BUTTON JOYSTICK once to the right to display a menu for settings 2 Move the JOYSTICK to AE AF button set 3 Press OK BUTTON once to display the options OK BUTTON again to select the AE lock option MENU BUTTON AE AF BUTTON to lock the exposure setting 4 Check that AEL displays on the MONITOR LCD 5 Press the AE AF BUTTON again to allow adjustment of t...

Page 28: ...ON to select Single Checking the Communication 1 Connect the CAMERA DOCK to the computer with the USB CABLE 2 Download the images and the video file with the USER SOFTWARE 3 Check the quality of the images 4 Do Connecting to the SERVICE SOFTWARE on Page 75 If successful the USB interface on the DOCK CONNECTOR is operating correctly 5 Remove the CAMERA from the CAMERA DOCK 6 Disconnect the USB CABL...

Page 29: ...mm 9 Do Step 4 Step 6 again Checking the Internal Components of the CAMERA Important For operations of the Warranty Channel Returns department do not do LENS Lens Adjustment 90 cm on Page 36 1 Connect the CAMERA DOCK to the computer with the USB CABLE 2 Install MEMORY CARD in the CAMERA CAMERA on the CAMERA DOCK 3 Do Checking the ACTUATION FLASH and POWER ON COUNTERS Without the SERVICE SOFTWARE o...

Page 30: ... 1 cm 44 9 0 4 in from the TARGET by using SLOT 6 red holes CAMERA NEST in the red hole for the TRIPOD 2 Do Connecting to the SERVICE SOFTWARE on Page 75 3 Click Test to display the menu Purpose To set the value for the position of the image on the LCD to the position of the LENS Do When After installing a new CP1 BOARD MCU MONITOR LCD AY LENS AY Specification None Special Tools SERVICE SOFTWARE C...

Page 31: ...e the lines or DOTS 5 Check that the MONITOR LCD displays the TARGET 6 Adjust the position of the CAMERA to align the center of the MONITOR LCD a small distance up and to the left of the center of the symbol on the TARGET SHIFT LENS ADJUSTMENT TARGET the center of the screen the center of the cross symbol P264_9002AA ...

Page 32: ...SERVICE MANUAL 32 11NOV05 SM7648 1 7 Click Test to display the menu 8 Select EIS Adj 9 After the test check result and adjustment value display does not display NG 10 Click OK Postrequisites None ...

Page 33: ...T 6 red holes CAMERA NEST in the red hole for the TRIPOD 2 Do Connecting to the SERVICE SOFTWARE on Page 75 3 In the Cal Data field type 2 Purpose To provide calibration information for the CP1 BOARD MCU to adjust the position of the LENS Do When After installing a new CP1 BOARD MCU MONITOR LCD AY LENS AY Specification FOCUS OK displays Special Tools SERVICE SOFTWARE Computer 5 V AC ADAPTER USB CA...

Page 34: ...6 Click OK 7 In the Cal Mode field type 155 8 Click OK 9 Check that the Dsc Calibration window displays Data1 155 does not display NG 10 Click Test to display the menu 11 Select EIS Check 12 Check that the Dsc Calibration window displays Data1 155 ManualAdj OK does not display NG ...

Page 35: ...Adjustments SM7648 1 11NOV05 35 13 Click OK Postrequisites None ...

Page 36: ...on values AF_WIDE ZW focus at zoom position Wide 50 ZW 50 AF_MID1 ZM1 focus at zoom position center 1 25 ZM1 ZW 25 AF_MID2 ZM2 focus at zoom position center 2 35 ZM2 ZW 35 AF_MID3 ZM3 focus at zoom position center 3 25 ZM3 ZW 25 AF_MID4 ZM4 focus at zoom position center 4 25 ZM4 ZW 25 AF_MID5 ZM5 focus at zoom position center 5 30 ZM5 ZW 30 AF_MID6 ZM6 focus at zoom position center 6 30 ZM6 ZW 30 ...

Page 37: ...SLOT 4 yellow holes in the CAMERA NEST TRIPOD MOUNT 2 Do Connecting to the SERVICE SOFTWARE on Page 75 3 Click Focus 4 Click Yes to continue 5 Check that the Dsc Calibration window displays the adjustments within the specifications does not display NG X 6 Click OK Postrequisites None P264_9001AA STAR TARGET ...

Page 38: ...RD MCU MONITOR LCD AY LENS AY Specification The test results must comply with the specification values AF_I_WIDE ZIW focus at zoom position Wide 50 ZIW 50 AF_I_MID1 ZIM1 focus at zoom position center 1 25 ZIM1 ZIW 25 AF_I_MID2 ZIM2 focus at zoom position center 2 35 ZIM2 ZIW 35 AF_I_MID3 ZIM3 focus at zoom position center 3 25 ZIM3 ZIW 25 AF_I_MID4 ZIM4 focus at zoom position center 4 25 ZIM4 ZIW ...

Page 39: ...7648 1 11NOV05 39 4 Click Test to display the menu 5 Select Infinity Cal 6 Check that the Dsc Calibration window displays the adjustments within the specifications does not display NG X 7 Click OK Postrequisites None ...

Page 40: ...e color balance of red green and blue for the CCD Do When The color of the images is not correct After installing a new CP1 BOARD MCU MONITOR LCD AY LENS AY Specification The test results must comply with the specification values AGC a1 1023 a2 1023 a3 1023 a4 1023 a5 1023 CHECK wc0 128 2 wc1 128 2 wc2 130 40 MS 2400 ms1 3500 2600 ms2 3800 MS_M 2400 ms3 3600 2600 ms4 3700 Special Tools SERVICE SOF...

Page 41: ...luminance 900 20 cd m2 Important The CAMERA LENS moves during the test Hold the CAMERA against the PATTERN BOX carefully to stop light from entering 3 Place the CAMERA 0 cm 0 in from the PATTERN BOX without entering any light 4 Do Connecting to the SERVICE SOFTWARE on Page 75 CAMERA PATTERN BOX COLOR VIEWER P264_9003AA ...

Page 42: ...SERVICE MANUAL 42 11NOV05 SM7648 1 5 Click AWB 6 Click Yes 7 Check that the Dsc Calibration window displays values that are within the specifications does not display NG 8 Click OK Postrequisites None ...

Page 43: ...N BOX color temperature 3100 20 K luminance 900 20 cd m2 Purpose To measure and store the values for the number of white pixels Do When The image has pixels that should not be white After installing a new CP1 BOARD MCU MONITOR LCD AY LENS AY Specification The Dsc Calibration window displays the number of pixels that have a malfunction Special Tools SERVICE SOFTWARE Computer USB CABLE 5 V AC ADAPTE...

Page 44: ...L 44 11NOV05 SM7648 1 3 Place the CAMERA 0 cm 0 in from the PATTERN BOX without entering any light 4 Do Connecting to the SERVICE SOFTWARE on Page 75 5 Click Test to display the menu 6 Select CCD Defect 7 Click Yes ...

Page 45: ...Adjustments SM7648 1 11NOV05 45 8 Check that the Dsc Calibration window displays values that are within the specifications does not display detect_ng 9 Click OK Postrequisites None ...

Page 46: ...t the PATTERN BOX color temperature 3100 20 K luminance 900 20 cd m2 Purpose To measure and store the values for the number of black pixels Do When The image has pixels that are not correct After installing a new CP1 BOARD MCU MONITOR LCD AY LENS AY Specification The Dsc Calibration window displays the number of pixels that have a malfunction Special Tools SERVICE SOFTWARE Computer USB CABLE 5 V A...

Page 47: ... the CAMERA against the PATTERN BOX carefully to stop light from entering 3 Place the CAMERA 0 cm 0 in from the PATTERN BOX without entering any light 4 Do Connecting to the SERVICE SOFTWARE on Page 75 5 Click Test to display the menu 6 Select CCD Black Note The test runs automatically ...

Page 48: ...SERVICE MANUAL 48 11NOV05 SM7648 1 7 Check that the Dsc Calibration window displays values number 0 BK 0 WT 0 does not display detect_ng BLACK x y 8 Click OK Postrequisites None ...

Page 49: ...hin 10 degrees luminance BV2 6 temperature 25 5 C 3 Place the PAF SENSOR on the CAMERA 300 1 cm 118 1 0 4 in from the TARGET 4 Do Connecting to the SERVICE SOFTWARE on Page 75 Purpose To measure and store the values for the up and down positions Do When The image is not correctly aligned vertically After installing a new CP1 BOARD MCU MONITOR LCD AY LENS AY Specification The PAF SENSOR adjusts to ...

Page 50: ...g window displays 7 Select ON The GRAPH displays 8 Align the AF FRAME next to the center of the MONITOR LCD with the gray line in the TARGET 9 Adjust the PAF SENSOR to the correct up and down positions at the same time checking the GRAPH and values UP AND DOWN ADJUSTMENT TARGET P264_9004AA ...

Page 51: ...Adjustments SM7648 1 11NOV05 51 10 After adjusting the up and down positions click Up Down Cal to set the adjustment value 11 Check that the value displays PAF_up_down OK 12 Click OK Postrequisites None ...

Page 52: ... luminance 900 20 cd m2 3 Place the CAMERA 0 cm 0 in from the PATTERN BOX COLOR VIEWER Purpose To measure and store the values to provide a uniform focus and light of the image Do When The image focus and light are not uniform After installing a new CP1 BOARD MCU MONITOR LCD AY LENS AY Specification The PAF SENSOR adjusts to match the TARGET in the PATTERN BOX Special Tools SERVICE SOFTWARE Comput...

Page 53: ...Adjustments SM7648 1 11NOV05 53 4 Do Connecting to the SERVICE SOFTWARE on Page 75 5 Click PAF Cal 6 Check that the PAF Calibration Dialog window displays 7 Click Uniformity 8 Click Yes ...

Page 54: ...SERVICE MANUAL 54 11NOV05 SM7648 1 9 Check that the value displays State Unif OK 10 Click OK to set and display the adjustment values Postrequisites None ...

Page 55: ... within 10 degrees luminance BV2 6 temperature 25 5 C 3 Place the PAF SENSOR on the CAMERA 300 1 cm 118 1 0 4 in from the TARGET 4 Do Connecting to the SERVICE SOFTWARE on Page 75 Purpose To adjust the automatic focus feature of the CAMERA to prevent distortion or skew Do When The image has skew After installing a new CP1 BOARD MCU MONITOR LCD AY LENS AY Specification The PAF SENSOR adjusts to mat...

Page 56: ...SERVICE MANUAL 56 11NOV05 SM7648 1 5 Click PAF Cal 6 Check that the PAF Calibration Dialog window displays 7 Select ON Note The GRAPH displays PARALLAX ADJUSTMENT TARGET P264_9006AA ...

Page 57: ... 11NOV05 57 8 Align the AF FRAME next to the center of the MONITOR LCD with the TARGET 9 Click Parallax 10 Click Yes to continue 11 Check that the values display 12 Click OK to set the adjustment value Postrequisites None ...

Page 58: ...otation is within 10 degrees luminance BV2 6 temperature 25 5 C Purpose To adjust the automatic focus feature of the CAMERA for distance Do When The distance in the image is not correct After installing a new CP1 BOARD MCU MONITOR LCD AY LENS AY Specification The test results must comply with the specification values Temperature when TEMP a 2 point adjustment For example 25 0 250 L XX F XX each of...

Page 59: ...the sections of the TARGET with the labels 1 2 3 from right to left b Check that there are no spaces between the sections of the TARGET c Adhere the TARGET using tape 4 Place the PAF SENSOR on the CAMERA 300 1 cm 118 1 0 4 in from the TARGET 5 Do Connecting to the SERVICE SOFTWARE on Page 75 6 Click PAF Cal DISTANCE ADJUSTMENT TARGET P264_9005AA ...

Page 60: ...SERVICE MANUAL 60 11NOV05 SM7648 1 7 Check that the PAF Calibration Dialog window displays 8 Click Calibration 9 Click Yes 10 Check that the distance value displays ...

Page 61: ...ts SM7648 1 11NOV05 61 11 Determine if the adjustment value is within the specification Note The test is not within specification if any of the 7 series display NG TEMP 0 displays 12 Click OK Postrequisites None ...

Page 62: ...not check this adjustment To Adjust 1 Do Connecting to the SERVICE SOFTWARE on Page 75 2 Click Test to display the menu Purpose This feature allows the CAMERA to reset to the defaults prepare for user mode Do When After doing maintenance on the CAMERA Specification Initialize Complete displays Special Tools SERVICE SOFTWARE Computer USB CABLE ...

Page 63: ...Adjustments SM7648 1 11NOV05 63 3 Select Set Default Note All user values are reset to the defaults 4 Check that Initialize Complete displays in the field Postrequisites None ...

Page 64: ...AMERA display 3 Compare the serial numbers in the Serial field and on the LABEL on the CAMERA 4 If the serial numbers are not the same enter the serial number from the CAMERA in the Serial field 5 Click Set 6 If the VID field does not have Kodak type Kodak 7 Click Set Purpose This feature allows the values to be written to the CAMERA VID PID serial number Do When After doing maintenance on the CAM...

Page 65: ...Adjustments SM7648 1 11NOV05 65 8 If the PID field does not have Digital Camera type Digital Camera 9 Click Set 10 If the Rev field does not have 1 00 type 1 00 11 Click Set Postrequisites None ...

Page 66: ...move 1 Remove COVER from the side PLATE 2 SCREWS A 2 SCREWS B HOLDER HOT SHOE COVER 2 SCREWS C COVER SCREW D SCREW E 6 SCREWS F 2 SCREWS G 2 Disconnect the CONNECTOR CN193 3 Remove the BACK COVER AY To Install 1 Reverse the steps in the removal procedure Postrequisites None P264_1004GC G G F HOT SHOE COVER COVER BACK COVER PLATE HOLDER A B C D E CN193 F COVER AY P264_1004GCA ...

Page 67: ...S A 2 Disconnect the CONNECTORS CN501 CN171 3 Remove MONITOR LCD AY 2 SCREWS B 4 Disconnect the CONNECTORS CN502 CN801 5 Remove the VIEWFINDER AY To Install 1 Reverse the steps in the removal procedure 2 Install the BACK COVER AY Postrequisites None P264_1005GC B A MONITOR LCD AY CN502 CN801 B A VIEWFINDER AY CN501 CN171 A P264_1005GCA ...

Page 68: ...ACK COVER AY MONITOR LCD AND VIEWFINDER AYs To Remove 1 Remove 4 SCREWS A 2 SCREWS B FRONT COVER AY To Install 1 Reverse the steps in the removal procedure 2 Install MONITOR LCD AND VIEWFINDER AYs BACK COVER AY Postrequisites None P264_1006GC FRONT COVER AY A B A P264_1006GCA ...

Page 69: ...ge You must discharge the CAPACITOR at wires GY and RD from the ST1 BOARD CAPACITOR 1 Remove SOLDER from wires STROBE AY WT BK GY PK ST1 BOARD CAPACITOR GY RD P264_1007HC B A A A B CP1 BOARD MCU P264_1007HCA WT GY PK MICROPHONE SPEAKER CN702 CN192 ST2 CN302 BAT TB1 CN301 CN701 CN951 CN101 TB2 CN303 STROBE AY CN191 ST1 CN103 TB3 BL RD WT RD WT BK GY PK GY PK GY RD ...

Page 70: ...SCREWS B 4 Carefully pull the CP1 BOARD MCU toward you a small distance 5 Remove SOLDER from wires from the BATTERY GY PK WT 6 Disconnect the CONNECTORS CN302 from ST2 CN702 CN301 from TB1 CN701 CN101 CN951 CN192 7 Remove the CP1 BOARD MCU To Install 1 Reverse the steps in the removal procedure 2 Install FRONT COVER AY MONITOR LCD AND VIEWFINDER AYs BACK COVER AY Postrequisites None ...

Page 71: ...sconnect CN301 3 Remove SOLDER from BATTERY COMPARTMENT AY at GY PK WT SOLDER from ST1 BOARD CAPACITOR GY RD SCREWS B C D TOP COVER Caution Dangerous Voltage You must discharge the CAPACITOR at the 4 SOLDER JOINTS on the top of the ST1 BOARD CAPACITOR 4 Remove TB1 BOARD SHUTTER AND MODE DIAL SCREW E ST1 BOARD CAPACITOR P264_1010CC P264_1010CCA BATTERY ST1 BOARD E A D C TB1 TOP COVER B CN301 GY WT ...

Page 72: ...SERVICE MANUAL 72 11NOV05 SM7648 1 To Install 1 Reverse the steps in the removal procedure 2 Install CP1 BOARD MCU FRONT COVER AY MONITOR LCD AND VIEWFINDER AYs BACK COVER AY Postrequisites None ...

Page 73: ...ant The CONNECTOR NUMBERS described in the graphic are for your reference and are used in the preceding procedures 1 Remove 3 SCREWS A LENS AY SCREW B STROBE AY SCREW C TB2 BOARD FOCUS AND STROBE MODE P264_1009HC BL RD WT RD WT BK GY PK GY PK A B LENS AY STROBE AY TB2 BOARD C D TB3 BOARD E MICROPHONE SPEAKER F ST2 BOARD G PAF AY CN302 CN701 CN101 CN951 CN191 CN303 CN103 CN702 CN191 CN303 MICROPHON...

Page 74: ...EW F ST2 BOARD STROBE POSITION SCREW G PAF AY To Install 1 Reverse the steps in the removal procedure 2 Install BATTERY COMPARTMENT AY TB1 BOARD SHUTTER AND MODE DIAL AND ST1 BOARD CAPACITOR CP1 BOARD MCU FRONT COVER AY on Page 68 MONITOR LCD AND VIEWFINDER AYs on Page 67 BACK COVER AY on Page 66 Postrequisites None ...

Page 75: ... SERVICE SOFTWARE 2 Check Transfer window displays green LED at the ON SWITCH of the CAMERA illuminates Windows 98 ME 2000 Windows XP a Install the Kodak EasyShare SOFTWARE b Advance to Step 3 Continue with Step 2 Version 4 Version 5 a Install the Kodak EasyShare SOFTWARE b Continue with Step 3 a Select the Custom installation b Load only the connection DRIVERS for the CAMERA c Continue with Step ...

Page 76: ...WARE displays 6 If the Can not get version window displays when you run the SERVICE SOFTWARE Click OK Check CAMERA is energized connections for the USB CABLE connections for the 5 V AC ADAPTER connections to the CAMERA DOCK all of the SERVICE SOFTWARE files are installed in the folder See Installing the SERVICE SOFTWARE on Page 75 ...

Page 77: ... for the equipment to warm before using 3 Adjust color temperature to 3100 20 K luminance to 900 20 cd m2 Using the CAMERA NEST Distance Placement of CAMERA NEST Color of STICKERS for Placement of PINS Placement of TARGET 300 cm 118 1 in TRIPOD Green On the wall 40 cm 15 7 in GEN II FIXTURE Yellow SLOT 4 114 cm 44 9 in GEN II FIXTURE Red SLOT 6 ...

Page 78: ...Install the KP850nnn FW file into the System folder on the MEMORY CARD 11 Remove the MEMORY CARD from the computer 12 Install the MEMORY CARD into the CAMERA Important Do not select any other mode during the energizing 13 Energize the CAMERA 14 Check that the CAMERA energizes 15 Do the steps that display on the MONITOR LCD using the JOYSTICK to select Upgrade Continue 16 Check that downloading beg...

Page 79: ... 7 Select KP850nnn FW file Edit Copy 8 Double click My Computer icon P850 Camera icon Internal Memory folder 9 Select firmware file in the Internal Memory folder Edit Paste 10 De energize the CAMERA 11 Disconnect the USB CABLE from CAMERA computer 12 Energize the CAMERA 13 Do the steps that display on the MONITOR LCD using the JOYSTICK to select Upgrade Continue Note The upgrading of the firmware ...

Page 80: ...74LVC1G08DCKR IC172 LM8261M5X NOPB VCOM AMP IC182 NJM2860F3 03 REG CN103 DOCK CONNECT CN102 USB USB USB USB TEMP 2 5 inch 0 24 inch VMUTE CAMPWR CAMPWR ACPR DCIN VRON LCDON LCDON2 EVFON ASSHUT1 ASSHUT2 EVFBL LCDBL ZCARD ACPR DCIN VMONIT ZJACKIN CHG CHGCTL CHGSEL BATTEMP BATTEMP LCDON LCDON2 EVFON EVFBL LCDBL CHG VRON VMONIT BATT BATT CHGSEL CHGCTL USBCNT_C USBCNT_D USBCNT_C USBCNT_D ZJACKIN OR IC1...

Page 81: ... CXD3443GA 23 H2A 28 REG H DRIVER CA1 CIRCUIT CCD 29 CCDSD Sdata 30 CCDCK SCK 31 TGVD VD_in 19 TGHD HD_in 18 ADCK CLK_in 17 H2A 10 H1A 27 H1A 13 H2B 19 H2B 12 H1B 18 H1B 16 RG 17 RG 3 45V A 7 7V A 15 2V A N9 SUBGT T6 SUBGT2 W21 Y1 9 R2 P9 M9 U10 AD5 Y6 V1 XV8 R9 XVH XV6 XV7 XSG3B XSG2C T9 AC1 W2 AD3 Y5 XV4 XV5 XSG1B XSG2B V6 U9 AD4 AA6 XV3 XVS XSG3A XSG1C AB2 W6 AA5 Y7 XV1 XV2 XSG1A XSG2A AA7 AE3 ...

Page 82: ... USB PO 8bit D A 8bit A D 8bit D A Encoder LENS Driver IS CCD 5Mega Pixcel SG TG CCD V Driver ADCK To CA1 To LCD To EVF To AUDIO JPEG Controller Card Control SRCLK PAF UNIT PAF A D IC192 Converter Gyro Sensor H V 16bit CPU Shift LENZ Driver EVF Display 0 24inch ASPAON3A ASPAON DOSCK DOSB DOOPS USB TB3 BLOCK AD DATA JOG Dial MODE Dial CMD Dial ZOOM SW SHUTTER SW SELF LED SELFLED TB1 BLOCK POWER LED...

Page 83: ...1 AE4pin FCW IC101 AA25pin FCLK IC101 V25pin FICTL IC195 16pin MODE2 IC101 U20pin IC531 DD CONV BOOST5 25V Q9502 Q9503 PICTL IC101 R21pin ZPI IC101 M25pin FPI IC101 M20pin VM 45 59 47 29 60 48 58 57 44 31 49 30 41 40 IN6A IN5B IN5A OE1 CW1 CLK1 FB1 FB2 IN6B MODE2 MODE3 MODE4 IN4B 50 61 62 63 64 LENS FPC 7 6 8 9 11 10 OUT7B IIN1 IC101 AA1pin IIN2 IC101 V5pin IIN3 IC101 U6pin IIN4 IC101 Y2pin SIN1 I...

Page 84: ...2 ST1 C5414 ST1 POWER FILTER BLOCK Q5405 D5406 OSCILLATION CIRCUIT EMISSION CONTROL CIRCUIT OSCILLATION TRANSFORMER RECTIFIER CIRCUIT VOLTAGE MONITOR CIRCUIT Q5409 LIGHT EMISSION CIRCUIT CHARGING CIRCUIT TRIGGER CIRCUIT LIGHT EMITTING ELEMENT XENON TUBE FLCTRL VMONIT CHG TO DMA MAIN TO PWA CHGSEL P264_0007FC_ ...

Page 85: ...5V T 3 6V E 3 45V A 1 25V D ASPAON PON VRON LCDON LCDON2 EVFON ASPAON3A LCDBL EVFBL 1 EVFAN 2 EVFCA 15 2V A DL1 DL2 PVSD LXM LXSU LXSD VR VR501 ON2 ON3 L5009 Q5008 STEP UP CIRCUIT DL3 Q5018 Q5010 CN502 TO EVF TO DMA MAIN 29 40 18 14 28 35 6 27 22 24 34 36 IC503 REGULATOR IC502 REGULATOR CURRENT DEDECTOR CIRCUIT Power Distribution Q5303 Q5304 8 7 1 LED_AN 2 LED_CA CN501 TO LCD Q5003 IC531 Q5301 DC ...

Page 86: ...PROG RAM WIDE1 PROG EXP SET DELETE TELE2 UP TELE1 INFO OK S1 MENU LEFT DOWN WIDE2 CARD AVJACK FAVORITE PWSW REVIEW SHARE FLASH FOCUS BAT_SW AE AF LOCK RIGHT PW_TEST POP UP LCD EVF TEST SW3 2V Q3002 CN301 CN302 CN303 BACKUP3 2V 63 1 64 50 54 57 58 55 61 6 17 19 31 45 21 X3001 X3002 32KHz 4MHz SCK SO SI SREQ XIN XOUT XCOUT XCIN VMONIT CHG ON TO DMA MAIN TO DMA MAIN MAIN RESET P ON LCD BL VMONIT CHG ...

Page 87: ... 10 IRED FOCUS 4 ZOOM B 11 VCC FOCUS 5 NC 12 FOCUS A 6 SENS ZOOM 13 FOCUS B 7 VCC ZOOM 14 FOCUS A 8 IRED ZOOM 15 FOCUS B 9 SENS FOCUS 16 SH DRV 17 SH DRV 18 IG A 19 IG B 20 IG A 1 ZOOM A 2 ZOOM B 3 ZOOM A 21 IG B Z1 Z2 10 THEMISTER 4 RWCLK 11 AFDATA 5 RESET 12 AL3 2V 6 END 13 SELFLED 7 DGND 8 VDD 9 AGND 1 NC 2 ADEXTEND 3 AFCEN Z1 Z2 10 AVJDET 4 NC 11 AUDIO 5 NC 12 CD2 6 NC 13 GND 7 SCK 14 BAT 8 SB...

Page 88: ...9 IG B 20 IG A 1 ZOOM A 2 ZOOM B 3 ZOOM A 21 IG B Z1 Z2 1 SOLE 2 SOLE Z1 Z2 1 2 3 4 5 6 1 2 3 4 5 6 7 8 1 2 3 4 5 6 7 8 1 2 3 4 5 6 7 8 1 2 3 4 5 Z1 Z2 1 2 3 4 5 6 1 2 3 4 5 6 1 2 3 4 5 6 1 2 3 4 5 6 7 8 A1 NC A2 NC A9 NC A10 NC B1 NC B2 NC B3 NC B4 ALE B5 VSS B6 VCCn B7 CEn B8 NC B9 NC B10 NC C1 NC C2 NC C3 WPn C4 WEn C5 CLE C6 WE C7 REn C8 R Bn C9 NC C10 NC D1 NC D2 A1 D3 A6 D4 NC D5 NC D6 NC D7...

Page 89: ...I5D 1000P B C3009 330 1 16J R3002 3 3K 1 16J R3023 3 3K 1 16J R3024 3 3K 1 16J R3025 10K 1 16J R3026 10K 1 16J R3027 SHUT1 SHUT2 1K 1 20J R3028 1K 1 20J R3029 SOQ 152CLST S3001 12P CH C3008 12P CH C3007 820K 1 20J R3003 10K 1 20J R3030 RN4981FE Q3004 87F5932AU TQFP7 E QXXAGF327122N IC301 8bit MICRO PROCESSOR 1 2 3 1 2 3 4 5 6 7 8 1 2 3 4 5 1 2 3 4 1 2 3 4 1 2 3 4 5 6 7 8 1 2 3 4 5 6 1 2 3 4 5 6 7 ...

Page 90: ...7515 2 2K 1 16D R7514 2 2K 1 16D R7516 1 B C7001 0 1 B C7003 0 1 B C7006 0 1 B C7007 0 1 B C7008 0 1 B C7009 0 1 B C7010 0 1 B C7011 0 1 B C7012 0 1 B C7015 0 1 B C7013 0 1 B C7201 0 1 B C7206 0 1 B C7207 0 1 B C7208 0 1 B C7210 0 1 B C7221 0 1 B C7222 0 1 B C7228 0 1 B C7230 0 1 B C7233 0 1 B C7512 0 1 B C7513 0 1 B C7514 4 7 B C7515 1608 4 7 B C7516 1608 4 7 B 2125 C7014 1 B 1608 C7234 STABON EN...

Page 91: ... 47K 1 20D 0603 R8006 300K 1 16D R8002 47 1 16D 1 2 3 4 1 2 3 4 1 2 3 4 10 DWN 4 VSS 11 INV 5 VDD 12 VS 6 CK1 13 HS 7 CK0 14 VIDBL 8 SLEEP 15 VIDGL 9 RGT 16 VIDRL 17 VIDBH 18 VIDGH 19 VIDRH 20 VEE 1 VEE 2 TOUT2 3 TOUT1 Z1 Z2 C3 SCLK_3W C2 SDAT_3W B1 LD_3W D2 SI_SEL C1 SDA D3 SCL D1 ResetB E2 DIN0 E1 DIN1 F2 DIN2 F1 DIN3 G1 DIN4 E3 DIN5 F3 DIN6 G2 DIN7 F4 DVALID G3 HS_IN E4 VS_IN G4 CLK_IN F5 VDD G...

Page 92: ...20D 0603 R5042 120K 1 20D 0603 R5002 2 1AV4J10UC023G CN502 CL501 CL502 VRON 15 2V A 7 7V A 1 25V D DTC123EM Q5020 DTC123EM Q5019 510K 1 20D 0603 R5027 510K 1 20D 0603 R5041 MA2S111 D5009 4 7K 1 20D 0603 R5021 10K 1 20D 0603 R5023 C5011 220P CH 0 033 B 1608 C5018 0 033 B 1608 C5019 1 B 1608 C5021 4 7 B 2125 C5030 22P CH C5303 UNR32A3 Q5001 UNR32A3 Q5302 620 1 20D 0603 R5018 18 1 20D 0603 R5032 REG ...

Page 93: ...0TR D5403 1 B 1005 C5405 10M 1 8F X RGXAVE106FCAP 2125 R5405 100K 1 8J X 3216 R5403 10K 1 20J R5418 10K 1 16J 1005 R5424 470 1 16J 1005 R5411 CL543 CL545 290 CHGSEL CPH5504 E Q5405 6800P B 1005 C5409 0 1 B 1005 C5401 470 1 16J 1005 R5417 10K 1 20J R5420 CL546 220K 1 8J X 3216 R5404 15 2V A 2SC4617 R Q5406 470 1 16J 1005 R5413 UNREG ST 10K 1 20J R5409 CHG 1000P B 1005 C5404 0 033 350H 3 3X1 6 C5402...

Page 94: ... H1 H2 J1 J2 K1 B11 C11 L10 G1 L6 L8 L9 G11 K3 L7 L5 L4 B3 A3 B5 A7 B7 B9 C10 A9 B8 A8 B6 A5 B4 A2 C2 A10 A6 A4 K4 K5 K6 K7 K8 D10 Z1 Z2 Z3 Z4 1 D4 2 D5 3 D6 4 D7 5 D8 6 D9 7 DVdd12 8 DLLC 9 DVss2 10 H1A 11 H2A 12 H1B 13 H2B 14 DVss3 15 DVdd3 16 RG 17 CLK_in 18 HD_in 19 VD_in 20 AVss1 21 CDS_in 22 FBC 23 SHC 24 Bias 25 AVdd12 26 VRT 27 VRB 28 AVss2 29 CS 30 Sdata 31 SCK 32 D0 MON 33 D1 34 D2 35 D3...

Page 95: ...601 FBMH1608HM470 1AV4L3DU470PG 1608 L5602 FBMH1608HM470 1AV4L3DU470PG 1608 L5603 CN561 1AV4J10UC064G DAN222 DDDAN222 P D5601 D5603 CR08AS 12 DTXAGS12 G02P UMZ6 8EN D5602 CN562 1 2 3 4 5 6 4 CAFLCE 5 CAFLCLK 6 CAFLDT 1 VDD3 2 X 3 GND Z1 Z2 1 2 3 K A G 1 3 4 5 2 4 CAFLCLE HOT SHOE 1 X 2 CAFLCLK 3 CAFLDT TO CP1 DMA CN193 S3 02300 SX823 WKO ST3 BOARD HOTSHOE STROBE P264_0017FC_ ...

Page 96: ...1 16J R6002 DAP222 D6001 1000P B C6001 HN1D01FE D6002 HN1D01FE D6003 SW1AB 260 10T28 1AV4S10B4101G S6005 SW1AB 260 10T28 1AV4S10B4101G S6006 XRE092_IBN123PCE S6004 11K 1 16J R6010 1 2 3 4 5 6 1 2 3 4 5 6 7 8 9 Z1 10 MODE SW_AD 4 CMD IN 2 11 SCAN OUT 4 5 CMD IN 1 12 SCAN IN 5 6 BOOST5 25V 13 SCAN IN 4 7 ALWAYS3 2V 14 SCAN OUT 0 8 PW LED 15 SCAN IN 3 9 S2 16 SCAN IN 2 17 S1 1 GND 2 GND 3 GND 18 SCAN...

Page 97: ...OBE MODE TB2 EVQPQHB55 1AV4S10B2591G S6501 EVQPQHB55 1AV4S10B2591G S6503 HN1D01FE D6501 EVQP7J01K S6502 4 5 6 1 2 3 SCAN OUT 4 SCAN OUT 5 SCAM IN 0 SCAN IN 1 FOCUS LCD EVF CP1 SYA CN303 FLASH T2 02300 SX823 WKO TB2 BOARD FOCUS AND STROBE MODE 264_0019EC_ ...

Page 98: ...701 BK1608LM751 L6701 1AV4J11SJ082G CN671 HEC3600 017010 DC JACK JK671 0 1 16Z R6701 0 1 16Z R6702 0 1 16Z R6703 1AV4J11B7431G CN672 4 VCC 5 VIDEO 6 GND 7 AUDIO 8 AVDET G TO CP1 PWA 1 GND 2 D 3 D Z1 Z2 1 2 3 4 VCC 5 VIDEO 6 GND 7 AUDIO 8 AVDET G 1 GND 2 D 3 D Z1 Z2 Z3 Z4 T3 02300 SX823 WKO TB3 BOARD AC ADAPTER USB CONNECTOR TO CP1 DMA MAIN CN103 TO USB AV P264_0020EC_ ...

Page 99: ...ARDS P264_0031DC_ Board Locator CA1 BOARD CCD TB3 BOARD AC ADAPTER USB CONNECTOR CP1 BOARD MCU ST2 BOARD STROBE POSITION TB2 BOARD FOCUS AND STROBE MODE TB4 BOARD BATTERY SENSOR ST1 BOARD CAPACITOR TB1 BOARD SHUTTER AND MODE DIAL ST3 BOARD HOT SHOE STROBE ...

Page 100: ...10 D9001 C9025 C9026 C9027 C9028 R9001 C9029 R9002 R9003 R9004 R9005 R9006 R9009 R9010 R9011 R9012 R9013 R9014 R9015 R9016 R9017 R9018 R9021 R9022 R9023 R9024 C9061 C9066 C9067 C9069 C9070 C9071 C9072 C9073 R9061 R9063 R9068 L9001 C9002 C9003 Q9001 C9008 C9009 Q9002 R9062 RB904 CL902 IC903 D9002 C9062 C9068 C9074 CB901 CB902 CB903 CB904 RB901 RB902 RB903 CN901 IC904 IC905 IC906 C9001 CL901 IC901 P...

Page 101: ...09 R1701 CN801 R1703 R1709 IC192 R1710 R1711 R1712 R1713 R1714 CB101 CB102 CB103 CB106 Q5006 CB107 R7503 CB301 R7505 CB302 CB303 R7508 C5403 R7510 R7513 R7515 D5001 Q5409 D5002 C5026 C5027 D5006 R5006 RB102 R5007 RB103 R5008 RB302 RB303 RB111 RB305 RB306 RB113 RB114 R5018 RB115 X3001 D5405 RB309 X3002 RB116 R5403 R5406 R5407 RB310 R5408 RB311 R5021 R5409 R5023 RB121 R5025 RB122 R5026 R5028 R5410 R...

Page 102: ...3003 Q3006 Q5010 Q5012 Q5013 Q3001 R7035 R7036 R7522 R7037 X7001 R1901 R1902 IC193 R1904 R1905 R1913 C5002 C5004 C5006 C5007 C5008 C5009 Q5007 Q5008 C5012 R7506 C5013 C5402 R7511 Q5402 Q5405 R7517 R7518 C5025 C5029 R5002 R5003 C5413 R7520 R5004 RB101 R5005 RB104 RB105 R5009 C5031 RB106 C5033 RB107 RB109 R5010 R5011 RB301 R5012 R5013 RB110 R5014 R5015 R5016 D5402 R5017 RB307 D5403 R5401 C5042 C5043...

Page 103: ...ST1 F7000AA GRAY RED SIDE B CL582 CL581 ST1 BOARD CAPACITOR P264_0026BC_ ST2 BOARD STROBE POSITION SIDE A GY BL SX823_ST2 F7000BA SIDE B S6801 CL682 CL681 P264_0024BC_ LCLK SIDE A LDT X LCE GND F7000CA SX823_ST3 SIDE B C5601 L5601 L5602 L5603 Q5601 D5601 R5601 R5602 CN561 CL561 P264_0025BC_ ST3 BOARD HOT SHOE STROBE ...

Page 104: ... AND STROBE MODE SIDE B GY BL SX823_TB1 F7000DA SIDE A S6005 S6006 S6007 S6008 S6009 TB1 BOARD SHUTTER and MODE DIAL P264_0028EC_ SIDE A RD BL GY WT SX823_TB2 SIDE B F7000EA S6502 S6501 S6503 D6501 S6502 CL651 CL652 CL653 CL654 S6501 S6503 TB2 BOARD FOCUS and STROBE MODE P264_0030BC_ ...

Page 105: ... SENSOR SIDE A DC DC PK GY F7000FA SIDE B SX823_TB3 JK671 CN672 L6701 L6702 L6703 L6704 CN671 CL672 CL671 R6701 R6702 R6703 VA671 VA672 VA673 L6705 C6701 P264_0029BC_ TB3 BOARD AC ADAPTER USB CONNECTOR SIDE B F7000GA SX823 TB4 BL WH SIDE A S6901 P264_0027BC_ TB4 BOARD BATTERY SENSOR ...

Page 106: ...8_1 fm EASTMAN KODAK COMPANY Rochester NY 14650 Section 8 Publication History Publication Date Publication No Changed Pages File Name Notes 11NOV05 SM7648 1 sm7648_1 fm New Publication Kodak and EasyShare are trademarks of Eastman Kodak Company ...

Reviews: