background image

6

45

Troubleshooting

If you are having problems with your camera, check the following tables for 
possible solutions.
Additional technical information is available in the ReadMe file located in the 
KODAK DC3800 folder on your camera.

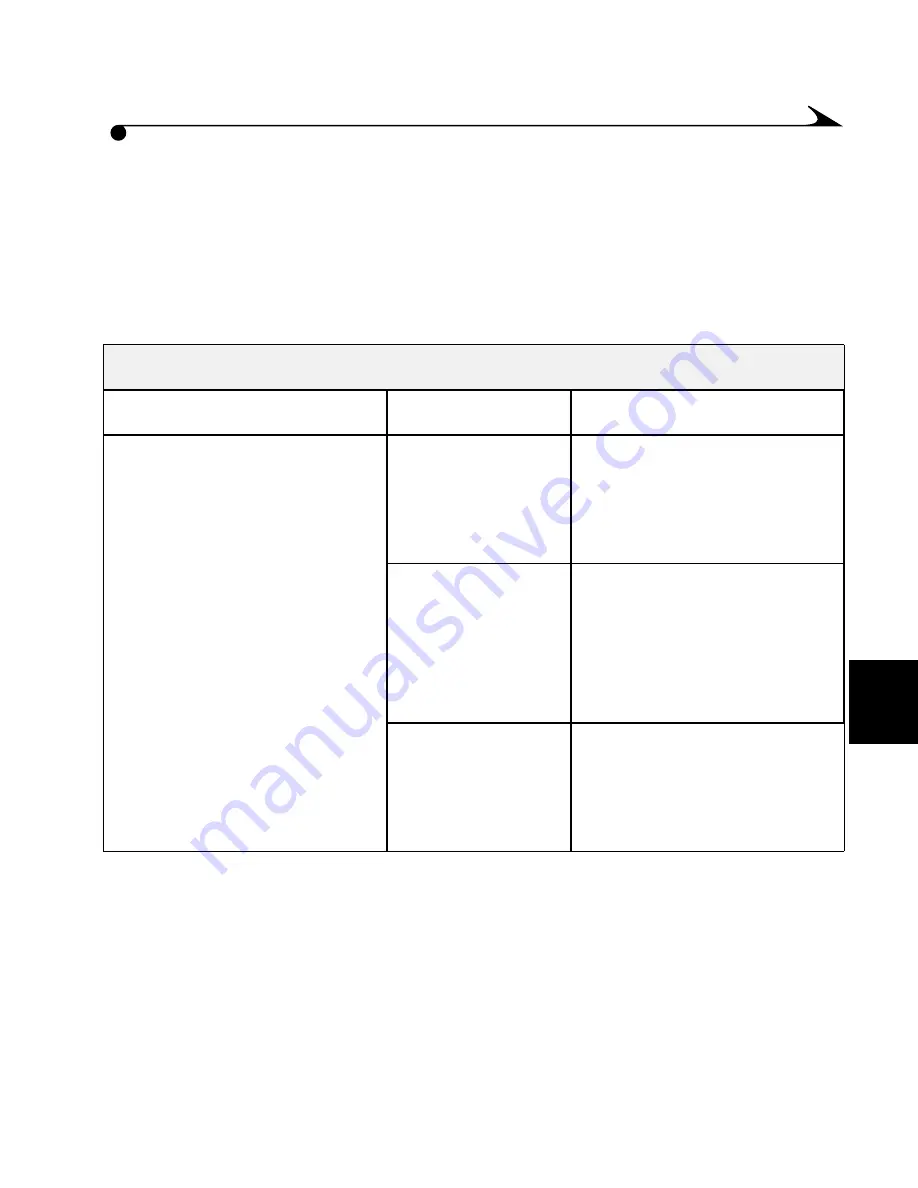
Memory Card

Problem

Cause

Solution

The camera does not 
recognize your memory 
card.

The memory card 
may not be 
CompactFlash 
certified.

Purchase a certified 
CompactFlash camera 
memory card (page 3).

The memory card 
may be corrupt or 
formatted for use 
in other digital 
cameras.

Reformat the memory card 
(page 26).

Camera memory 
card is not 
inserted in 
camera.

Insert a memory card into 
the camera (page 3).

Summary of Contents for DC3800

Page 1: ...computer Since the camera does not connect directly to your computer with additional memory cards someone else can be using the camera while you work with the pictures m E mail your pictures in minutes to friends family and business associates anywhere in the world m Print high quality pictures at home using KODAK Inkjet Photo Paper or take your KODAK Picture Card to a KODAK Picture Maker System a...

Page 2: ...Eastman Kodak Company 343 State Street Rochester N Y 14650 Eastman Kodak Company 2000 Kodak is a trademark of Eastman Kodak Company P N 6B4718 ...

Page 3: ...d 3 Removing a Memory Card 4 Turning the Camera On and Off 5 Checking the Batteries 6 Setting the Clock 7 2 Taking Pictures 9 Taking a Picture 10 Shooting Close Up Pictures 12 Putting Yourself in the Picture 13 Shooting a Burst Series of Pictures 14 Setting the Flash 15 Previewing Your Shot 16 Using Digital Zoom 17 ...

Page 4: ... Formatting a Memory Card 26 Viewing Camera Information 27 4 Reviewing Your Pictures 29 Viewing Your Pictures 30 Deleting One Picture 31 Deleting All Pictures 33 Transferring Pictures to Your Computer 34 Selecting Pictures for Automatic Printing 35 5 Installing Your Software 39 System Requirements for the KODAK USB Picture Card Reader 40 Windows Based Systems 40 Macintosh Systems 40 Installing the...

Page 5: ...ervices 51 Kodak Fax Support 51 Telephone Customer Support 52 Before You Call 52 Telephone Numbers 52 8 Warranty and Regulatory Information 55 Limited Warranty Time Period 55 Warranty Repair Coverage 55 Limitations 56 Application Support 57 How to Obtain Service 57 Regulatory Information 58 FCC Compliance and Advisory 58 Canadian DOC Statement 59 ...

Page 6: ...iv 9 Appendix 61 Original Default Settings 62 Camera Specifications 63 General Maintenance and Safety 65 Using Your Batteries 66 ...

Page 7: ...ont inside cover for a description of the camera buttons and parts This chapter covers the following information m Loading the batteries m Handling a memory card m Turning the camera on and off m Checking the batteries m Setting the clock ...

Page 8: ...e as an accessory from a dealer of Kodak products or from our web site at http www kodak com go accessories Loading the Batteries Your camera comes with two AA batteries so you can start taking pictures immediately NOTE For more information about your batteries see page 66 1 Open the battery door 2 Install the two AA batteries on top of the plastic strip Pull the plastic strip to remove the batter...

Page 9: ...an be purchased separately on our web site at http www kodak com go accessories NOTE Think of memory cards as removable and reusable film except they are x ray safe 1 Open the memory card door 2 Hold the memory card by the lip so the connection end is pointed at the camera and the lip is facing the back of the camera CAUTION The memory card can only be inserted one way Forcing the card may damage ...

Page 10: ...rd CAUTION Do not insert or eject a memory card when the green ready light is blinking This may damage your pictures or camera 1 Open the memory card door 2 Press the Eject button 3 Remove the memory card and close the door ...

Page 11: ...ng the Camera On and Off m To turn the camera on slide the power button to the left When the green ready light stops blinking the camera is ready m To turn the camera off slide the power button to the left again ...

Page 12: ...th the camera on turn the Mode Dial to Review Setup or Close up 2 Check the battery symbol that appears in the LCD Full fully charged Low not fully charged and soon needs to be replaced Exhausted blinking too weak to power the camera and needs to be replaced When the batteries are exhausted the LED blinks red and then the camera turns off ...

Page 13: ...It is important to set the correct date and time if you want to imprint the date on your pictures See Placing the Date and Time on Pictures on page 22 1 With the camera on turn the Mode Dial to Setup 2 Press a until Date Time is highlighted 3 Press the OK button The date time screen appears and the arrows indicate which field is being adjusted 4 Press a to adjust the field and then press the OK bu...

Page 14: ...8 ...

Page 15: ...lmost any situation With your camera you can m Take close up pictures m Set the self timer so you can get into the picture m Take a burst series of pictures m Adjust the flash for specific lighting conditions m Preview the picture before it is taken m Use digital zoom to get close to your subject ...

Page 16: ... the Shutter button half way to lock the autofocus and exposure 4 Check the ready light for camera status m Glows Green Camera is ready to take the picture m Blinks Green Focus and exposure are not locked or flash is not charged Release the Shutter button and recompose the picture m Glows Red There is a problem with the camera see page 49 m Blinks Red Camera batteries are low replace the batteries...

Page 17: ...ress the Shutter button completely down to take the picture The frame counter changes as the image is processed Note You can delete a picture you just took by quickly pressing a and selecting the delete option ...

Page 18: ...s automatically activated For information on using Preview see page 16 This setting is ideal for taking close up pictures of flowers or artwork when you want to fill the image area with the subject NOTE When you use the Close Up feature batteries are drained faster so use the KODAK Digital Camera AC Adapter 3 Volt when possible 1 With the camera on turn the Mode dial to Close Up 2 Frame your subje...

Page 19: ...r Close Up 2 Press the Self Timer button until the icon appears in the LCD 3 Place the camera on a flat steady surface or tripod 4 Compose the picture then press the Shutter button The Self Timer light located on the front of the camera turns on for 8 seconds then blinks for 2 additional seconds before the picture is taken You may not change camera settings such as flash during the 10 second delay...

Page 20: ...e flow of moving objects 1 With the camera on turn the Mode Dial to Setup 2 Press the until Burst is highlighted 3 Press the OK button 4 Press the to select On 5 Press the OK button to accept the changes 6 Turn the Mode Dial to Capture 7 Press the Shutter button half way to lock the autofocus and exposure 8 Press and hold the shutter button all the way down to take the pictures The camera beeps th...

Page 21: ... on a steady surface 1 With the camera on turn the Mode dial to Capture 2 Press the Flash button While the LCD is on press the Flash button to scroll through and select the correct flash icon See the descriptions of the icons below The Flash setting remains until changed m AUTO no icon flash fires automatically when needed m Red Eye flash fires once so the subject s eyes become accustomed to the f...

Page 22: ...en you use the Preview feature batteries are drained faster so use the KODAK Digital Camera AC Adapter 3 Volt when possible 1 With the camera on turn the Mode dial to Capture 2 Press the OK button The LCD displays a live image 3 To take a picture using Preview m Center the subject on the LCD m Press the Shutter button half way to lock the autofocus and exposure m Press the Shutter button completel...

Page 23: ...the Digital Zoom setting quality is automatically set to good Due to the camera s digital zoom frame rate during Preview the quality of the LCD display may appear degraded 1 Use Preview page 16 to frame your subject 2 Press to activate Digital Zoom The image is center cropped then magnified on the LCD 3 Press again to remove the Digital Zoom feature 4 ...

Page 24: ...18 ...

Page 25: ...ital Camera for more control of your picture results These settings allow you to m Set the picture quality m Place the date and time stamp on your pictures m Set your camera for quickview m Set your camera for a different language m Set your camera for an audible tone response m Format a memory card m View your camera information ...

Page 26: ...on settings result in compressed JPEG files m If the quality of your pictures is most important use the Best Quality setting which results in little compression m If space on your memory card is most important use the Good or Better quality settings which result in more compression 1 With the camera on set the mode dial to Setup 2 Press a button until Quality is highlighted 3 Press the OK button t...

Page 27: ...riate setting m Best for printing 8x10 in pictures m Better for printing up to 5x7 in pictures m Good for e mailing pictures or using pictures online 5 Press the OK button Note You can switch freely among these three settings when taking pictures ...

Page 28: ...ock is set to the correct time See Setting the Clock on page 7 2 With the camera on turn the Mode dial to Setup 3 Press a button until Date Time Stamp is highlighted 4 Press the OK button to display the Date Time Stamp screen 5 Press a button to highlight the format you want to use 6 Press the OK button to accept the changes The next time you take a picture the date and time stamp is recorded in t...

Page 29: ...ant in order to save space on the camera memory card page 12 NOTE This setting is ideal when you need to view your picture immediately 1 With the camera on turn the Mode dial to Setup 2 Press a button until Quickview is highlighted 3 Press the OK button to display the Quickview screen 4 Press the button until On is highlighted 5 Press the OK button to accept the changes Note This setting remains u...

Page 30: ...With the camera on turn the Mode dial to Setup 2 Press a button until Language is highlighted 3 Press the OK button to display the Language screen 4 Press a button to highlight the Language you want to use 5 Press the OK button to accept the changes and return to the Setup menu Note This setting remains until you change it ...

Page 31: ...amera to make sounds for most functions or to make no sounds at all 1 With the camera on turn the Mode dial to Setup 2 Press a button until Beep is highlighted 3 Press the OK button to display the Beep screen 4 Press the button until On is highlighted 5 Press the OK button to accept the changes Note This setting remains until you change it ...

Page 32: ...card deletes everything on the memory card 1 With the camera on turn the Mode Dial to Setup 2 Press a button until Format is highlighted 3 Press the OK button to display the Format Card screen 4 Press a button to highlight Yes or No m Yes erases all of the information on the card and formats the memory card for use in the camera m No exits without making a change 5 Press the OK button to accept yo...

Page 33: ...is information is helpful if you need to call for service on your camera 1 With the camera on turn the Mode Dial to Setup 2 Press a button until About is highlighted 3 Press the OK button to display the About screen The information that appears is for viewing only and cannot be changed 4 Press the OK button to return to the Setup menu ...

Page 34: ...28 ...

Page 35: ...ed on the memory card in your KODAK DC3800 Digital Camera You can m View the pictures you have taken m Delete some or all of the pictures m Create a print order or index print m Select Pictures for Automatic Printing DPOF m Display and run a slide show on your television from your camera ...

Page 36: ...for viewing pictures stored on the memory card To conserve batteries use the KODAK Digital Camera Adapter 3 Volt which is available as an accessory from a dealer of Kodak products or from our web site at http www kodak com go accessories 1 With the camera on turn the Mode dial to Review The last picture you took is displayed in the LCD 2 Use the to scroll through your pictures ...

Page 37: ...OTE This setting is ideal to free up space on the memory card and also allows for easy picture verification before deleting 1 With the camera on turn the Mode dial to Review 2 Press a button until the picture you want to delete is selected 3 Press the OK button 4 Press a button until Delete is highlighted 5 Press the OK button to display the Delete screen ...

Page 38: ...32 6 Press a button until Current Picture is highlighted 7 Press the OK button to delete the picture and return to the main Review screen ...

Page 39: ...d 1 With the camera on turn the Mode dial to Review 2 Press the OK button to display the Delete screen 3 Press a button until All Pictures is highlighted 4 Press the OK button to display the verification screen 5 Press a button until Yes is highlighted 6 Press the OK button to delete all the pictures on the memory card All the pictures are deleted from the memory card ...

Page 40: ...ave used your USB Picture Card Reader install it using the instructions accompanying the card reader 1 Open the memory card door 2 Press the Eject button 3 Remove the memory card and close the door 4 Insert the memory card into the USB Picture Card Reader You can now access your pictures using the software that is included with your camera or any JPEG compatible software Note The KODAK USB Picture...

Page 41: ...per when printing When you put the memory card into a direct print enabled printer only the selected images are printed 1 With the camera on turn the Mode dial to Review 2 Press the OK button 3 Press a button until Print Order is highlighted 4 Press the OK button 5 Press a button until Current Picture or Index Print is highlighted m CURRENT PICTURE selects the current picture m INDEX PRINT creates...

Page 42: ... indicate the number of prints desired 8 Press the OK button The print order or Index Print icon appears on the LCD for the pictures that have been ordered Now you can print your marked pictures directly from the memory card ...

Page 43: ...cessory from a dealer of Kodak products or from our web site at http www kodak com go accessories 1 Turn off your television and camera 2 Insert the video cable into the video out port on the side of your camera 3 Connect the other end of the video cable to the video in port on the television 4 Turn the Mode Dial to Review 5 Turn on the camera and television 6 Set the television to the correct cha...

Page 44: ...38 ...

Page 45: ...aller Software Installer included with your camera operates on both Windows based personal computers and Macintosh computers Using the KODAK USB Picture Card Reader these applications let you access and use the pictures stored on the camera memory card Information on using the software can be found in the online help supplied with each software application ...

Page 46: ... 200 MHz or greater microprocessor m 32 MB RAM or greater m 150 MB hard disk space or greater m CD ROM drive m Available USB port or PCMCIA adapter slot m Color monitor with 256 colors thousands of colors recommended Macintosh Systems m PowerMac system MacOS 8 6 or higher m 32 MB RAM or greater m Available USB port m Color monitor with 256 colors thousands of colors recommended ...

Page 47: ... CD ROM drive 3 Load the software If Auto Play is enabled the first installation window automatically appears If the first installation window does not automatically appear On a Windows based computer choose Run from the Start menu In the Run dialog box type the drive letter that contains the CD and type setup exe For example d setup exe On a Macintosh computer double click the Get Started icon 4 ...

Page 48: ...42 ...

Page 49: ...ion in this chapter can point you in the right direction for finding the answers quickly so you can continue using your camera This chapter provides the following information m Getting better results from your camera m Troubleshooting memory card problems m Troubleshooting camera problems m LCD messages and tips ...

Page 50: ...ack and white More complex pictures increase the printing and drying time m Color printing is more memory intensive than black and white If your computer gives you an insufficient memory message you may need to close some applications change some settings or add additional memory m Color prints may not photocopy as clearly as black and white If you plan to photocopy documents you should consider p...

Page 51: ...older on your camera Memory Card Problem Cause Solution The camera does not recognize your memory card The memory card may not be CompactFlash certified Purchase a certified CompactFlash camera memory card page 3 The memory card may be corrupt or formatted for use in other digital cameras Reformat the memory card page 26 Camera memory card is not inserted in camera Insert a memory card into the ca...

Page 52: ...take another picture The memory card is full Delete pictures on the card page 31 or insert a memory card with available memory page 3 Part of the picture is missing Something was blocking the lens when the picture was taken Keep hands fingers or other objects away from the lens when taking pictures Your eye or the picture was not centered correctly in the viewfinder Leave space around the subject ...

Page 53: ...sition so the light is not behind the subject Camera does not turn on Batteries are not properly installed Remove and reinstall the batteries page 2 Batteries are too weak Install new batteries Picture is too light The flash is not needed Turn the flash off page 15 The subject was too close when the flash was used Move so there is at least 1 6 ft 0 5 m between the camera and the subject The light ...

Page 54: ... taking a picture Image Resolution and Quality settings do not take up sufficient space to decrease the picture remaining number The camera is operating normally Continue taking pictures Picture is not clear The lens is dirty Clean the lens page 65 Subject or the camera moved while the picture was being taken Hold camera steady until the picture is taken The subject is too far away for the flash t...

Page 55: ... batteries if necessary page 2 Camera memory card is full Delete pictures on the memory card page 31 or insert a memory card with available memory page 3 Green ready light blinks Focus and exposure are not locked Release the Shutter button and recompose the picture Red ready light comes on Flash is not charged Wait for the flash to charge Resume picture taking when the light goes off Green ready l...

Page 56: ...res on the card page 31 or insert a memory card with available memory Insert Memory Card There is no memory card inserted in the camera Insert a memory card into the camera page 3 Card Cannot be Read Memory card is corrupted Insert a memory card into the camera page 3 or reformat the memory card page 26 Card Requires Formatting ...

Page 57: ...the online help or by contacting the manufacturer Kodak Online Services Kodak Fax Support m Chapter 6 Tips and Troubleshooting m Place of purchase m Software s manufacturer m World Wide Web m Product information by fax m Technical support m World Wide Web http www kodak com click Service and Support m U S and Canada 1 800 508 1531 m Europe 44 0 131 458 6962 m U K 44 0 131 458 6962 ...

Page 58: ...___________ Amount of memory MB ____________________________________ Exact error message you received ______________________________ Version of installation CD ____________________________________ Camera serial number ______________________________________ Telephone Numbers m U S call toll free 1 800 235 6325 between the hours of 9 00 a m and 8 00 p m Eastern Standard Time Monday through Friday m ...

Page 59: ...d Suomi 0800 1 17056 France 01 55 1740 77 Germany Deutschland 069 5007 0035 Greece 0080044125605 Italy Italia 02 696 33452 Netherlands Nederland 020 346 9372 Norway Norge 23 16 21 33 Portugal 021 415 4125 Spain Espana 91 749 76 53 Sweden Sverige 08 587 704 21 Switzerland Schweiz Suisse 01 838 53 51 UK 0870 2430270 International Toll Line 44 131 4586714 International Toll Fax Number 44 131 4586962 ...

Page 60: ...54 ...

Page 61: ... warranty period due to defects in either materials or workmanship Kodak will at its option either repair or replace the equipment without charge subject to the conditions and limitations stated herein Such repair service will include all labor as well as any necessary adjustments and or replacement parts If replacement parts are used in making repairs these parts may be remanufactured or may cont...

Page 62: ...ND CABLES OR CLAIMS MADE AFTER THE ONE YEAR DURATION OF THIS WARRANTY KODAK MAKES NO OTHER WARRANTIES EXPRESS IMPLIED OR OF MERCHANTABILITY OR FITNESS FOR A PARTICULAR PURPOSE FOR THIS EQUIPMENT OR SOFTWARE IN THE EVENT THAT THE EXCLUSION OF ANY IMPLIED WARRANTY IS INEFFECTIVE UNDER THE LAW THE DURATION OF THE IMPLIED WARRANTY WILL BE ONE YEAR FROM THE PURCHASE DATE REPAIR OR REPLACEMENT WITHOUT C...

Page 63: ...or the support number designated to your location When returning a camera for repair pack the camera in the original packaging materials A problem report should also be enclosed with the equipment If the original packaging has been discarded or is not available packaging will be at the owner s expense Unless a specific Kodak warranty is communicated to the purchaser in writing by a Kodak company n...

Page 64: ...nterference will not occur in a particular installation If this equipment does cause harmful interference to radio or television reception which can be determined by turning the equipment off and on the user is encouraged to try to correct the interference by one or more of the following measures 1 reorient or relocate the receiving antenna 2 increase the separation between the equipment and the r...

Page 65: ...the radio interference regulations of the Canadian Department of Communications Obervation des normes Class B Le présent appareil numérique n émet pas de bruits radioélectriques dépassant les limites applicables aux appareils numériques de la Classe B prescrites dans les règlements sur le brouillage redioélectrique édictés par le Ministère des Communications du Canada ...

Page 66: ...60 ...

Page 67: ...erves as a resource for specific technical information and care for your camera and contains the following information m Original camera default settings m Camera specifications m General maintenance and safety m Using your batteries ...

Page 68: ...et to the following defaults when you take the camera out of the box for the first time Feature Default Setting Date Time Stamp Off Digital Zoom Off Flash Auto Preview Off Quality Best Quickview On Self Timer Off Burst Off Beep On Language English ...

Page 69: ...ls total number of pixels Best Better 1792 x 1184 Good 896 x 600 Color 24 bit millions of colors Picture File Format JPEG EXIF Picture Storage External memory only ATA compatible CompactFlash card Viewfinder Real image ASA ISO Sensitivity ISO 100 equivalent Flash Range 1 6 ft to 8 2 ft 0 5 to 2 5 m ...

Page 70: ... 6 9 mm actual Focus Distance Normal 0 5 m to infinity Close Up 0 66 ft 0 2 m to 1 64 ft 0 5 m Power Battery AA Alkaline Ni MH Tripod Socket 25 in 006 m threaded Video Out NTSC only Dimensions Width 3 7 in 95 mm Depth 1 3 in 33 mm Height 2 4 in 61 mm Weight 5 8 oz 165 g without batteries Operating Temperature 32 to 104 F 0 to 40 C Camera Specifications ...

Page 71: ...uld result in electrical shock m If you notice smoke or a strange smell coming from the camera immediately turn off the camera wait a few minutes until the camera cools and then remove the batteries m Clean the lens and back LCD screen Do not use cleaning solutions unless they are designed specifically for camera lenses Do not wipe the camera lens or LCD screen with chemically treated eyeglass len...

Page 72: ...ormal exhaust point and increase their possibility of leakage m NOT ALL BATTERIES ARE CREATED EQUAL Battery life depends significantly on age usage conditions type brand and camera Digital camera requirements are very demanding on batteries Not all batteries perform well under these challenging conditions In Kodak lab tests Ni MH rechargeable batteries delivered outstanding results in a variety of...

Page 73: ...n disposing of batteries follow the manufacturer s instructions and any local and national regulations Kodak suggests customers take advantage of any community battery recycling programs that may exist in your area Contact your local waste remover or recycler for details Caution Hot Surface m When removing batteries allow to cool before touching since the batteries may be hot m Keep batteries away...

Page 74: ...68 ...

Page 75: ...fault setting 62 setting 25 best quality setting 20 21 burst default setting 62 setting 14 C camera information 27 specifications 63 troubleshooting 46 Canadian DOC statement 59 card formatting 26 memory inserting 3 memory removing 4 card reader using 34 cleaning LCD 65 lens 65 clock setting 7 close up setting 12 CompactFlash card inserting 3 removing 4 compressed files 20 D date setting 7 date ti...

Page 76: ...ash 15 flash default setting 62 range 63 focal length 64 focus distance 64 formatting memory card 26 G getting help 51 good quality setting 20 21 H help getting 51 I index prints 35 installing software 41 ISO sensitivity 63 J JPEG files 20 L language default setting 62 selecting 24 LCD cleaning 65 messages 50 LED status lights tips 49 lens cleaning 65 specifications 64 light ready 10 limitations w...

Page 77: ... deleting one at a time 31 transferring pictures 34 viewing 30 pixel resolution 63 preparing to take pictures 2 preview default setting 62 setting 16 print order 35 printer tips 44 printing pictures 35 Q quality default setting 62 picture setting 20 quickview default setting 62 setting 23 R ready light 10 red eye flash 15 regulatory information 55 repair coverage 55 requirements system 40 resoluti...

Page 78: ...quirements 40 T taking a picture 10 telephone support 52 television slide show 37 temperature operating 64 time setting 7 stamp adding 22 transferring pictures 34 tripod socket 64 troubleshooting 50 camera 46 LED status lights 49 memory card 45 U USB Picture Card Reader 34 V video cable 37 video out specifications 64 viewfinder information 63 viewing camera information 27 pictures 30 W warranty 55...

Reviews: