background image

22

CARE AND MAINTENANCE

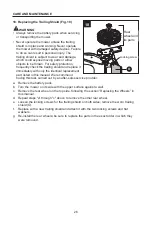
14. Removing the Blade

 WARNING

•  Always remove the battery pack when servicing 

or transporting the mower. 

•  Always protect your hands by wearing heavy 

gloves or wrapping the cutting edges with 

rags or other materials when performing any 

maintenance on the mower blade. 

NOTICE: 

The following tools are required (not 

included) for replacing the blade:
•  9/16" (14mm) wrench
•  Torque wrench
•  Manual screwdriver or metal rod with a diameter 

of 5/16" (8mm)

•  Manual screwdriver or metal rod with a diameter 

of 1/4" (6.35mm) or less

a.  Stop the motor and remove the battery pack 

from the mower.

b.  Turn the mower on its side.

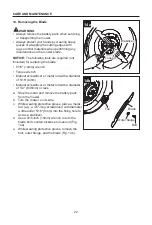
c.  While wearing protective gloves, place a metal 

rod (e.g., a 3.5"-long screwdriver) with diameter 

a little under 5/16" (8mm) into the fixing hole to 

act as a stabilizer.

d.  Use a 9/16-inch (14mm) wrench to turn the 

blade bolt counterclockwise to loosen it (Fig. 

14a).

e.  While wearing protective gloves, remove the 

bolt, outer flange, and the blade (Fig. 14b).

14a

Stabilizer

Loosen

14b

Fan

Blade

Outer flange

Bolt

Summary of Contents for 3809909

Page 1: ... KOBALT and logo design are trademarks or registered trademarks of LF LLC All rights reserved Questions problems missing parts Before returning to your retailer call our customer service department at 1 888 3KOBALT 1 888 356 2258 8 a m 8 p m EST Monday Sunday You could also contact us at partsplus lowes com or visit www lowespartsplus com ...

Page 2: ...MPONENT SPECIFICATION Rated voltage 40V d c No Load speed 2850 min RPM Approximate Cutting Height setting 1 1 4 30mm 1 9 16 40mm 2 3 16 55mm 2 3 4 70mm 3 5 16 85mm 4 100mm Deck size 20 510mm Grass bag volume 1 7 Bushel 60 L Operating temperature 32 F 0 C 104 F 40 C Storage temperature 4 F 20 C 113 F 45 C Recommended replacement blade for this lawn mower PART NAME MODEL NUMBER 20 Lawn Mower Blade K...

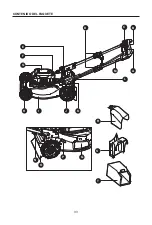
Page 3: ...3 PACKAGE CONTENTS L B C H N P O M R S T G F E I J K A D Q ...

Page 4: ...ty button must be pressed down before the motor can be started Bail Switch The bail switch is located on the upper handle of the mower The switch engages and disengages the motor blade WARNING The bail switch and the safety button are safety devices Never attempt to bypass their operations Handle Locking Clamp Locks unlocks the side rails in the extended or the recessed position Side Rails Can be ...

Page 5: ...te the mower without the trailing shield and rear discharge door in place Spring Loaded Cutting Height Adjustment Lever One handed cutting height adjustment WARNING Remove the tool from the package and examine it carefully Do not discard the carton or any packaging material until all parts have been examined If any part of the tool is missing or damaged do not attach the battery to use the tool un...

Page 6: ...ls known to the state of California to cause cancer birth defects or other reproductive harm Some examples of these chemicals are Lead from lead based paints Crystalline silica from bricks cement and other masonry products Arsenic and chromium from chemically treated lumber Your risk from these exposures varies depending upon how often you do this type of work To reduce your exposure to these chem...

Page 7: ...Bystanders Away Remove objects that can be thrown by the blade in any direction IMPORTANT SAFETY INSTRUCTIONS DANGER This machine was built to be operated according to the rules for safe operation included in this manual As with any type of power equipment carelessness or error on the part of the operator can result in serious injury This machine is capable of amputating hands and feet and throwin...

Page 8: ...ing at all times This machine is a precise piece of power equipment not a plaything Therefore exercise extreme caution at all times Your unit has been designed to perform one job to mow grass Do not use it for any other purpose Don t force the lawn mower it will do the job better and more safely at the rate for which it was designed Thoroughly inspect the area where the equipment is to be used Rem...

Page 9: ...when crossing gravel drives walks or roads If the equipment should start to vibrate abnormally immediately stop the motor remove the battery and check for the cause Vibration is generally a warning of trouble Before cleaning the machine unclogging the chute or removing or replacing the grass bag mulching insert or side discharge chute turn the motor off and wait until the blade comes to a complete...

Page 10: ...this manual Do not wash the mower with a hose avoid getting water in the motor and electrical connections Remove the battery and store the idle lawn mower in a covered area when not in use Allow the motor to cool before storing it in any enclosure The lawn mower should be stored in a dry high or locked up enclosure out of reach of children When servicing use only identical replacement parts listed...

Page 11: ...C may cause explosion Follow all charging instructions and do not charge the battery pack or appliance outside of the temperature range specified in the instructions Charging improperly or at temperatures outside of the specified range may damage the battery and increase the risk of fire Disconnect the battery pack from the appliance before making any adjustments changing accessories or storing ap...

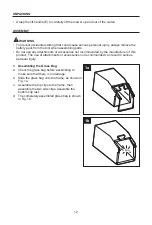
Page 12: ...essories not recommended by the manufacturer of this product The use of attachments or accessories not recommended can result in serious personal injury 1 Assembling the Grass Bag a Check the grass bag before assembling to make sure that there is no damage b Slide the grass bag onto the frame as shown in Fig 1a c Assemble the top clips to the frame then assemble the two side clips Assemble the bot...

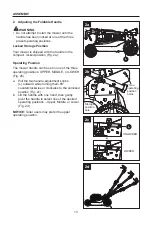
Page 13: ...dle can be set in one of the three operating positions UPPER MIDDLE or LOWER Fig 2b a Pull the two handle adjustment knobs L outward while turning them 90 counterclockwise or clockwise to the unlocked position Fig 2c b Lift the handle with one hand then gently pivot the handle to select one of the desired operating positions Upper Middle or Lower Fig 2d NOTICE Taller users may prefer the upper ope...

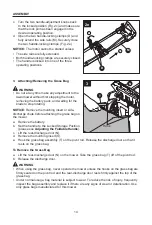
Page 14: ...harge chute before attaching the grass bag on the mower a Remove the battery b Set the handle to the Locked Storage Position please see Adjusting the Foldable Handle c Lift the rear discharge door N d Remove the mulching insert S e Hook the grass bag assembly T on the pivot rod Release the discharge door so that it rests on the grass bag To Remove the Grass Bag a Lift the rear discharge door N on ...

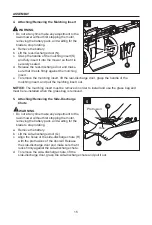
Page 15: ...g insert and pull the mulching insert out NOTICE The mulching insert must be removed in order to install and use the grass bag and must be re installed when the grass bag is removed 5 Attaching Removing the Side Discharge Chute WARNING Do not at any time make any adjustment to the lawn mower without first stopping the motor removing the battery pack and waiting for the blade to stop rotating a Rem...

Page 16: ...ur feet away from the deck when adjusting its height The mower can be set to any of 6 cutting heights between 1 3 16 30mm and 4 100mm Choose the proper cutting height according to the type and condition of the grass a Grasp the height adjustment lever P and move it outwards b Move the lever toward the back or the front of the mower and engage the lever in the desired cutting height position on the...

Page 17: ...ert the battery pack into compartment c Push the battery pack until you hear a click It indicates that the battery pack is securely attached NOTICE Make sure that the latch on the battery pack snaps into place and that the battery pack is secured to the mower before starting operation d To detach the battery pack depress the battery release button to release the battery pack and then lift it out o...

Page 18: ... will immediately turn off the mower to protect the battery pack from heat damage Release the bail switch A wait for the battery pack to cool down then restart the mower 9 To Start Stop the Mower WARNING The operation of any lawn mower can result in foreign objects being thrown into your or others eyes which can damage eyes severely Always wear safety glasses while operating the mower or while per...

Page 19: ...se serious personal injury to the operator and to others WARNING If you strike a foreign object stop the motor and remove the battery pack Thoroughly inspect the mower for any damage and repair the damage before restarting and operating the mower Excessive vibration of the mower during operation is an indication of damage The unit should be promptly inspected and repaired For best results do not m...

Page 20: ...all growth For effective mulching do not cut wet grass it tends to stick to the underside of the deck preventing the proper mulching of grass clippings The best time to mow grass is in the late afternoon when the grass is dry and the newly cut area will not be exposed to direct sunlight For the best mulching performance set the cutting height to remove approximately one third of the grass blade le...

Page 21: ...Cleaning WARNING Always remove the battery pack when servicing or transporting the mower When cleaning the mower DO NOT immerse in water or other liquids The underside of mower deck should be cleaned after each use as grass clippings leaves dirt and other debris will accumulate This accumulation is undesirable as it will promote rust and corrosion Remove any build up of grass and leaves on or arou...

Page 22: ...screwdriver or metal rod with a diameter of 5 16 8mm Manual screwdriver or metal rod with a diameter of 1 4 6 35mm or less a Stop the motor and remove the battery pack from the mower b Turn the mower on its side c While wearing protective gloves place a metal rod e g a 3 5 long screwdriver with diameter a little under 5 16 8mm into the fixing hole to act as a stabilizer d Use a 9 16 inch 14mm wren...

Page 23: ...e outer flange with the shaft and assemble it in place d Mount the bolt into the shaft and turn it clockwise by hand to re tighten it e While still wearing protective gloves hold the blade with one hand and turn the fan with the other hand to align the holes in the blade with the through holes in the inner flange Fig 15a f Place a metal rod e g a 3 5 long screwdriver with diameter a little under 1...

Page 24: ...is excessively worn bent cracked or otherwise damaged must be replaced A worn or damaged blade can break causing blade pieces to be thrown from the mower If the blade is found to be bent replace it Sharpening Frequency Sharpening the blade twice during a mowing season is usually sufficient under normal circumstances Sand causes the blade to dull quickly if your lawn has sandy soil more frequent sh...

Page 25: ...e with the upper surface against a wall b Use a flat blade screwdriver to pry the dust cover away from the wheel c Use an adjustable or inch 13mm wrench to turn the bolt counterclockwise to loosen it d For front wheels remove the bolt the worn wheel the wave washer and flat washer from the wheel axle Fig 17a e For rear wheels remove the bolt the worn wheel the wave washer from the wheel axle Fig 1...

Page 26: ...the identical replacement part listed in this manual We recommend having this task carried out by an after sales service provider a Remove the battery pack b Turn the mower on its side with the upper surface against a wall c Remove the rear wheel on the top side following the section Replacing the Wheels in this manual d Repeat steps a through c above to remove the other rear wheel e Loosen the lo...

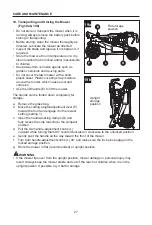
Page 27: ... folded down completely for storage a Remove the grass bag b Move the cutting height adjustment lever P toward the front and engage it in the lowest setting setting 1 c Open the handle locking clamps D and fully recess the side rails M to the compact position d Pull the two handle adjustment knobs L outward while turning them 90 counterclockwise or clockwise to the unlocked position e Gently pivot...

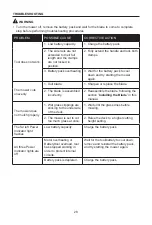
Page 28: ...eplace the blade 2 The blade is assembled incorrectly 2 Reassemble the blade following the section Installing the Blade in this manual The mower does not mulch properly 1 Wet grass clippings are sticking to the underside of the deck 1 Wait until the grass dries before mowing 2 The mower is set to cut too much grass at once 2 Raise the deck to a higher cutting height setting The far left Power Indi...

Page 29: ...endable parts and accessories expected to become unusable after a reasonable period of use This warranty is limited to 90 days for commercial and rental use If you think your product meets the above guarantee criteria please return it to the place of purchase with valid proof of purchase and the defective product will be repaired or replaced at no charge This guarantee gives you specific legal rig...

Page 30: ...30 ...

Page 31: ...8 p m hora estándar del Este También puede ponerse en contacto con nosotros en partsplus lowes com o visitar www lowespartsplus com ADJUNTE SU RECIBO AQUÍ Número de serie Fecha de compra ARTÍCULO 4132845 3809909 PODADORA DE CÉSPED SIN ESCOBILLAS MODELO KPM 1040B 03 KOBALT y el diseño del logotipo son marcas comerciales o marcas registradas de LF LLC Todos los derechos reservados ...

Page 32: ...0 V CC Velocidad sin carga 2850 min RPM Configuración aproximada de la altura de corte 30 mm 1 1 4 40 mm 1 9 16 55 mm 2 3 16 70 mm 2 3 4 85 mm 3 5 16 100 mm 4 Tamaño de la plataforma 510 mm 20 Volumen de la bolsa para césped 1 7 bushel 60 l Temperatura de funcionamiento De 0 C 32 F a 40 C 104 F Temperatura de almacenaje De 20 C 4 F a 45 C 113 F Cuchilla de repuesto recomendada para esta podadora d...

Page 33: ...33 CONTENIDO DEL PAQUETE L B C H N P O M R S T G F E I J K A D Q ...

Page 34: ...ón de seguridad Para que el motor se encienda es necesario presionar el botón de seguridad Interruptor de agarre El interruptor de agarre está ubicado en la manija superior de la podadora Permite encender y apagar el motor y la cuchilla ADVERTENCIA El interruptor de agarre y el botón de seguridad son dispositivos de seguridad No intente evitar su activación Abrazadera de bloqueo de la manija Traba...

Page 35: ...ncionar la podadora sin el protector ni sin la puerta de descarga posterior en su lugar Palanca de ajuste de la altura de corte con resortes Palanca de ajuste de la altura de corte para operar con una mano ADVERTENCIA Retire la herramienta del paquete y examínela cuidadosamente No deseche la caja ni ningún material de embalaje hasta después de examinar todas las piezas Si falta alguna pieza o si e...

Page 36: ... que según el estado de California causan cáncer defectos congénitos u otros daños reproductivos Estos son algunos ejemplos de dichos productos químicos Plomo de pinturas a base de plomo Sílice cristalina de ladrillos cemento y otros productos de mampostería Arsénico y cromo de madera tratada con químicos El riesgo que corre debido a la exposición a estos químicos varía según la frecuencia con que...

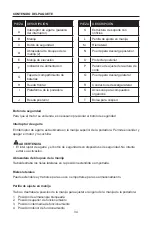
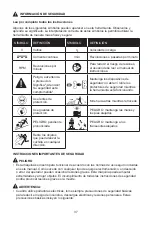
Page 37: ...o Use lentes de protección Mire hacia atrás mientras retrocede Use guantes de protección PELIGRO mantenga las manos y los pies alejados PELIGRO pendiente pronunciada PELIGRO mantenga a los transeúntes alejados Retire los objetos que pueda lanzar la cuchilla en cualquier dirección INSTRUCCIONES IMPORTANTES DE SEGURIDAD PELIGRO Esta máquina se diseñó para funcionar de acuerdo con las normas de uso s...

Page 38: ...a podadora se diseñó para realizar una sola tarea cortar el césped No se extienda demasiado mantenga una posición y un equilibrio adecuados en todo momento Los objetos que golpea la cuchilla para podadora pueden causar lesiones graves a las personas El césped siempre se debe examinar y despejar todos los objetos que haya antes de cada corte Mantenga el área de operación libre de cualquier persona ...

Page 39: ...s de la mitad hacia usted Repita estos pasos si es necesario No use la podadora bajo los efectos del alcohol o de drogas Manténgase alerta preste atención a lo que hace Use el sentido común No use la podadora de césped si está cansado La manija de control del motor y la cuchilla es un dispositivo de seguridad Nunca intente evitar su activación Al hacerlo el dispositivo de seguridad no funciona y p...

Page 40: ... o la posición No use la máquina bajo ninguna circunstancia si duda del funcionamiento de la tracción la dirección o la estabilidad ya que los neumáticos se pueden deslizar aun si las ruedas están detenidas Evite arrancar y detenerse en pendientes evite hacer cambios bruscos de velocidad o dirección Realice los cambios de manera suave y gradual Tenga especial cuidado al operar la máquina con un co...

Page 41: ...hilla solo con la cuchilla de reemplazo idéntica como se indica en este manual Realice un mantenimiento cuidadoso de su podadora mantenga la cuchilla para podadora afilada y limpia para obtener el mejor y más seguro rendimiento Las cuchillas para podadora son filosas y pueden cortar Envuelva la cuchilla o use guantes y tenga mucho cuidado cuando realice su mantenimiento Mantenga tuercas pernos y t...

Page 42: ...go de arranques accidentales del electrodoméstico Pida solo a personas capacitadas que reparen el electrodoméstico y que usen exclusivamente piezas de repuesto idénticas De esta forma se asegurará de que se mantenga la seguridad de la herramienta eléctrica No modifique ni intente reparar el electrodoméstico o el paquete de baterías except como se indica en las instrucciones de uso y cuidado GUARDE...

Page 43: ... de este producto no recomiende El uso de acoplamientos o accesorios no recomendados puede producir lesiones personales graves 1 Ensamblaje de la bolsa para césped a Verifique la bolsa para césped antes de ensamblarla para asegurarse de que no haya daños b Deslice la bolsa para césped sobre la estructura como se muestra en la Figura 1a c Ensamble los sujetadores superiores a la estructura y luego ...

Page 44: ...a mientras las gira 90 en dirección contraria a las manecillas del reloj o en dirección de las manecillas del reloj hasta la posición de desbloqueo Fig 2c b Levante la manija con una mano luego gírela suavemente para seleccionar una de las posiciones de funcionamiento deseadas superior intermedia o inferior Fig 2d AVISO es posible que los usuarios más altos prefieran la posición superior de funcio...

Page 45: ... de almacenaje bloqueada consulte Ajuste de la manija plegable c Levante la puerta de descarga posterior N d Retire el accesorio para compuestos orgánicos S e Enganche el ensamblaje de la bolsa para césped T en la varilla giratoria Suelte la puerta de descarga para que se apoye sobre la bolsa para césped Para retirar la bolsa para césped a Levante la puerta de descarga posterior N de la podadora Q...

Page 46: ...a posterior sujete la manija y extráigalo AVISO este accesorio se debe retirar para colocar y usar la bolsa para césped y luego se debe volver a colocar cuando se retira la bolsa 5 Colocación y extracción del conducto de descarga lateral ADVERTENCIA No realice ningún ajuste en la podadora de césped en ningún momento sin antes detener el motor retirar el paquete de baterías y esperar a que la cuchi...

Page 47: ...dos de la plataforma cuando ajuste su altura La podadora se puede configurar en cualquiera de las 6 alturas de corte entre 30 16 mm 1 3 16 y 101 6 mm 4 Elija la altura de corte adecuada según el tipo y la condición del césped a Sujete la palanca de ajuste de altura P y muévala hacia afuera b Mueva la palanca hacia la parte posterior o frontal de la podadora y engánchela en la posición de altura de...

Page 48: ... baterías en el compartimento c Presione el paquete de baterías hasta que escuche un clic Indica que la batería está bien colocada AVISO asegúrese de que el pestillo del paquete de baterías encaje en su lugar y que el paquete de baterías esté fijo en la podadora antes de comenzar la operación d Para retirar el paquete de baterías oprima el botón de liberación de las baterías y tire el paquete de b...

Page 49: ...de protección apagará inmediatamente la podadora para proteger el paquete de baterías del daño por calor Suelte el interruptor de agarre A espere hasta que el paquete de baterías se enfríe y luego reinicie la podadora 9 Para encender y apagar la podadora ADVERTENCIA La podadora puede lanzar objetos extraños a los ojos y causar daños oculares graves Siempre use gafas de seguridad cuando use la poda...

Page 50: ...cción y provoque lesiones personales graves al operador y a otras personas ADVERTENCIA Si choca contra un objeto extraño detenga el motor y retire los paquetes de baterías Inspeccione minuciosamente la podadora y repare si hay algún daño antes de volver a encenderla y usarla La vibración excesiva de la podadora durante su funcionamiento advierte un daño La unidad se debe inspeccionar y reparar de ...

Page 51: ...reno irregular o en una subida alta Para que la trituración sea efectiva no corte césped húmedo ya que tiende a pegarse en el lado inferior de la plataforma y de esta manera los recortes de césped no se trituran correctamente El mejor momento para cortar el césped es al atardecer cuando el césped está seco y el área recién cortada no estará expuesta a la luz solar directa Para obtener el mejor tri...

Page 52: ...ADVERTENCIA Siempre retire el paquete de baterías al transportar la podadora o efectuarle tareas de mantenimiento Al limpiar la podadora NO la sumerja en agua ni en ningún otro líquido Se debe limpiar el lado inferior de la plataforma de la podadora después de cada uso ya que se acumulan recortes de césped hojas suciedad y otros desechos Esta acumulación no es aceptable ya que facilitará el óxido ...

Page 53: ... de metal con un diámetro de 7 93 mm 5 16 Destornillador manual o varilla de metal con un diámetro de 6 35 mm 1 4 o menor a Detenga el motor y retire el paquete de baterías de la podadora b Ponga la podadora de lado c Mientras usa guantes protectores coloque una varilla de metal p ej un destornillador de 8 89 mm de largo con un diámetro algo inferior a 7 93 mm 5 16 en el orificio de fijación para ...

Page 54: ...n su lugar d Monte el perno en el eje y gírelo con la mano en dirección de las manecillas del reloj para volver a apretarlo e Mientras todavía usa guantes protectores sostenga la cuchilla con una mano y gire el ventilador con la otra para alinear los orificios en la cuchilla con los orificios pasantes en el reborde interior Fig 15a f Coloque una varilla metálica p ej un destornillador de 8 89 cm d...

Page 55: ...chilla desafilada pero se debe reemplazar la cuchilla que esté muy desgastada doblada agrietada o dañada Una cuchilla desgastada o dañada puede romperse y provocar que se lancen las cuchillas desde la podadora Si la cuchilla está doblada reemplácela Frecuencia de afilado Afilar la cuchilla dos veces durante una temporada de corte suele ser suficiente en circunstancias normales La arena hace que la...

Page 56: ...llador de punta plana para retirar la cubierta contra polvo de la rueda c Use una llave inglesa ajustable o de 13 mm para girar el perno en dirección contraria a las manecillas del reloj para aflojarlo d Para las ruedas delanteras retire el perno la rueda desgastada la arandela ondulada y la arandela plana del eje de la rueda Fig 17a e Para las ruedas posteriores retire el perno la rueda desgastad...

Page 57: ...solo con piezas de repuesto idénticas incluidas en este manual Le recomendamos que lleve a cabo esta tarea un proveedor de servicio de posventa a Retire el paquete de baterías b Ponga la podadora de costado con la superficie superior contra la pared c Retire la rueda posterior del lado superior como se indica en la sección Reemplazo de las ruedas en este manual d Repita de los pasos a a c anterior...

Page 58: ...o para el almacenaje a Retire la bolsa para césped b Mueva la palanca de ajuste de la altura de corte P hacia delante y acóplela en la configuración más baja configuración 1 c Abra las abrazaderas de bloqueo de la manija D y empotre completamente los rieles laterales M en la posición compacta d Tire de las dos perillas de ajuste de la manija L hacia afuera mientras las gira 90 en dirección contrar...

Page 59: ...ensambló incorrectamente 2 Vuelva a ensamblar la cuchilla como se explica en la sección Instalación de la cuchilla en este manual La podadora no tritura adecuadamente 1 Los recortes de césped húmedo se pegan en el lado inferior de la plataforma 1 Espere a que el césped se seque antes de podar 2 La podadora está configurada para cortar una gran cantidad de césped de una sola vez 2 Levante la plataf...

Page 60: ... no autorizadas o piezas y accesorios prescindibles que se espera que resulten inutilizables después de un período de uso razonable La vigencia de esta garantía se limita a 90 días para el uso comercial y de alquiler Si considera que el producto cumple con los términos de garantía mencionados arriba devuélvalo al lugar donde lo compró con un comprobante de compra válido y el producto defectuoso se...

Reviews: