background image

25

INSTRUCCIONES DE FUNCIONAMIENTO

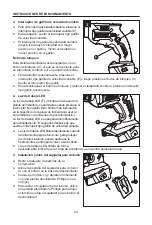
6.  Instalación o retiro de la punta
Para instalar el portabrocas y las puntas:

a.  Retire el paquete de baterías de la 

herramienta.

b.  Jale del manguito de tope (A) para retirarlo de 

afilada.

c.  Con una mano, empuje el manguito de puntas 

(B) hacia atrás y sosténgalo en su posición.

d.  Con la otra mano, inserte el portabrocas 

magnético (G) en el orificio hexagonal del 

retenedor de brocas.

e.  Con la otra mano, inserte el portabrocas 

magnético (G) en el orificio hexagonal del 

retenedor de brocas.

f.  Presione la broca (H) firmemente en el 

portabrocas magnético.

g.  Vuelva a colocar el manguito de tope en la herramienta. Presiónelo hasta que encaje en 

su lugar.

h.  Apriete a mano el mango girándolo en dirección de las manecillas del reloj.

NOTA:

 Cuando utilice un accesorio en intercalación, no vuelva a colocar el manguito.

Para retirar las puntas y el portabrocas:

a.  Retire el paquete de baterías de la herramienta.

b.  Jale del manguito de tope (A) para retirarlo de la herramienta.

c.  Jale la punta (H) en el portabrocas (G) para extraerla.

d.  Empuje el manguito de puntas (B) hacia la parte posterior de la herramienta y manténgalo 

en su posición.

e.  Retire el portabrocas del orificio hexagonal en el retenedor de brocas.

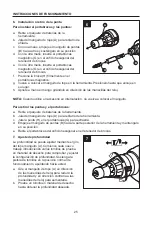
7.  Ajuste de profundidad

La profundidad se puede ajustar mediante el giro 

del tope manguito (A). Comience cada nuevo 

trabajo introduciendo varios tornillos de prueba 

en material de desecho para comprobar y ajustar 

la configuración de profundidad. Sostenga la 

pistola de tornillos en la posición normal de 

funcionamiento, apuntando hacia usted.
a.  Gire el manguito de tope (A) en dirección 

de las manecillas del reloj para reducir la 

profundidad y en dirección contraria a las 

manecillas del reloj para aumentarla.

b.  Pruebe un tornillo en material de desecho 

hasta obtener la profundidad deseada.

6

A

H

G

B

7

A

Summary of Contents for 1260305

Page 1: ...rning to your retailer call our customer service department at 1 888 3KOBALT 1 888 356 2258 8 a m 8 p m EST Monday Friday ATTACH YOUR RECEIPT HERE Serial Number Purchase Date Español p 15 ITEM 1260305 1260306 BRUSHLESS DRYWALL SCREWGUN MODEL KDS 124B 03 ...

Page 2: ...Warranty 13 PRODUCT SPECIFICATIONS COMPONENT SPECIFICATIONS Rated voltage 24V d c No load speed 0 4500 min Collet size 1 4 inch Operating Temperature 4 F 113 F 20 C 45 C Charging temperature 41 F 104 F 5 C 40 C Advice Use only the following types of battery packs and chargers BATTERY PACK CHARGER KB 124 03 KB 224 03 KB 424 03 KB 524 03 KB 624 03 KRC 2445 03 KRC 2490 03 ...

Page 3: ...t I Belt clip J Screw WARNING Remove the tool from the package and examine it carefully Do not discard the carton or any packaging material until all parts have been examined If any part of the tool is missing or damaged do not attach the battery pack or use the tool until the part has been repaired or replaced Failure to heed this warning could result in serious injury F E D G H J I A B C ...

Page 4: ... or other reproductive harm Some examples of these chemicals are Lead from lead based paints Crystalline silica from bricks cement and other masonry products Arsenic and chromium from chemically treated lumber Your risk from these exposures varies depending upon how often you do this type of work To reduce your exposure to these chemicals Work in a well ventilated area Work with approved safety eq...

Page 5: ...nings refers to your mains operated corded power tool or battery operated cordless power tool Work area safety Keep work area clean and well lit Cluttered or dark areas invite accidents Do not operate power tools in explosive atmospheres such as in the presence of flammable liquids gases or dust Power tools create sparks which may ignite the dust or fumes Keep children and bystanders away while op...

Page 6: ...at all times This enables better control of the power tool in unexpected situations Dress properly Do not wear loose clothing or jewelry Keep your hair and clothing away from moving parts Loose clothes jewelry or long hair can be caught in moving parts If devices are provided for the connection of dust extraction and collection facilities ensure these are connected and properly used Use of dust co...

Page 7: ... medical help Liquid ejected from the battery may cause irritation or burns Do not use a battery pack or tool that is damaged or modified Damaged or modified batteries may exhibit unpredictable behaviour resulting in fire explosion or risk of injury Do not expose a battery pack or tool to fire or excessive temperature Exposure to fire or temperature above 265 F may cause explosion Follow all charg...

Page 8: ...ovide a secure stance The power tool is guided more securely with both hands PREPARATION Know Your Drywall Screwgun This drywall screwgun can be used to attach drywall chipboard or fiberboard onto wood or sheet metal with drywall screws Before attempting to use the drywall screwgun familiarize yourself with all of its operating features and safety requirements WARNING Do not allow familiarity with...

Page 9: ...pack c Pull forward on the battery pack to remove it from the tool WARNING Battery tools are always in operating condition Therefore the direction of rotation selector D should always in the center lock position when the tool is not in use or when carrying the screwgun at your side 2 Direction of Rotation Selector The direction of bit rotation is reversible and is controlled by a selector D locate...

Page 10: ...d on the foot of the screwgun will illuminate when the trigger switch is depressed This provides additional light on the surface of the workpiece for operation in lower light conditions The LED worklight will automatically turn off approximately 10 seconds after the trigger has been released a The LED worklight will blink rapidly if the tool has stopped working in order to protect internal circuit...

Page 11: ...se NOTE When using a collated attachment do not reattach the sleeve To remove bits and bit holder a Remove the battery pack from tool b Pull the stop sleeve A to remove it from the tool c Pull the bit H from the bit holder G to remove it d Push the bit sleeve B back of the tool and hold it in place e Remove the bit holder from the hexagonal hole in the bit retainer 7 Depth Adjustment The depth can...

Page 12: ...is released h When you have finished driving screws turn off the screwgun CARE AND MAINTENANCE All maintenance should only be carried out by a qualified service technician Cleaning Before cleaning or performing any maintenance remove the battery pack from the tool For safe and proper operation always keep the tool and its ventilation slots clean Always use only a soft dry cloth to clean your screw...

Page 13: ...on or expendable parts and accessories expected to become unusable after a reasonable period of use This warranty is limited to 90 days for commercial and rental use If you think your product meets the above guarantee criteria please return it to the place of purchase with valid proof of purchase and the defective product will be repaired or replaced at no charge This guarantee gives you specific ...

Page 14: ...Printed in China ...

Page 15: ... MODELO KDS 124B 03 Preguntas problemas piezas faltantes Antes de volver a la tienda llame a nuestro departamento de servicio al cliente al 1 888 3KOBALT 1 888 356 2258 de lunes a viernes de 8 a m a 8 p m hora estándar del Este ADJUNTE SU RECIBO AQUÍ Número de serie Fecha de compra ...

Page 16: ...CIFICACIONES DEL PRODUCTO COMPONENTE ESPECIFICACIONES Rango de voltaje 24 V CC Velocidad sin carga 0 a 4500 min Tamaño de mandril pulg Temperatura de funcionamiento 20 C a 45 C 4 F a 113 F Temperatura de carga 5 C a 40 C 41 F a 104 F Consejo Utilice solo los siguientes tipos de paquetes de baterías y cargadores PAQUETE DE BATERÍAS CARGADOR KB 124 03 KB 224 03 KB 424 03 KB 524 03 KB 624 03 KRC 2445...

Page 17: ...ara brocas H Punta de 1 I Sujetador para cinturón J Tornillo ADVERTENCIA Retire la herramienta del paquete y examínela con cuidado No deseche la caja ni ningún material de embalaje hasta después de examinar todas las piezas Si falta alguna pieza o si alguna pieza está dañada no fije el paquete de baterías ni use la herramienta hasta reparar o reemplazar la pieza El incumplimiento de esta advertenc...

Page 18: ...énitos u otros daños reproductivos Algunos ejemplos de estos productos químicos son Plomo de pinturas a base de plomo Sílice cristalina de ladrillos cemento y otros productos de mampostería Arsénico y cromo de la madera tratada con químicos El riesgo que corre debido a la exposición a estos químicos varía según la frecuencia con que realiza este tipo de trabajo Para reducir la exposición a estos p...

Page 19: ...con cable o a la herramienta eléctrica que funciona con batería inalámbrica Seguridad en el área de trabajo Mantenga el área de trabajo limpia y bien iluminada Las áreas oscuras o desordenadas propician los accidentes No utilice herramientas eléctricas en atmósferas en las que exista riesgo de explosión como por ejemplo en presencia de líquidos inflamables gases o polvo Las herramientas eléctricas...

Page 20: ...or encendido aumenta las posibilidades de sufrir accidentes Retire todas las llaves de ajuste o llaves inglesas antes de encender la herramienta eléctrica Si se deja una llave inglesa o una llave conectada a una pieza giratoria de la herramienta eléctrica se podrían producir lesiones personales No se incline ni extienda demasiado Mantenga una postura y un equilibrio adecuados en todo momento Esto ...

Page 21: ... baterías puede crear un riesgo de incendio cuando se usa con otro paquete de baterías Use herramientas eléctricas solo con paquetes de baterías designados específicamente Utilizar cualquier otro paquete de baterías puede crear un riesgo de lesión e incendio Cuando el paquete de baterías no está en uso aléjelo de objetos metálicos como sujetapapeles monedas llaves clavos tornillos u otros objetos ...

Page 22: ...enta se puede atascar y provocar la pérdida de control sobre la herramienta eléctrica Antes de realizar cualquier tipo de trabajo en la herramienta por ejemplo mantenimiento cargar la herramienta etc al igual que al transportarla o almacenarla siempre gire el interruptor de dirección de rotación a la posición central de bloqueo La activación accidental del interruptor de encendido apagado podría o...

Page 23: ...uete de baterías hacia delante para retirar la batería de la herramienta ADVERTENCIA Las herramientas con batería siempre están en condiciones de operación Por lo tanto el selector de dirección de rotación D siempre debe estar en la posición de bloqueo central cuando la herramienta no se encuentre en uso o al transportar la pistola atornilladora a su lado 2 Selector de dirección de rotación La dir...

Page 24: ...ola atornilladora se iluminará cuando presione el interruptor tipo gatillo Esto brinda más iluminación en la superficie de la pieza de trabajo para usar la herramienta en condiciones de poca iluminación La luz de trabajo LED se apagará automáticamente aproximadamente 10 segundos después de que suelte el interruptor tipo gatillo de velocidad variable a La luz de trabajo LED titilará rápidamente cua...

Page 25: ...a a colocar el manguito Para retirar las puntas y el portabrocas a Retire el paquete de baterías de la herramienta b Jale del manguito de tope A para retirarlo de la herramienta c Jale la punta H en el portabrocas G para extraerla d Empuje el manguito de puntas B hacia la parte posterior de la herramienta y manténgalo en su posición e Retire el portabrocas del orificio hexagonal en el retenedor de...

Page 26: ... magnetizado y soporta la mayoría de los tornillos para paneles de yeso comerciales g Aplique una presión de acción rápida a la broca La presión aplicada activará el embrague e impulsará el tornillo NOTA La broca dejará de girar automáticamente una vez que se libere la presión de la broca h Cuando haya terminado de introducir los tornillos apague la pistola atornilladora CUIDADO Y MANTENIMIENTO To...

Page 27: ...re el servicio posventa GARANTÍA La herramienta eléctrica está garantizada contra defectos de fabricación en los materiales y la mano de obra por 5 años a contar de la fecha de compra para el comprador original Esta garantía no cubre daños por abuso desgaste normal mantenimiento inadecuado negligencia reparación alteración no autorizada ni piezas fungibles o accesorios cuya inutilidad es esperable...

Page 28: ...Impreso en China ...

Reviews: