background image

4

Contrast:

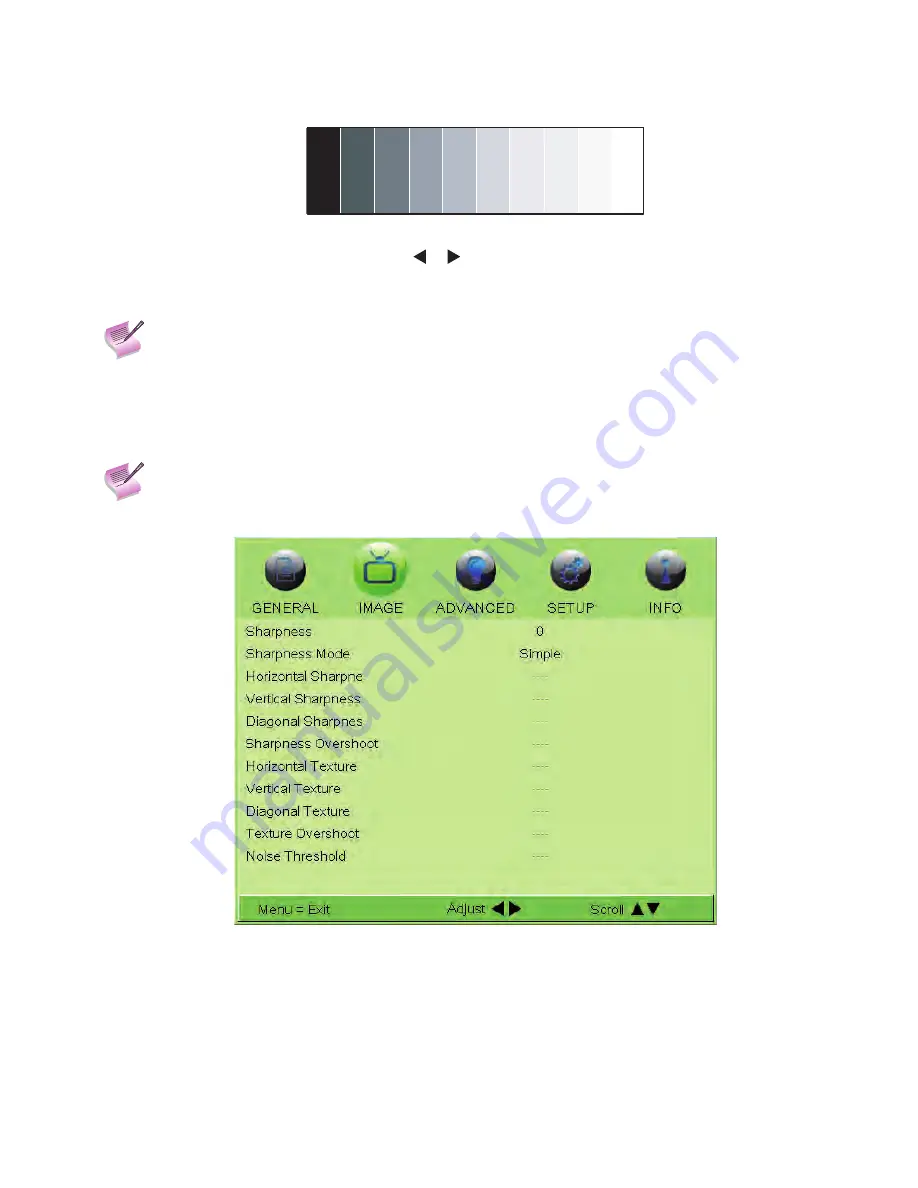
 On your external test pattern source, select a stepped, gray-bar pattern like the one shown in Figure 4-10.

Figure 4-10: Typical Gray Bar Pattern for Adjusting Contrast

Select Contrast from the IMAGE menu. Use the   or   buttons to adjust the contrast up until the top two bars be-

come almost the same brightness, then down just until the brightness change between these bars is consistent with 

the other bars.

Note

Brightness and Contrast controls are interactive. A change to one may require a subtle change to 

the other in order to achieve the optimum setting. 

Color Saturation

: To adjust the overall color intensity, select Color Saturation from the IMAGE menu. Decrease this 

setting if colors are overly saturated; increase it if colors appear muted or washed out.

Color Tint: 

Tint or “hue” is the ratio of red to green in the color portion of the image. To adjust the tint, select Color 

Tint from the IMAGE menu. Decrease this setting to shift the hue toward red; increase it to shift the hue toward green.

Note

Like the Brightness and Contrast controls, the color and tint controls are interactive. A change to 
one may require a subtle change to the other in order to achieve the optimum setting.

Sharpness:

 Sharpness is the amount of high-frequency detail in the image. 

Figure 4-11: Sharpness Sub-Menu

operaTion

Summary of Contents for LED1081

Page 1: ...LED1081 High Definition Projector PROJECTOR User s Manual ...

Page 2: ... 1 3 Description Features and Benefits 9 Key Features and Benefits 9 Additional Features of the LED1081 10 Parts List 10 Controls and Functions 11 2 1 LED1081 at a Glance 11 2 2 LED1081 I O Panel 13 2 3 LED1081 Key Pad 14 2 4 LED1081 Remote Control 15 Installation 16 3 1 Remote Control 16 Notes on Batteries 16 Notes on Remote Control Operation 17 3 2 Installation Considerations 18 Installation Typ...

Page 3: ...r Projection 31 Ceiling Mode 31 3 8 Lens Adjustments 32 Focus 32 Zoom 32 Lens Shift 33 Operation 34 4 1 Selecting an Aspect Ratio 34 4 2 Selecting An Input Source 34 4 3 Using the On Screen Menus 34 GENERAL 36 IMAGE 40 ADVANCED 48 SETUP 52 INFO 54 Maintenance and Troubleshooting 55 5 1 Cleaning the Intake and Exhaust Vents 55 Cleaning the Air Vents 55 5 2 Troubleshooting Tips 56 Serial Interface S...

Page 4: ...ny implied warranties of merchantability or fitness for any particular purpose The manufacturer reserves the right to revise this publication and to make changes from time to time in the content here without obligation of the manufacturer to notify any person of such revision or changes About this manual This manual is intended for end users and describes how to install and operate the DLP project...

Page 5: ...lked on or pinched particularly at plugs convenience receptacles and the point where they exit from the apparatus Only use the attachments accessories specified by the manufacturer Use only with a cart stand tripod bracket or table specified by the manufacturer or sold with the apparatus When a cart is used use caution when moving the cart apparatus to avoid injury from tip over Unplug this appara...

Page 6: ...different from that to which the receiver is connected Consult the dealer or an experienced radio TV technician for help INDUSTRY CANADA ICES 003 This Class B digital apparatus complies with Canadian ICES 003 Cet appareil numérique de la classe B est conforme à la norme NMB 003 du Canada DISPOSAL OF OLD ELECTRICAL AND ELECTRONIC EQUIPMENT Applicable throughout the European Union and other European...

Page 7: ...tomer feedback it may require updating from time to time You can always find the latest version of this and other Knoll Systems product manuals on line at www knollsystems com Textual and Graphic Conventions Text Conventions The following conventions are used in this manual in order to clarify the information and instruc tions provided Remote and built in keypad button identifiers are set in upper...

Page 8: ...a given action or omitted action can degrade performance or cause a malfunction WARNING WARNINGS appear when a given action or omitted action can result in damage to the equipment or possible non fatal injury to the user DANGER DANGER appears when a given action can cause severe injury or death 1 2 Using This Manual Use the following table to locate the specific information you need in this manual...

Page 9: ...ages Completing this engineering marvel are discrete infrared IR and RS 232 control power and source selection controls for seamless flexible operation Key Features and Benefits The LED1081 offers these key features and benefits Native Resolution 1920 x 1080 16 9 Native Aspect Ratio DLP system using high performance Digital Micromirror Device DMD Two 2 HDMI 1 3 Inputs with High bandwidth Digital C...

Page 10: ...ms If any items are missing or damaged please contact your dealer or Knoll Systems Customer Service LED1081 DLP Projector Remote Control Unit and two 2 AA size batteries AC Power Cords HDMI Cable Allen Wrench for lens shift adjustment Component Cable Lens Cap User manual English Hard Copy CD Warranty Card Inspection Card China Only Quick Guide ...

Page 11: ... Vent Figure 2 1 LED1081 Front Side View EXHAUST VENT Warm air exits the projector through this vent Ensure that it is not blocked INTAKE VENT Internal fans draw cool air into the projector through this vent ZOOM RING Rotate this to change the projected image size FOCUS RING Rotate this to focus the projected image PROJECTION LENS Standard throw range 1 85 to 2 40 1 Short throw range 1 56 to 1 86 ...

Page 12: ...ontrol buttons for projector adjustment I O PANEL Connect input and output devices to these ports ADJUSTABLE FEET Use these when the projector is installed in a table top configuration to level the image and or adjust the projection angle CEILING MOUNT HOLES Use these to attach the ceiling bracket to the projector 1 2 3 4 ...

Page 13: ...er SD HD source Also provides RGB input for RGBS sources VIDEO Standard composite video input for connecting a VCR laser disc player or other composite video source Also pro vides composite sync input for RGBS sources S VIDEO A standard S Video input for connecting a DVD player satellite receiver or Super VHS S VHS VCR IR INPUT Wired input from a Niles or Xantech compatible infrared IR repeater sy...

Page 14: ...ED1081 Key Pad Cursor Keys Use these buttons to select items or settings adjust settings or switch display patterns ENTER Press to select a highlighted menu item or confirm a changed setting MENU Press this button to show or hide the OSD menu SOURCE Press to select a video source HDMI1 HDMI2 RGB COMP1 COMP2 VIDEO or S VIDEO Power Use the button to turn on off the projector 1 2 3 4 ...

Page 15: ...amorphic DVDs on a 16 9 screen 4 3 Scales the input signal to fit 4 3 sources in the center of the screen 4 3 Narrow Scales the input signal to fit 4 3 sources in the center of the screen when using an anamorphic lens Native Displays source image in its native resolu tion without re sizing or overscan TEMP Press this button to adjust the color temperature OS Press this button to switch to the next...

Page 16: ...tteries with the correct polarity Replace the cover 1 2 3 Notes on Batteries Make sure that the battery polarities are correct when installing the batteries Do not mix an old battery with a new one or different types of batteries If you will not use the remote control for a long time remove the batteries to avoid damage from battery leakage 1 2 3 3 Installation ...

Page 17: ... the projector In some cases however ambient conditions may prevent this If so point the remote control at the projector and try again If the effective range of the remote control decreases or it stops working replace the batteries with new ones The remote control may fail to operate if the infrared remote sensor is exposed to bright sunlight or fluorescent lighting 60 60 Figure 3 1 IR Reception A...

Page 18: ...or access is more difficult Rear Screen Floor Mount Installation Projector is completely hidden Projector is easily accessed Usually good ambient light rejection Requires separate room Installation cost is usually higher Rear Screen Inverted Mount ceiling Installation Projector is completely hidden Usually good ambient light rejection Requires separate room Installation cost is usually higher Rear...

Page 19: ...e lens throw ratio see Figure 3 2 The result of this calculation tells you roughly how far back the projector should be positioned from the screen in order to project a focused image large enough to fill the screen Estimated Throw Distance Throw Distance TD Screen Width w x Lens Throw Ratio Screen width W TD Figure 3 2 Estimated Throw Distance A replacement lens for the LED1081 is available one wi...

Page 20: ...enter Lens Center Ceiling Installation Screen Height Floor Lens Center Projection Distance Floor Installation Lens Center x Figure 3 3 Projector Placement Note When installing ensure that you use only UL Listed ceiling mounts For ceiling installations use approved mounting hardware and M4 screws with a maximum screw depth of 8 mm 0 31inch The construction of the ceiling mount must be of suitable s...

Page 21: ...ature constant and below 35 C 95 F Keep the projector away from heating and or air conditioning vents Changes in temperature may cause drifts in the projector circuitry which may affect perform ance Keep the projector away from devices that radiate electromagnetic energy such as motors and transformers Common sources of these include slide projectors speakers power amplifiers and elevators Utilize...

Page 22: ... of the screen height For ceiling mounted projectors the lens can be moved 120 0 6V downward while the lens can be moved 120 0 6V up or down on a desktop mounted projector Vertical Lens Shift V 0 6V 0 6V V 0 6V Note This is a general example of lens shift Lenses vary in their shift capabilities No particular lens or projector is used in this example Figure 3 5 Vertical Lens Shift Example Only ...

Page 23: ...pabilities No particular lens or projector is used in this example Figure 3 6 Horizontal Lens Shift Example Only Note With no vertical or horizontal lens shift the lens center and screen center are aligned with each other Vertical shift limits are percentages of the screen height Horizontal shift limits are percent ages of the screen width Vertical lens shift figures are for ceiling mount configur...

Page 24: ...ojector Install the mount kit according to the instructions provided with it Note When installing ensure that you use only UL Listed ceiling mounts For ceiling installations use approved mounting hardware and M4 screws with a maximum screw depth of 8 mm 0 31inch The construction of the ceiling mount must be of suitable shape and strength The ceiling mount load capacity must exceed the weight of th...

Page 25: ...ource Ensure that the cables are securely connected Tighten the thumbscrews on connectors that have them Connecting Source Components to the LED1081 Connect your video sources to the LED1081 as shown and described in the sections that follow HDMI DVI Connections See Figure 3 7 HDMI 1 HDMI 2 HDMI or DVI Source s BD HD DVD DVD Player HD SetTop Box Game Console etc Figure 3 7 HDMI DVI Source Connecti...

Page 26: ... with composite sync connect the green blue and red outputs to the Y Pb and Pr terminals on the COMPONENT 1 SCART input and the sync output to the VIDEO input See Figure 3 8 IR INPUT 12V TRIGGER VIDEO S VIDEO COMPONENT 1 SCART 1 2 Sync Green Blue Red Personal Computer DVD Player or Other SCART RGBS Source RGB Figure 3 8 RGB Connections ...

Page 27: ... Connect your component video sources to the COMPONENT 1 SCART COMPONENT 2 or RGB inputs as shown in Figure 3 9 COMPONENT 1 SCART Y RGB Pb Pr Y Pb Pr Y Pb Pr DTV Set Top Box or Other Component YPbPr Source Figure 3 9 Component Video Connections ...

Page 28: ...omposite S Video Connections Connect your Composite and S Video sources to the LED1081 as shown in Figure 3 10 DVD Player VCR Satellite Receiver Laser Disc etc VIDEO S VIDEO Figure 3 10 Composite and S Video Connections ...

Page 29: ...l cable wired straight through iKontrol compatible See www ikontrol biz for more information For more information about using this connection refer to Serial Interface Specifications on page 58 1 2 3 4 5 7 8 9 6 to Automation Kommand Center Communication Hub or PC 2 Transmit Data 3 Receive Data 5 Ground none of the other pins are used RS 232 Figure 3 11 RS 232 Control System Connection ...

Page 30: ... 3 12 iKontrol compatible See www ikontrol biz for more information IR INPUT VIDEO S VIDEO COMPONENT 1 SCART 3 5 mm mini phono plug Knoll IR Sensor Knoll IR Repeater Remote Control Figure 3 12 External IR Receiver Connection Connecting to AC Power The LED1081 ships with North American type of AC power cord source one that is appropriate to your AC standard Plug the female end of the power cord int...

Page 31: ...ion 3 7 Adjusting the Picture Orientation If the LED1081 is installed behind the screen you must change the picture orientation to match the installation meth od To do this press MENU on the remote control Then select SETUP from the Main Menu Rear Projection If the projector is used in a rear projection application press repeatedly to select Rear Projection from the SETUP Menu Press or to set it t...

Page 32: ...he picture size position and focus Focus To focus the projected image grasp the lens by the front ring and rotate it Focus Ring Zoom To make the picture smaller zoom out or larger zoom in rotate the zoom ring in the appropriate direction Zoom Ring Zoom In Zoom out Installation ...

Page 33: ...hift the projected image vertically insert the provided hex wrench into the hole at the top of the pro jector directly above the lens Then turn the wrench as shown to shift the lens in the desired direction Horizontal Lens Shift To shift the project ed image horizontally insert the provided hex wrench into the hole at the top of the projector Then turn the wrench as shown to shift the lens in the ...

Page 34: ...on the remote control or system keypad to display the Main Menu There are five menus Press or to select a sub menu Press or to select a sub menu item For each sub menu item the currently selected value is highlighted Press or to choose a setting for that item or press ENTER to go to another sub menu Press MENU to return to the previous menu From the Main Menu press MENU to turn off the OSD menu Th...

Page 35: ...op Zoom HSG HSG Select Hue Saturation Gain Red 0 200 Green 0 200 Blue 0 200 Cyan 0 200 Magenta 0 200 Yellow 0 200 Resync ADVANCED Color Space Auto REC709 REC601 RGB PC RGB VIDEO Video Format Auto NTSC PAL SECAM Gamma CRT Film Cinema Bright Graphics ColorTemperature Warm Standard Cool Cooler DLP Frame Rate Auto 48Hz 50Hz 60Hz Color Gamut Auto REC709 SMPTE C EBU Native DCI BrilliantColr Off On Dynam...

Page 36: ...to the most commonly used projector functions Figure 4 2 LED1081 GENERAL Menu Source Select To select a video source press or to highlight Source Select then press ENTER This dis plays the Source Select submenu shown in Figure 4 3 Figure 4 3 Source Select Sub Menu Operation ...

Page 37: ...his displays the PIP Select sub menu The default source selection is Off All sources that are not available refer to Source Enable on page 49 are grayed out Figure 4 4 PIP Select Sub Menu PIP Position Press or to select the on screen PIP position Choose one of the following DMD Area 1920x1080 Screen Safe Area 1842x1036 921x518 921x518 644x362 PIP top right PBP2 PBP1 Figure 4 5 PIP and PBP areas fo...

Page 38: ...e PIP source which is also in a 921x518 image area These two images are centered on the screen Split This is the mode in which the active source is also used as the PIP source and placed in a PIP area equal to half the display on the left side This results in the right half of the image being the active source and the left half is the PIP source Figure 4 6 PIP Split Mode Memory Select to save user...

Page 39: ...s when the current source is not available default setting is Off bration measurement and fault isolation purposes To access them select Test Patterns from the GENERAL menu and set it to On The available test patterns are White Black Red Green Blue Cyan Magenta Yellow ANSI Checkerboard Horizontal Gray Ramp Focus Grid Press or on the remote control unit or built in keypad to cycle through the test ...

Page 40: ...priate aspect ratio for your screen size installed lens con figuration and the type of program material being viewed then press ENTER refer to Table 4 1 Aspect Ratio Setting Description Aspect Ratio of Source Signal Geometry of Projected Image With Standard Lens 1 78 1 Screen With Anamorphic Lens 2 35 1 Screen 16 9 16 9 linearly scales the source active im age horizontally and vertically to fill a...

Page 41: ...the correct aspect ratio when using an an amorphic lens 16 9 4 3 Native Select Native to display the source signal in its native resolution centered in the display area with no re sizing or overscan This means for example that 720p HDTV programs will display with unused pixels on all sides 320 on the left and right sides and 180 above and below With SDTV and EDTV sources the image horizontally to ...

Page 42: ...ss Brightness Select Brightness from the Image menu Use the or buttons to adjust the level so that The darkest black bars disappear into the background Note For best results Knoll Systems recommends that you set Dynamic Iris to Off before adjusting Brightness Contrast and other image quality settings in IMAGE menu refer to Dynamic Iris on page 50 After you have completed the initial calibration se...

Page 43: ...timum setting Color Saturation To adjust the overall color intensity select Color Saturation from the IMAGE menu Decrease this setting if colors are overly saturated increase it if colors appear muted or washed out Color Tint Tint or hue is the ratio of red to green in the color portion of the image To adjust the tint select Color Tint from the IMAGE menu Decrease this setting to shift the hue tow...

Page 44: ...ple mode only the Sharpness top most slider is adjustable the others are grayed out Horizontal Sharpness Vertical Sharpness Diagonal Sharpness Use these controls to enhance image detail along horizontal vertical and diagonal edges respectively Sharpness Overshoot Use the Sharpness Overshoot control to minimize or eliminate rings or shadows on domi nant edges that cannot be removed using the simple...

Page 45: ... to be motion Block Artifact Reduction Use this control to reduce or eliminate so called block artifacts in MPEG compressed video signals digital broadcasts or DVDs Set it as needed to minimize distortion within horizontal and vertical block boundaries Mosquito Noise Reduction Use this control to reduce or eliminate so called mosquito noise in MPEG com pressed video signals Set it as needed to min...

Page 46: ...46 Note When the Aspect Ratio is set to Native set Overscan to Off or Crop Off Crop Zoom 4 3 16 9 4 3 Narrow Native 720p Source Image Area Edge Noise Screen 16 9 Figure 4 14 Overscan Examples Operation ...

Page 47: ... green blue cyan magenta yellow color settings Figure 4 15 HSG Sub Menu Resync If experiencing a distorted or scrambled input source image activate Resync which affects FineSync set tings see page 52 in the default mode to re obtain the active and PIP sources Operation ...

Page 48: ...e present the LED1081 uses the RGB PC color space Otherwise REC601 is used for SDTV and EDTV sources and REC709 for all other sources Component For SDTV and EDTV resolutions the LED1081 uses the REC601 color space For all other resolu tions REC709 is used In most cases the Auto setting determines the correct color space to use If it does not you can force the LED1081 to use a specific color space ...

Page 49: ...areas of the image to correspond to the function that video cameras use to create images Bright sets the gamma to 2 0 Graphics should only be used for computer presentations that require increased brightness at the cost of gray scale accuracy Color Temperature Select to set the projector s color temperature Range Warm Standard default Cool Cooler DLP Frame Rate Select DLP Frame Rate from the ADVAN...

Page 50: ... pattern If the gray areas contain traces of red green or blue decrease the Offset for that color Gain Use the Gain controls to correct color imbalances in the bright areas of the image A good way to do this is to use a test pattern consisting mostly of solid white areas such as an 80 IRE window pattern If the white areas contain traces of red green or blue decrease the Gain for that color The Gai...

Page 51: ... half off graphic image Adjust the slidebar until the image stabilizes and each pixel is clearly defined You may notice that you can stabilize the image at more than one point Use either setting in such cases Tracking RGB or Component sources Tracking determines the frequency of the pixel sampling clock indicat ed by the number of incoming pixels per line so that all pixels generated by a particul...

Page 52: ...guage Select Language and press the display the menus in English Español Français Deutsch Nederlands Italiano 繁體中文 and 简体中文 Source Enable To enable or disable selection of a source choose Source Enable and press ENTER This displays the Source Enable sub menu shown in Figure 4 20 Figure 4 20 Source Enable Sub Menu operaTion or buttons to change the OSD Language The LED1081 can ...

Page 53: ...witch instead of the remote control unit If you do not need this capability set Auto Power On to Off this is the de fault setting Rear Projection This control reverses all images and menus and is necessary when the projector is used in rear projection applications The default is Off Ceiling Mode This control flips the image so the projector can be used in ceiling mounted installations Trigger 1 Se...

Page 54: ...nit Serial Number Software Version Active PIP Source Pixel Clock Signal Format H V Refresh Rate LED Hours number of LED hours elapsed since the last reset LED Hour Reset Should you ever need to contact Knoll Systems Technical Support this information will help them answer your questions and or resolve product performance issues Figure 4 21 LED1081 INFO Menu Operation ...

Page 55: ... the Air Vents The projector intake exhaust vents should be cleaned every 500 hours of operation In dustier environments it is recommend to clean the projector more frequently to prevent damage or performance degradation Maintenance and Troubleshooting 5 ...

Page 56: ...n screen Incorrect source selection Source component is not turned on Source component is connected incorrectly or not at all Select the correct source Turn on the source Check cable connection from source component to projector A projected image from a DVD is split or otherwise scrambled DVD player is connected to the Component input and set to pro gressive scan mode Turn off progressive scan on ...

Page 57: ...57 6 1 Transfer Specifications Item Specifications Transmission Speed 38400 bps Data Length 8 bit Parity None Stop Bit 1 Flow Control None Serial Interface Specifications 6 ...

Page 58: ...pow on Turn power on 2 0x09 pow off Turn power off 3 0x15 menu Bring up or cancel menu display 4 0x17 enter Key pad enter 5 0x18 cur down Key pad down arrow 6 0x1A cur up Key pad up arrow 7 0x1D cur left Key pad left arrow 8 0x1F cur righ Keypad right arrow 9 0x80 bright Bring up or cancel brightness slide bar 10 0x81 contrast Bring up or cancel contrast slide bar 11 0x82 sharp Bring up or cancel ...

Page 59: ...he active source to COMP 2 20 0x93 osc sw Switch to the next Overscan mode 21 0x98 mem 1 Recall user memory associated with the User 1 key 22 0x99 mem 2 Recall user memory associated with the User 2 key 23 0x9A color temp Switch the color temperature 24 0x9D asp sw Switch to the next aspect ratio 25 0xA3 pip sw Switch to next PIP Select state 26 0xAA pip swap Swap the PIP image with the active sou...

Page 60: ...d Functions Operation Command Values Notes aspect 0 16 9 1 Letterbox 2 4 3 3 4 3 Narrow 4 Native memory 0 User Memory 1 1 User Memory 2 4 Default save mem 0 User Memory 1 1 User Memory 2 bright 0 200 contrast 0 200 saturat 0 200 tint 0 200 sharp simple 0 200 sharp mode 0 Simple 1 Advanced horiz sharp 0 200 vert sharp 0 200 diag sharp 0 200 sharp over 0 200 horiz text 0 200 vert text 0 200 diag tex...

Page 61: ...B 4 YPbPr 1 5 YPbPr 2 6 S Video 7 Video 8 SCART resync execute color space 0 Auto 1 REC709 2 REC601 3 RGB PC 4 RGB Video video stand 0 Auto 1 NTSC 2 PAL 3 SECAM gamma 0 CRT 1 Film 2 Cinema 3 Bright 4 Graphics color temp 0 Warm 1 Standard 2 Cool 3 Cooler dlp frame 0 Auto 2 48 Hz 3 50 Hz 4 60 Hz color gamut 0 Auto 1 REC709 2 SMPTE C 3 EBU 4 Native 5 DCI Serial Interface Specifications ...

Page 62: ...iz pos 0 200 phase 0 200 tracking 0 200 sync level 0 200 pip pos 0 Top left 1 Top right 2 Bottom left 3 Bottom right 4 PBP 5 Split screen menu pos 0 Top left 1 Top right 2 Bottom left 3 Bottom right 4 Center blank screen 0 Black 1 Blue 2 White 3 Logo auto pow off 0 Off 1 On auto pow on 0 Off 1 On rear proj 0 Off 1 On ceil mode 0 Off 1 On 2 Auto logo disp 0 Off 1 On Serial Interface Specifications ...

Page 63: ...string ser number string soft version string act source 0 HDMI 1 1 HDMI 2 2 RGB 3 YPbPr 1 4 YPbPr 2 5 S video 6 Video 7 SCART pip source 0 HDMI 1 1 HDMI 2 2 RGB 3 YPbPr 1 4 YPbPr 2 5 S video 6 Video 7 SCART h refresh number KHz v refresh number Hz pixel clock number MHz signal string led hours number total hours number led reset execute fact reset execute blue only 0 Off 1 On Serial Interface Spec...

Page 64: ...e 5 Cyan 6 Magenta 7 Yellow 8 ANSI Checkerboard 9 Horizontal Gray Ramp 10 Focus Grid 11 Off language 0 English 1 Spanish 2 French 3 German 4 Dutch 5 Italian 6 Traditional Chinese 7 Simplified Chinese OSD language only Table 6 3 Operations Commands Serial Interface Specifications ...

Page 65: ...ut DB15 pin RGB 2 x HDMI Component 1 RCA Component 2 BNC Composite RCA S Video I O Power Input IEC 320 C14receptacle Projector Control Hard wired via RS 232 IR Remote Keypad control method Zoom Focus Offsets Manual lens shift Manual zoom focus Projection Modes Front Rear Ceiling Front Rear Power Input Voltage 100 240V Power Consumption 110V BrilliantColor ON 280W BrilliantColor OFF 240W Standby 1W...

Page 66: ...286m 50 104 F 10 40 C Humidity 0 85 Storage 4 140 F 20 60 C Humidity 5 90 Standard Accessories Power Cord US 110VAC Remote and Batteries For set up use only HDMI Cable For set up use only User Manual CD For set up use only Warranty Card Inspection Card Q Pass Label For set up use only Allen Wrench For lens shift adjustment Note Specifications are subject to change without notice Table 7 1 LED1081 ...

Page 67: ...imensions in millimeters 539 mm 548 mm 520 mm 520 mm 410 00 mm 224 60 mm 224 60 mm 548 mm 220 00 mm CEILING MOUNT HOLES M4 x 4 APPROXIMATE CENTER OF GRAVITY LENS CENTER LINE MAX M4 L8 MAX M4 L8 MAX M4 L8 MAX M4 L8 Figure 7 1 LED1081 Dimensions SPECIFICATIONS ...

Page 68: ...640x480 85 ü ü 800x600 60 32 ü ü 800x600 75 ü ü 800x600 85 06 ü ü 848x480 47 95 ü ü 848x480 59 94 ü ü 1024x768 60 ü ü 1024x768 75 03 ü ü 1024x768 85 03 ü ü 1280x720 47 95 ü ü 1280x1024 60 02 ü ü 1280x1024 75 02 ü ü 1280x1024 85 02 ü ü 1600x1200 60 ü ü 1920x1080 47 95 ü ü 1680x1050 59 94 ü ü Apple Mac 640x480 66 59 ü ü 832x624 74 54 ü ü NTSC NTSC M 4 43 59 94 ü PAL PAL B G H I 50 ü PAL N 50 ü PAL M...

Page 69: ...480p 59 94 ü ü ü 576p 50 ü ü ü HDTV 720p 50 ü ü ü 720p 59 94 ü ü ü 720p 60 ü ü ü 1035i 60 ü ü ü 1080i 50 ü ü ü 1080i Aus 50 ü ü ü 1080i 59 94 ü ü ü 1080i 60 ü ü ü 1080p 23 98 ü ü ü 1080p 24 ü ü ü 1080p 25 ü ü ü 1080p 29 97 ü ü ü 1080p 30 ü ü ü 1080p 50 ü ü ü 1080p 59 94 ü ü ü 1080p 60 ü ü ü Table 7 2 Supported Signal Timings by Input SPECIFICATIONS ...

Page 70: ... 35 30 116 09 150 60 80 69 72 39 22 128 99 167 34 82 71 47 40 20 132 21 171 52 84 73 21 41 18 135 44 175 71 90 78 44 44 12 145 11 188 26 92 80 18 45 10 148 34 192 44 100 87 16 49 02 161 24 209 17 106 92 38 51 97 170 91 221 72 110 95 87 53 93 177 36 230 09 120 104 59 58 83 193 49 251 01 123 107 20 60 30 198 32 257 28 133 115 92 65 20 214 45 278 20 135 117 66 66 18 217 67 282 38 150 130 73 73 54 241...

Page 71: ... 20 121 36 157 44 84 67 20 50 40 124 32 161 28 90 72 00 54 00 133 20 172 80 92 73 60 55 20 136 16 176 64 100 80 00 60 00 148 00 192 00 106 84 80 63 60 156 88 203 52 110 88 00 66 00 162 80 211 20 120 96 00 72 00 177 60 230 40 123 98 40 73 80 182 04 236 16 133 106 40 79 80 196 84 255 36 135 108 00 81 00 199 80 259 20 150 120 00 90 00 222 00 288 00 170 136 00 102 00 251 60 326 40 200 160 00 120 00 29...

Page 72: ...3825 80 1771 996 3276 4250 82 1815 1021 3358 4357 84 1860 1046 3440 4463 90 1992 1121 3686 4782 92 2037 1146 3768 4888 100 2214 1245 4095 5313 106 2347 1320 4341 5632 110 2435 1370 4505 5844 120 2656 1494 4915 6376 123 2723 1532 5037 6535 133 2944 1656 5447 7066 135 2989 1681 5529 7173 150 3321 1868 6143 7969 170 3763 2117 6962 9032 200 4427 2490 8191 10626 250 5534 3113 10239 13282 300 6641 3736 ...

Page 73: ...3511 80 1626 1219 3007 3901 82 1666 1250 3083 3999 84 1707 1280 3158 4097 90 1829 1372 3383 4389 92 1869 1402 3458 4487 100 2032 1524 3759 4877 106 2154 1615 3985 5169 110 2235 1676 4135 5364 120 2438 1829 4511 5852 123 2499 1875 4624 5998 133 2703 2027 5000 6486 135 2743 2057 5075 6584 150 3048 2286 5639 7315 170 3454 2591 6391 8291 200 4064 3048 7518 9754 250 5080 3810 9398 12192 300 6096 4572 1...

Reviews: