KMART 43061068 Quick Start Manual Download Page 9

9 | 

P a g e


4.


Pairing the Wireless Chime


1. Insert the chime into any standard USB outlet or adaptor (not included), the 
chime needs to be in 5 metres range of the doorbell 
 
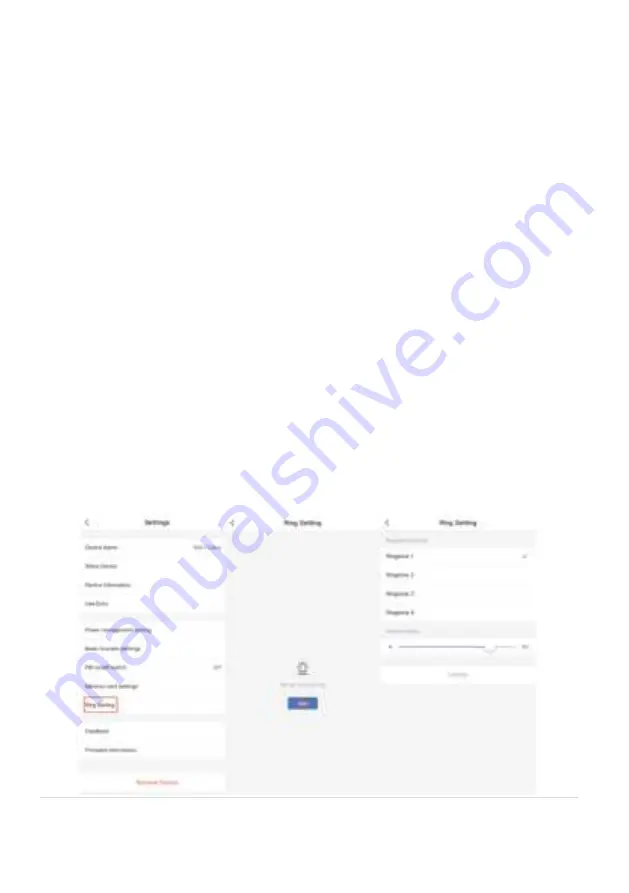
2. Open the Mirabella genio APP, tap on doorbell ->setting-> 

bell setting


>choose Wireless Chime or Chime Type , select

 Wireless Chime


3. Press and hold the reset button on the back of the chime and ensure the 
blue indicator light is 

continuously blinking for more than 10 seconds 

 before 

adding the chime. If it is not continuously blinking you will need to press and 
release the reset button again before proceeding to step 4 
 
4. Return to setting -> 

ring setting

-> tap on add, If 

you don’t have 

ring setting, 

then go to 

Bell Setting

,-> Bind 

 
5. The indicator light on the chime will stop blinking as soon as you hit the 

add 

or Bind

, the chime is paired successfully, and you can test it by press the 

doorbell button.  
 
6. If the chime did not stop blinking, or no ring tone, please unbind the chime, 
then repeat step 2 to step 5.  


Summary of Contents for 43061068

Page 1: ...1 P a g e Quick Start Guide FULL HD Doorbell Camera Model 43061068 Bell 15S v1 0 30 03 2021...

Page 2: ...2 P a g e Welcome Thank you for choosing our smart camera getting started is easy What s included Bell 15S USB charging cable USB chime Wall mount screw sets Product Details...

Page 3: ...see all the detectable networks in your area Locate the SSID the name of your network and ensure that the Wi Fi SSID does not end with a 5G 5GHz Check that you have a strong Wi Fi signal at least two...

Page 4: ...ently into the SD card slot Please pay attention to the direction of the Micro SD card Do not force it inside once inserted refit the rubber cap Micro SD card size needs 8GB Support up to Max of 128Gb...

Page 5: ...5 P a g e 2 Doorbell Camera Installation...

Page 6: ...nk every two seconds if it is blinking fast 2 blinks per second rather than slowly you will need press and hold the reset button until you hear a sound then the LED will now start to blink RED slowly...

Page 7: ...i name and password not your genio password 6 Tap continue and the QR code will appear place this QR code in front of the camera at approximate 15 20cm until your hear a sound the indicator light will...

Page 8: ...code A Please ensure camera is in the pairing mode indicator light is blinking red slowly as per APP screen if you are unsure please reset it Q After scanning the QR code indicator light doesn t turn...

Page 9: ...light is continuously blinking for more than 10 seconds before adding the chime If it is not continuously blinking you will need to press and release the reset button again before proceeding to step 4...

Page 10: ...roll Tap to speak to the camera Record live footage into your phone s internal storage Access to the footage recorded on the Micro SD card To turn sound on off To change video quality high definition...

Page 11: ...lk Mode is set as Two Way Talk PIR motion detection On off and detection sensitivity level setting have it off will save your battery life Memory Card Settings this option will only appear when 8GB 12...

Page 12: ...e it and reset the camera and pair it again through the APP Still receive the Cannot find Device error Manually disable the 5Ghz Wi Fi signal on the router setting Ensure that the 2 4Ghz Wi Fi signal...

Page 13: ...your router If you are using Telstra NBN or a dual band router you must disable the 5GHz Wi Fi in order to make a successful connection and for best overall performance as MOST smart products in Aust...

Page 14: ...ies drop them from high places or otherwise subject them to strong impacts 6 Do not put a lithium ion battery in a microwave oven pressure container or other such devices 7 Do not place combustible ma...

Reviews: