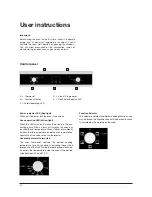
background image

9

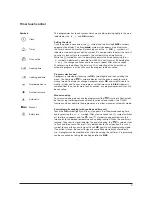
Symbols

Timer touch control

Clock

Timer

Oven active

Cooking time

Cooking end time

Number decrease

Number increase

Automatic

Manual

Safety lock

This programmer has touch sensors which are used by pressing lightly in the area 
indicated by the 

,

 and 

OK

 symbols

Setting the clock
Once the power is connected, the 

 symbol and the flashing 

12:00

 numbers 

appear on the display. The fixed 

h:min 

symbol also appears, which indicates 

the time in hours and minutes. By touching any of the 


OK 

 symbols, all 

indicators stop flashing, except the symbol. It is now possible to adjust the time. If 
no action is taken after a few seconds, this symbol will also stop flashing.
While the 

symbol flashes, it is possible to adjust the time by pressing the 

 symbols. Adjustment is possible from 0&24h in h:min format. By holding the 
or

, the change continues and increases in speed. After a few seconds 

of not pressing the buttons the time is set. Any adjusting of the time while an 
automatic program is active will cause the program to be cancelled.

Program select/cancel
A program is selected by touching the 

OK 

symbol lightly and then scrolling the 

menu. The illuminated 

 symbol indicates that the oven is ready for use in 

manual mode. To display or change a program, press 

OK

 and scroll this data to 

modify it, if desired. To cancel a program, set the time value to 

0:00

. If power is 

removed from the oven for more than 5 seconds, any programs previously set will 
be cancelled.

Manual cooking
For manual cooking, do not use the programmer (the 

 symbol is illuminated) 

but only using the temperature and oven function selector knobs. The TIMER 
function can be used while the programmer is in either manual or automatic mode.

Semi-automatic cooking (with cooking end time set) 
Touch the 

OK

 symbol lightly until the 

 appears. Set the desired cooking time 

end by pressing the 

 symbols. After a few seconds the 

 symbol switches 

off, the time re-appears and the 

 and 

 symbols re-appear. Now turn the 

two knobs to the desired temperature and cooking function. When the end time is 
reached, the acoustic signal indicates the end of cooking, the 

 symbols starts 

to flash and the oven switches off. Turn both knobs to the off position. Press any 
symbol to cancel the acoustic signal. Touch 

OK

 again to exit programming mode. 

If no action is taken, the acoustic signal is cancelled automatically after about 6 
min. A program can be modified at any time be varying the set times. Programming 
can be cancelled by setting the cooking duration to 

0:00

Summary of Contents for OMF6020

Page 1: ...cooking collection Instructions for use and warranty details Built In Oven Model No OMF6020...

Page 2: ...results carefully read the instructions on how your new appliance is to be installed Correct installation will avoid delays and unnecessary service call costs Once installation is complete please read...

Page 3: ...of the oven The plate must never be removed Installation must only be carried out by qualified staff in compliance with the local regulations in force and following the indications in this manual Imp...

Page 4: ...tend to disappear with the cooking Prior to oven commissioning Switch off the power supply to the appliance Remove all internal packaging and accessories from the oven Clean the internal surfaces with...

Page 5: ...ions 13 IMPORTANT The oven s data plate is accessible even with the oven fully installed The plate is visible simply by opening the door Always quote the details from it to identify the appliance when...

Page 6: ...hen it blinks intermittently it means that the temperature inside the oven is maintained constantly at the value set on the thermostat Oven temperature thermostat The oven thermostat controls the desi...

Page 7: ...ing method this function is recommended for perfecting the cooking of dishes that are already cooked on the surface but require further cooking in the centre The intense heat from below is excellent f...

Page 8: ...cooking it enough inside Only salt the meat after cooking or it will be less juicy Never prick food during cooking not even to turn them Their juice would run making the grilled food dry Meat can be...

Page 9: ...symbol indicates that the oven is ready for use in manual mode To display or change a program press OK and scroll this data to modify it if desired To cancel a program set the time value to 0 00 If po...

Page 10: ...imer to 0 00 to cancel this function This function can be used during manual cooking Acoustic signal beeper The acoustic signal continues at the end of a program for about 6 minutes To interrupt it to...

Page 11: ...Set both cooking function and temperature selections to CLEAN The CLEAN function will commence immediately 4 When the acoustic signal sounds set both cooking function and temperature selections to 0...

Page 12: ...rt them between the enamelled door and the glass in the areas right near the clips A that lock the glass into place in the upper part of the door Press until you hear a click which means that the clip...

Page 13: ...em easier if the internal parts of the oven are cleaned while they are still warm Due to an increasing presence of new products on the market it is not possible to establish a list of items suitable f...

Page 14: ...e it on the side sliding guides until they are fully removed then lift it by holding it firmly Make sure that the holes of the drip pan front are placed inside the end stops of the sliding guide fig 3...

Page 15: ...n the cabinet for fitting the oven are indicated in figures Ensure that the cabinet where the oven is to be installed is able to support the weight of 30 kg For the opening in the cabinet follow the d...

Page 16: ...he electric cable ensure the use of an electric cable certified according to the Standards in force and suitable to the technical features of the product Use only flexible cables cable type H05RR FH 3...

Page 17: ...power W 2000 Top element W 800 Grill element W 1800 Base element W 1200 Circular element W Oven light W 25 Oven fan W 30 Tangential fan W 20 Spit W EXTERNAL DIMENSIONS Width cm 59 5 Height cm 59 5 De...

Page 18: ...18...

Page 19: ...he cost of transporting the appliance to and from the Agent or the Agent s travel cost to and from the purchaser s home What these warranties do not cover Compass Capital Services trading as Kleenmaid...

Page 20: ...y Road Alexandria NSW 2015 E help kmaid com au www kleenmaid appliances com au Other products available in the Kleenmaid range of appliances Washing machines Clothes dryers Dishwashers Ovens Cooktops...

Reviews: