background image

• 7 •

For best washing results, be careful before
loading dishes to remove food residue. Any
burned or stuck leftovers should be removed.
Your dishwasher has two baskets for 14 place
settings (162 pieces) according to AS 2007
(Fig. 10 and 12). Always turn the inside of the
dishes towards the bottom. Be sure that no dish
hides others and the spray jet is not obstructed.
Check that the spray arm is free to rotate. No
dish should be higher than the basket.

Lower basket (Fig. 7-9-10)
Place the dishes so that water may circulate
freely and spray all the utensils. (Avoid
attaching and piling dishes up).
This basket is especially intended to hold:
plates, cutlery, dishes, frying pans, saucepans.
Dishes and frying pans can be placed on the
right-hand side or even in the front.
Avoid mixing plates and soup dishes. You should
preferably place same-sized plates together.
Place soup dishes at the back, in the high pin
area.
Make sure nothing obstructs the rotation of the
lifting arm (saucepan handles, cutlery or large
dishes).
Collapsible racks on the front and back of the
basket facilitate storing large recipients.

The cutlery baskets are sliding and can be
placed in any area of the lower basket meaning
that you can change the layout according to the
type of dishes you are washing.
Removable grids are adaptable to cutlery
baskets allowing you to arrange cutlery,
especially small spoons, as you wish.
For optimum washing, you can use the
separation grids.

Cutlery (Fig. 8)
• Place handles downwards.
• It is preferable to place small spoons in the

separating grids.

• Avoid washing wooden, bone or hollow

handled cutlery in the machine.

• Separate silverware from other metals using

the separating grid.

Important note : For reasons of safety, we
recommend you place sharp-ended table knives
blade down in the cutlery basket.
Long-bladed cutlery and other sharp utensils
should be placed flat in the upper basket.

Upper basket (Fig. 11-12)

This basket is particularly intended to hold
glasses, cups, ramekins, small salad bowls, bowls,
saucers etc… 
Place glasses so that they do not touch and tip
them sufficiently so that they do not retain any
water.

Place the hollow end of glasses, cups

and bowls facing downwards.

Arrange the

dishes methodologically to gain space (rows of
glass, cups, and bowls).
You can also stack cups, ladles, etc. on the racks.
The foldaway spikes provide you with the
possibility of a multi-purpose space to
accommodate a varied load.

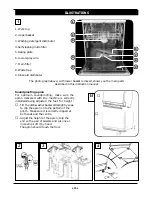
The upper basket should be adjusted to the HIGH
position when loading large plates in the lower
basket. 

Setting the HIGH POSITION

Slowly lift the basket until you hear a

click

on each side.

Setting the LOW POSITION

Lift the basket completely on both sides

(click)

and then follow it downwards.

Make sure that the two runners are adjusted
to the same level.

LOADING THE DISHWASHER

Summary of Contents for DW17W

Page 1: ...Instructions for Use and Warranty Details Dishwashers DW17W White DW17X Stainless Steel DISHWASHER c o l l e c t i o n ...

Page 2: ...new appliance Correct installation will avoid delays and unnecessary service calls Once installation is complete read this booklet and get to know the controls and the features of your new appliance If you need further information call our After Sales Service I 300 652 I00 We reserve the right to alter the specifications with no influence on the operation of the appliance This instruction manual c...

Page 3: ...0 Glassware Pots and Silverware 11 Cutlery China and Woodware 11 Technical characteristics 12 Installation 12 Instructions for cleaning and maintenance 13 Troubleshooting 14 Illustrations 1 4 15 Illustrations 5 14 16 17 Warranty and Service BEFORE READING THESE EXPLANATIONS CONSULT THE ILLUSTRATIONS ON THE PAGES 15 17 OF THIS INSTRUCTION MANUAL CONTENTS ...

Page 4: ...lean or maintain your machine is highly unsuitable You should store dishwasher products as well as other cleaning products out of the reach of children These products have a corrosive effect on the mouth and pharynx if they are swallowed If the machine malfunctions due to other causes than those mentioned in this booklet disconnect the machine remove the plug or break the circuit concerned and con...

Page 5: ...building in sizes for the machine are given in the technical characteristics chapter on page 12 Fix the anti condensation protection to the underside of your work surface To maintain stability and proper alignment you should attach your machine to the work surface using a bracket Installation Consult page 12 of this manual for this operation and use the assembly template and accessories supplied w...

Page 6: ...cessible Do not use an extension lead or multiple plug We cannot be held responsible for any incident caused by the machine being badly earthed In any case the machine must be fitted in compliance with the applicable regulations in your state as well as any extra instructions from the Electricity Company The machine s approval and model are indicated on the sticker fixed to the left hand side of t...

Page 7: ...le to cutlery baskets allowing you to arrange cutlery especially small spoons as you wish For optimum washing you can use the separation grids Cutlery Fig 8 Place handles downwards It is preferable to place small spoons in the separating grids Avoid washing wooden bone or hollow handled cutlery in the machine Separate silverware from other metals using the separating grid Important note For reason...

Page 8: ...ll with powder or liquid Minimum and maximum levels are marked on the inside of the distributor and represent approximately 10 25 grams or 2 5 teaspoons Amount required to be used for each load may vary according to the conditions such as dirtiness of the dishes water hardness and detergent type However in most cases 10 grams 2 teaspoons of Kleenmaid St George Dishwashing Powder will be sufficient...

Page 9: ...amount of slightly resistant stains glasses china that does not support high temperatures 5 Prewash This very short cycle used without detergent rinses dishes waiting to be washed the next day or the day after 6 Economy wash 50 C Recommended for slightly dirty non greasy dishes with a small amount of dry or resistant stains every day dishes coffee or dessert services Auto Cycle This standard progr...

Page 10: ...e to delay 9 hours The light associated with the button will go on Pressing the button a third time will cancel the Time Delay The 9 hour light will go out The programme will only commence when you have pressed the Start button Running the cycle Press the Start button The Washing light goes on The progress of the cycle The Washing Rinsing and Drying lights go on in turn according to the programmes...

Page 11: ...ome into contact with each other as this can stain the silver 쐽 Remove sterling and silver plated cutlery from the dishwasher and hand dry it immediately after the programme has finished 쐽 Wooden bone and plastic handles can be sensitive to higher water temperatures The appearance of these items may change over time if washed in the dishwasher Decorated China and Tableware 쐽 Most current china pat...

Page 12: ...arranty may be void Voltage 240 V 50 Hz Fuses 10 A Power 2300 W Capacity 14 place settings Water pressure 3 psi 21 kPa min 100 psi 690 kPa max Water evacuation pipe height 60 cm 1 m TECHNICAL CHARACTERISTICS COMPARATIVE TESTS ACCORDING TO AS NZS 2007 98 Fig 8 10 12 With the Condenser Drying touch activated Programme 4 Fragile wash 40 C Rinse aid dispenser setting on 3 Quantity of washing product 1...

Page 13: ...ters around the door and the door joint with a damp sponge to remove any deposit Use only soap and water for the body and control panel Do not clean with abrasive powders scouring pads spirit based products or solvents Preferably use a cloth or a sponge If you have a stainless steel door you may use products adapted for stainless steel See the manufacturer s instructions for advice on their use We...

Page 14: ......

Page 15: ...lt the dish washer backwards slightly so as to clip the apron onto the bottom of the plinth Make sure it is correctly clipped at both ends and the centre Adjust the height of the apron snip the end with a pair of scissors and cut one or more strips off it by hand The apron should touch the floor 15 4 1 Work top 2 Upper basket 3 Washing detergent distributor 4 Self cleaning microfilter 5 Rating pla...

Page 16: ... 16 11 5 6 9 7 14 ...

Page 17: ...S NZS 2007 98 Fig 8 10 12 With the Condenser Drying touch activated Programme 4 Fragile wash 40 C Rinse aid dispenser setting on 3 Quantity of washing product 10 40 g For the determination of Drying Index the door of the dishwasher was opened approximately 240mm at the end of the program for 30 minutes knives knives Teaspoons Soup spoons 8 Spoons Forks ...

Page 18: ...manship becoming apparent will be rectified free of charge for parts and labour provided that all service is performed during normal working hours by Kleenmaid or their designated Agents Where the appliance is installed outside the normal servicing area of the above the Purchaser must pay for the cost of transporting the appliance to and from the Agent or the Agent s travelling cost to and from th...

Page 19: ...shers Dryers Dishwashers Ovens Cooktops Rangehoods Sinks Waste Disposals Taps Cookware Refrigerators Freezers Vacuum Cleaners For sales informations on the full range of quality kitchen and laundry appliances phone 13 13 08 Kleenmaid Head Office PO Box 5560 MAROOCHYDORE BC QLD 4558 ...

Reviews: