Klarstein 10030846 Manual Download Page 20

20

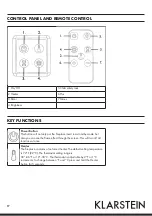
6.  Press the TIMER button a sixth time until the back digits start flashing. Use the [+] and [-] buttons to set the minutes (e.g. 

47).

7.  Press the TIMER button again to save the time you set and turn the power on. The digital display shows the ambient 

temperature. You can now set the weekly timer. 

Set the day timer

Press TIMER button on remote control, you can set day timer. Press [+] and [-] button to set the day time. Press [+] to set the 
time to 30 (min) - 1H - 2H - 3H ... up to 8H - 00. Press [-] to set the time to 8H - 7H - 6H ... down to 30 minutes.

Note: While making any settings relevant to timer setting, the screen will also display the timing icon. When the timer 
setting has only 99 seconds left, the digital tube will show the seconds left.

Set the week timer

Press this TIMER button 3-5 seconds to set the weekly timer. Press the TIMER button for 5 seconds, and the display panel 
will show [ON] and [MON] , while the digital display showing […].

Weekly timer set, start from Monday, for example setting Monday: Monday [ON] status - Monday [OFF] status - Thursday 
[ON] status - ... Sunday [OFF] status.

1.   Press TIMER button the first time, through the ‚ ‚ button to set the start working time on Monday, while the display 

board [ON] and [MON] will be flashing at the same time. Firstly, set the hour, the first two digital of the tube 

showing hours, you can press [+] and [-] button to set the hour.

2.   Press TIMER button the second time to set minutes. Ten minutes is consider to be a unit and you could press [+] and 

[-] button to adjust minutes (from 10, 20 - 50 - 00 minutes).

3.   Press TIMER button the for the third time, you can set the power-off working time on Monday. The [ON] icon will be 

disappear and at the same time the [OFF] icon will flash on. [MON] icon will not disappear. First, you can set hours 
by pressing plus and minus button. The first two digit will display hours.

4.  Press TIMER button the fourth time to set the minutes, you can adjust the minutes by pressing plus and minus button. 

You will finish setting the Monday timer setting after four time setting operation. 

5  Press the TIMER button again you can setting the on-off situation on Tuesday. The operation method is same as 

Monday.

Note

: When you finish to set the whole week, the digital tube will show the ambient temperature. This indicate the 

setting have been finished.

Disabling the timer on a certain day of the week

If you do not want to set the on-off timer on a certain day of the week, you need to press the timer key continuously for four 
times to skip this day.

Example:

 you do not need to set on-off status on Tuesday. When the Monday timer setting is finished, press the timer 

setting key, then you could set Tuesday. [ON] and [MON] will disappear. Instead, [ON] and [TUE] will lit up. At the same 

time, the first two digits begin to flash on the screen. In this case you should not press [+] or [-] button to set time. Press the 
TIMER button again. At the same time, the second two digits begin to flash on the screen. In this case you should not press 

[+] or [-] button to set time. Press the TIMER button again. The [ON] icon on the display board will disappear while [OFF] 

Summary of Contents for 10030846

Page 1: ...se as a primary heat source Remarque l appareil ne convient pas en tant que source principale de chauffage Nota il dispositivo non è idoneo ad essere utilizzato come fonte di riscaldamento primaria Advertencia el aparato no es apto para utilizar como fuente de calefacción primaria 10030846 Elektrischer Kamin ...

Page 2: ... gefallen sind wenn das Gerät Nässe oder Feuchtigkeit ausgesetzt oder fallen gelassen wurde oder nicht ordnungsgemäß funktioniert Modifizieren Sie das Gerät nicht Benutzen Sie das Gerät nicht im Freien Stellen Sie das Gerät nicht in Badezimmer oder in der Nähe eines Swimmingpools auf Verlegen Sie das Netzkabel nicht unter einem Teppich und decken Sie es nicht ab Verlegen Sie das Netzka bel so dass...

Page 3: ...icht unter einem Teppich und decken Sie es nicht ab Verlegen Sie das Netzka bel so dass keiner darauf tritt oder darüber stolpert Stellen Sie in einem Umkreis von 1 m keine Gegenstände wie Möbel Vorhänge oder Kleidungsstücke vor dem Gerät auf und halten sie entzündliche Materialien auch von den Seitenwänden fern Stellen Sie das Gerät nicht zu nah am Bett auf da Gegenstände wie Kissen oder Decken h...

Page 4: ... Fingerspitzen zur Unterstützung Halten Sie das Gerät immer so nah wie möglich am Körper Dadurch wird der Schwerpunkt verlagert Verwenden Sie Handschuhe die zusätzlichen Halt bieten Öffnen Sie das Paket und heben Sie das Produkt vorsichtig aus der Verpackung heraus und legen Sie es auf eine ebene Fläche mit der Vorderseite nach oben Wichtige Hinweise zu Betrieb und Standort Schließen Sie das Gerät...

Page 5: ... Ein Zustand können durch Drücken dieser Taste alle Funktionen gleichzeitig ausgeschaltet werden Heizung Das Gerät verfügt über einen Heizlüfter Die voreingestellte Temperatur beträgt 22 C 72 F Die einstellbare Temperatur liegt zwischen 10 C und 30 C 50 86 F Der Temperaturbereich kann jeweils um 1 C 2 F angepasst werden Halten Sie die Taste 5 Sekunden lang gedrückt um die Anzeige von F auf C zu we...

Page 6: ...se Taste können Sie die Helligkeit des Flammeneffekts kontrollieren Kindersicherung Die Kindersicherung kann nur über die Fernbedienung angepasst werden Halten Sie diese Taste für 5 Sekunden gedrückt um alle Tasten auf dem Bedienfeld und der Fernbedienung zu sperren oder wieder zu entsperren Plus Erhöhen einer Funktion Minus Verringern einer Funktion DISPLAYANZEIGEN Wochentag Heizung Timer an Temp...

Page 7: ...2018 2 Drücken Sie die TIMER Taste ein zweites Mal bis die hinteren Ziffern zu blinken beginnen Über die Tasten und können Sie nun den Monat einstellen z B 7 für Juli 3 Drücken Sie die TIMER Taste ein drittes Mal bis die ersten beiden Ziffern zu blinken beginnen Über die Tasten und können Sie nun das Datum einstellen z B 10 4 Drücken Sie die TIMER Taste ein viertes Mal bis die hinteren Ziffern zu ...

Page 8: ... der Fernbedienung um die automatische Ausschaltzeit des Timers für Montag zu deaktivieren Das Symbol ON verschwindet dann vom Bildschirm während das Symbol OFF erscheint Die Anzeige MON bleibt Sie können nun die Stunden über die Tasten und einstellen 4 Drücken Sie erneut die TIMER Taste auf der Fernbedienung um die Minuten über die Tasten und einstellen Die Einstellung für Montag ist nun beendet ...

Page 9: ...nn der Heizmodus aktiv ist piept das Gerät dreimal und der Bildschirm zeigt E8 an wenn die Raumtemperatur innerhalb von 10 Minuten um über 5 C sinkt Das bedeutet dass irgendwo ein Fenster geöffnet sein könnte über welches Kälte eindringt oder dass ein Kühlgerät im selben Raum aktiv sein könnte Wenn Sie das Fenster schließen bzw das Kühlgerät ausschalten und sich die Raumtemperatur stabilisiert wir...

Page 10: ...eten Staubsauger Aufsatz ab Kontaktieren Sie bei Fragen oder Zweifeln immer den Kundendienst Verwenden Sie außer der Sicherung nur vom Hersteller empfohlenes Zubehör Wichtige Hinweise zu Wartung und Reparaturen Das Gerät verfügt über eine spezielle Sicherung Sollte die Sicherung ersetzt werden müssen lassen Sie diese von einem Fachbetrieb durch eine Sicherung des selben Typs ersetzen Das Gerät ent...

Page 11: ...eren Sie sich über die örtlichen Regelungen zur getrennten Sammlung elektrischer und elektronischer Gerätschaften Richten Sie sich nach den örtlichen Regelungen und entsorgen Sie Altgeräte nicht über den Hausmüll Durch die regelkonforme Entsorgung der Altgeräte werden Umwelt und die Gesundheit ihrer Mitmenschen vor möglichen negativen Konsequenzen geschützt Materialrecycling hilft den Verbrauch vo...

Page 12: ......

Page 13: ...13 ...

Page 14: ...djustment or repair Any repairs to this appliance should be carried out by a qualified service person Under no circumstances should this appliance be modified Do not use outdoors This heater is not intended for use in bathrooms laundry areas and similar indoor locations Never locate heater where it may fall into a bathtub or other water container Do not run cord under carpeting Do not cover cord w...

Page 15: ...e cord away from traffic area and where it will not be tripped over Do not place any objects such as furniture papers clothes and curtains closer than 3 feet 0 9 m to the front of the heater and keep them away from the sides and rear when the heater is plugged in Do not place the heater near a bed because objects such as pillows or blankets can fall off the bed and be ignited by the heater Hints o...

Page 16: ...he body as possible This will minimize the cantilever action Use gloves to provide additional grip Unpack the package and lift the product gently out of the box put it on a flat surface with the front panel facing up Safety Warnings Do not connect this heater to a programmer timer separate remote control system or any other device that switches the heater on automatically since a fire risk exists ...

Page 17: ... in a standby mode but also you can see the flame effect through the screen This will turn off all functions at once Heater The fireplace contains a fan forced heater The default setting temperature is 72 F 22 C The thermostat setting range is 50 86 F or 10 30 C The thermostat is adjustable by 2 F or 1 C increments To change between F and C press and hold the Heater button for 5 seconds ...

Page 18: ...ntrols the brightness of the flame effect Child safety lock The child safety lock is adjustable from remote control only Holding the child safety lock button for 5 seconds disables or enables all functions on the control panel and remote control Plus Function increase of any function button Minus Function decrease of any function button DISPLAY SYMBOLS Weekday Heater Timer on Temperature Time Time...

Page 19: ... the socket 1 Press and hold the TIMER button for 5 seconds until the first two digits start flashing Use the and buttons to set the current year e g 18 for 2018 2 Press the TIMER button a second time until the back digits start flashing You can now set the month using the and keys e g 7 for July 3 Press the TIMER button a third time until the first two digits start flashing Use the and keys to se...

Page 20: ... you could press and button to adjust minutes from 10 20 50 00 minutes 3 Press TIMER button the for the third time you can set the power off working time on Monday The ON icon will be disappear and at the same time the OFF icon will flash on MON icon will not disappear First you can set hours by pressing plus and minus button The first two digit will display hours 4 Press TIMER button the fourth t...

Page 21: ...emperature is 1 C higher than the set temperature the heating will be off for example set to 27 C the actual test is 28 C the fan will stop working after 10 seconds Press the power off button on the control panel the temperature control function will record the last setting when power on again Open Window function additional hidden functions In the thermostat control heating mode when the ambient ...

Page 22: ...down into the battery bracket making sure the battery is firmly seated Note the battery should be removed if the product is to be left unused for a long period of time Safety Control Thermal Cut Out The unit has an overheat protection which is activated when the air inlets and outlets of the unit are blocked Turn off the power and unplug the appliance from the wall outlet Leave the unit switched o...

Page 23: ...iceable parts Do not attempt to repair this product yourself Only qualified service personnel should perform servicing TROUBLESHOOTING Problem Possible Cause and Suggested Solution Fire is not switching on Ensure mains switch is on Replace the fuse in the plug Logs glow but flame effect does not work Check to see if the spinning motor is working Heater doesn t work but Power and Heater switches bu...

Page 24: ...riate waste handling of this product For more detailed information about recycling of this product please contact your local council or your household waste disposal service Your product contains batteries covered by the European Directive 2006 66 EC which cannot be disposed of with normal household waste Please check local rules on separate collection of batteries The correct disposal of batterie...

Page 25: ......

Page 26: ...26 ...

Reviews: